Amazon Smart Thermostat

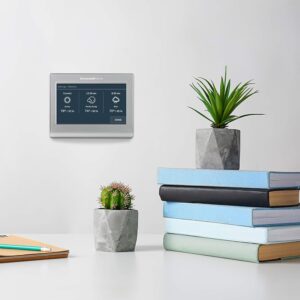
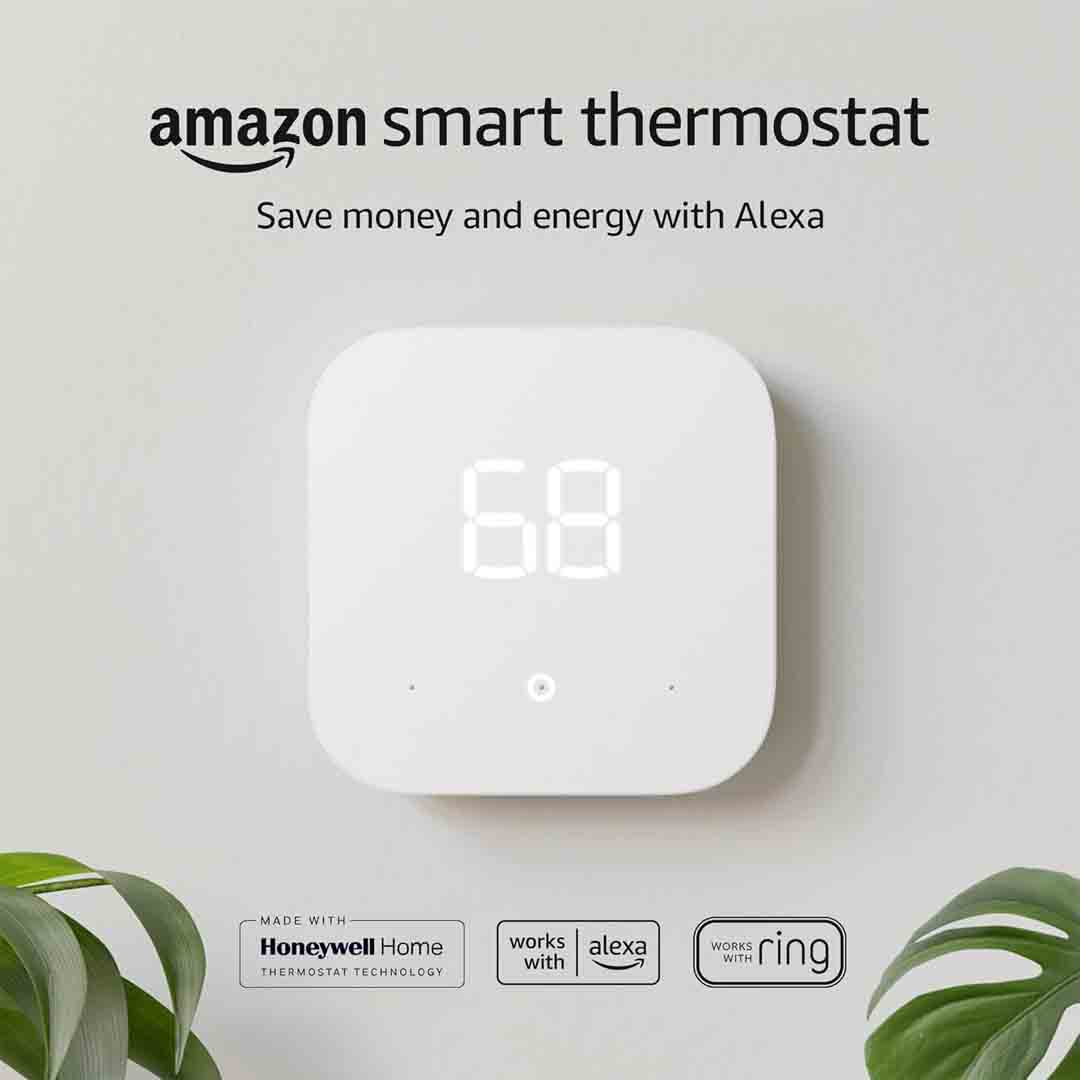
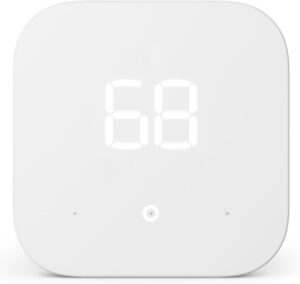
The Amazon Smart Thermostat is a modern, energy-saving device crafted to make home climate control effortless and economical. Featuring intelligent technology and a clean, minimalist look, it allows you to manage your indoor temperature with ease while reducing energy consumption. By automatically regulating heating and cooling according to your routine and preferences, it delivers consistent comfort and efficiency — an ideal enhancement for any contemporary home.

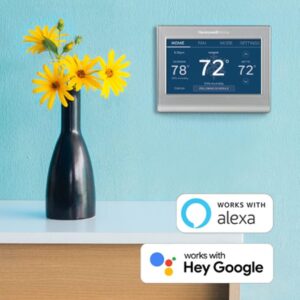
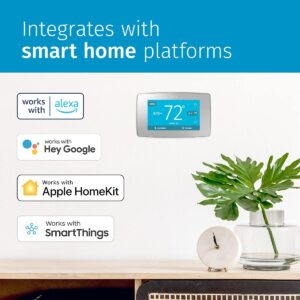
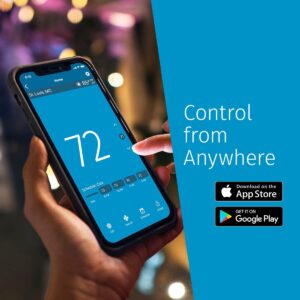
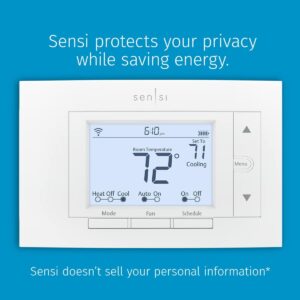
Fully compatible with Alexa and Ring, the Amazon Smart Thermostat delivers simple, hands-free temperature control through voice or app commands. Just ask Alexa to adjust the climate, create schedules, or track energy use with ease. When linked to the Alexa app, you can manage your home’s temperature from anywhere — whether you’re at the office, traveling, or relaxing at home. It’s smart convenience and effortless control, all within your connected home network.

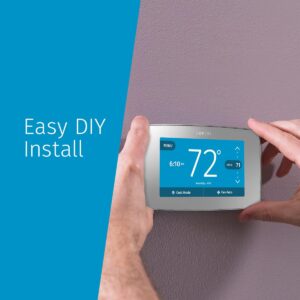
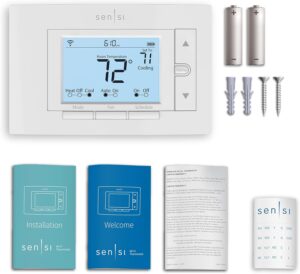
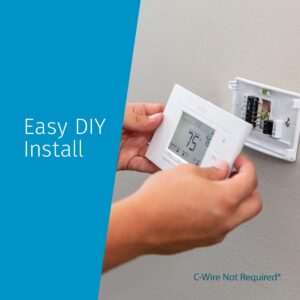
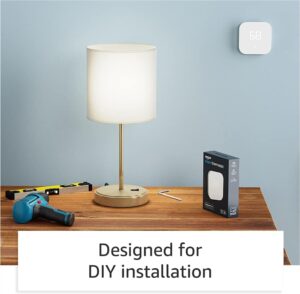
Engineered for energy efficiency, this thermostat helps lower utility costs over time by adapting to your lifestyle and fine-tuning temperature settings automatically. The C-wire connection provides consistent power for dependable operation, and the simple installation makes it a great DIY upgrade. Combining affordability, smart integration, and user-friendly design, the Amazon Smart Thermostat delivers the ideal mix of comfort, precision, and energy savings for today’s connected homes.

Specification

Here are the key specifications for the Amazon Smart Thermostat:

Technical Specifications

  • Model number: S6ED3R.

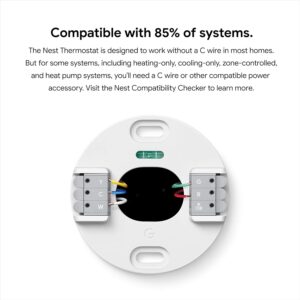
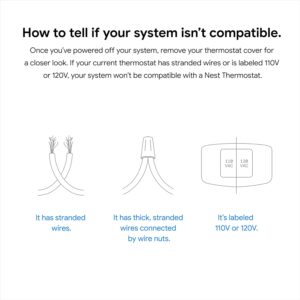
  • Compatibility: Compatible with most 24-volt HVAC systems, including standard forced-air, heat pump, and radiant boiler setups. It is not suitable for high-voltage systems, such as 110–240 V electric baseboard heating.

  • Power requirement: A C-wire (common wire) is necessary for installation or when using the included power adapter kit.

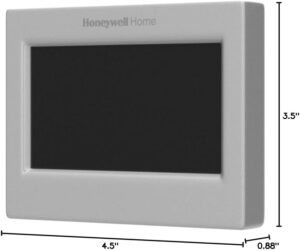
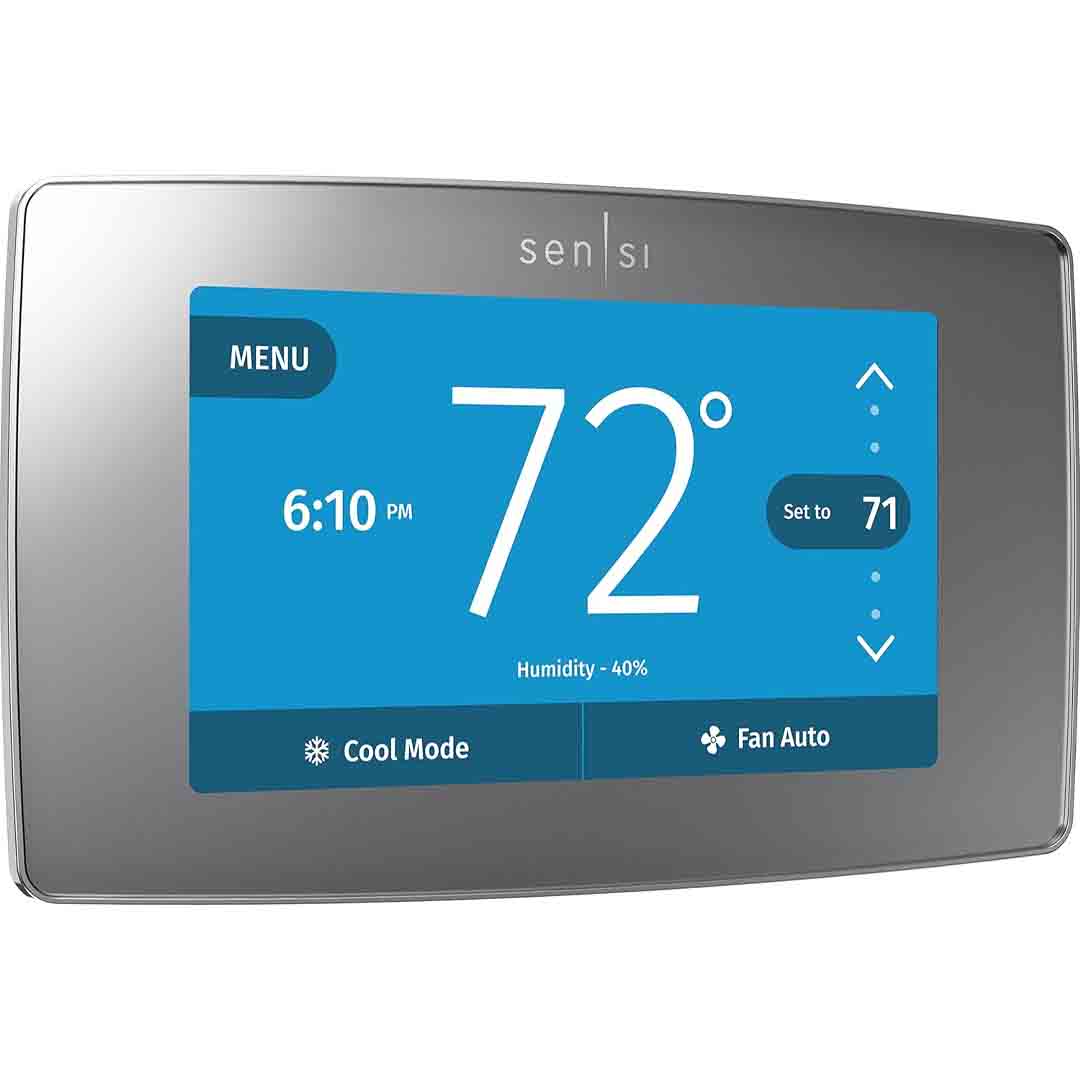
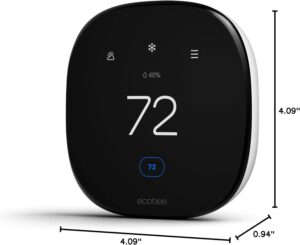
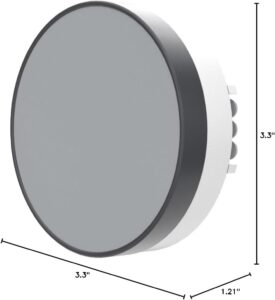
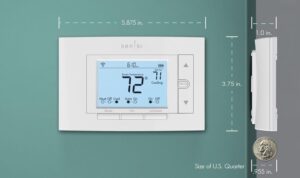
  • Dimensions: Approximately 3.56 in × 3.56 in × 0.84 in (Width × Height × Depth) of the thermostat unit.

  • Standby power consumption: ~ 0.89 W.

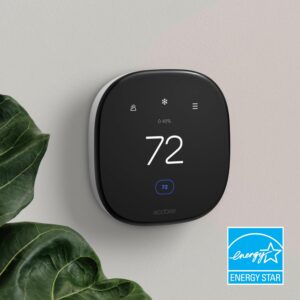
  • Certifications: ENERGY STAR® certified.

  • Warranty: 1-year limited warranty.

Features

  • Compatible with the Alexa app and voice control, allowing you to adjust temperatures and set schedules remotely.

  • Includes an integrated humidity sensor and supports scheduling with up to four time periods per day.

  • “Thermostat Hunches” feature via Alexa: The system automatically adjusts settings when it detects that rooms are empty or occupants are asleep.

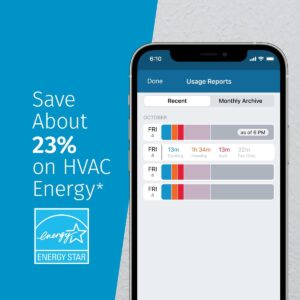
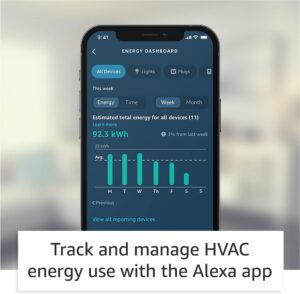
  • Energy dashboard reporting: Offers detailed insights into your energy consumption and potential cost savings.

Key Features

Here are the key features of the Amazon Smart Thermostat:

Smart Control & Voice Integration

  • Works seamlessly with Alexa — After connecting to an Alexa-enabled device, you can adjust the temperature, change modes, or view system status using voice commands.

  • Control your thermostat remotely through the Alexa app or other compatible applications, allowing you to adjust settings from anywhere.

  • “Hunches” feature: It can automatically regulate the temperature when it detects that you’re away or asleep (if the feature is enabled).

Energy Efficiency & Smart Scheduling

  • ENERGY STAR® certified: Engineered to reduce heating and cooling expenses by optimizing HVAC system performance.

  • Allows scheduling with multiple time segments, enabling you to set customized temperature profiles such as Home, Away, or Sleep for each day.

  • Features integrated humidity monitoring and an energy dashboard that provides usage insights to help you improve efficiency decisions.

Compatibility & DIY Installation

  • Needs a C-wire (common wire) or a compatible power adapter kit for installation to provide consistent power for smart functionality.

  • Works with most 24-volt HVAC systems, including forced-air, heat pump, and radiant boiler setups, but is not compatible with high-voltage systems such as 120–240V electric baseboard heaters.

  • Step-by-step DIY installation through the Alexa app, providing a simple and intuitive setup process for most users.

How to use the Amazon Smart Thermostat

Here’s a clear, step-by-step guide on how to use the Amazon Smart Thermostat — from setup to daily operation:

1. Installation & Setup

  • Check compatibility: Verify that your HVAC system operates on low voltage (24V). The thermostat needs a C-wire or Amazon’s optional power adapter kit to maintain a steady power supply.

  • Switch off power to your HVAC system at the circuit breaker before beginning installation.

  • Detach your existing thermostat and mark each wire based on your HVAC system’s configuration.

  • Install and wire the Amazon Smart Thermostat by following the on-screen or in-app setup instructions..

  • Use the Alexa app to complete setup — It will guide you step-by-step through wiring, Wi-Fi setup, and system type identification.

2. Basic Operation

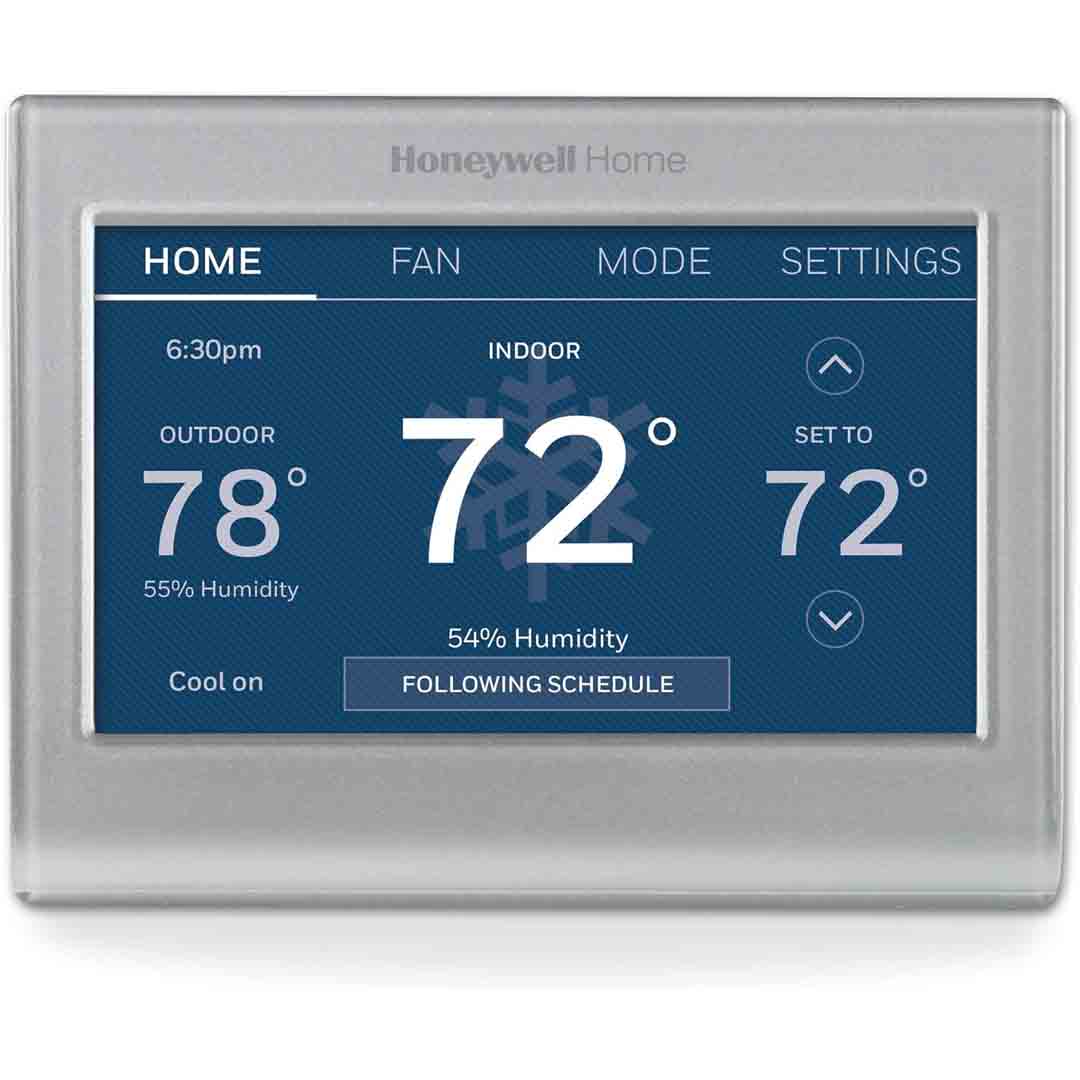
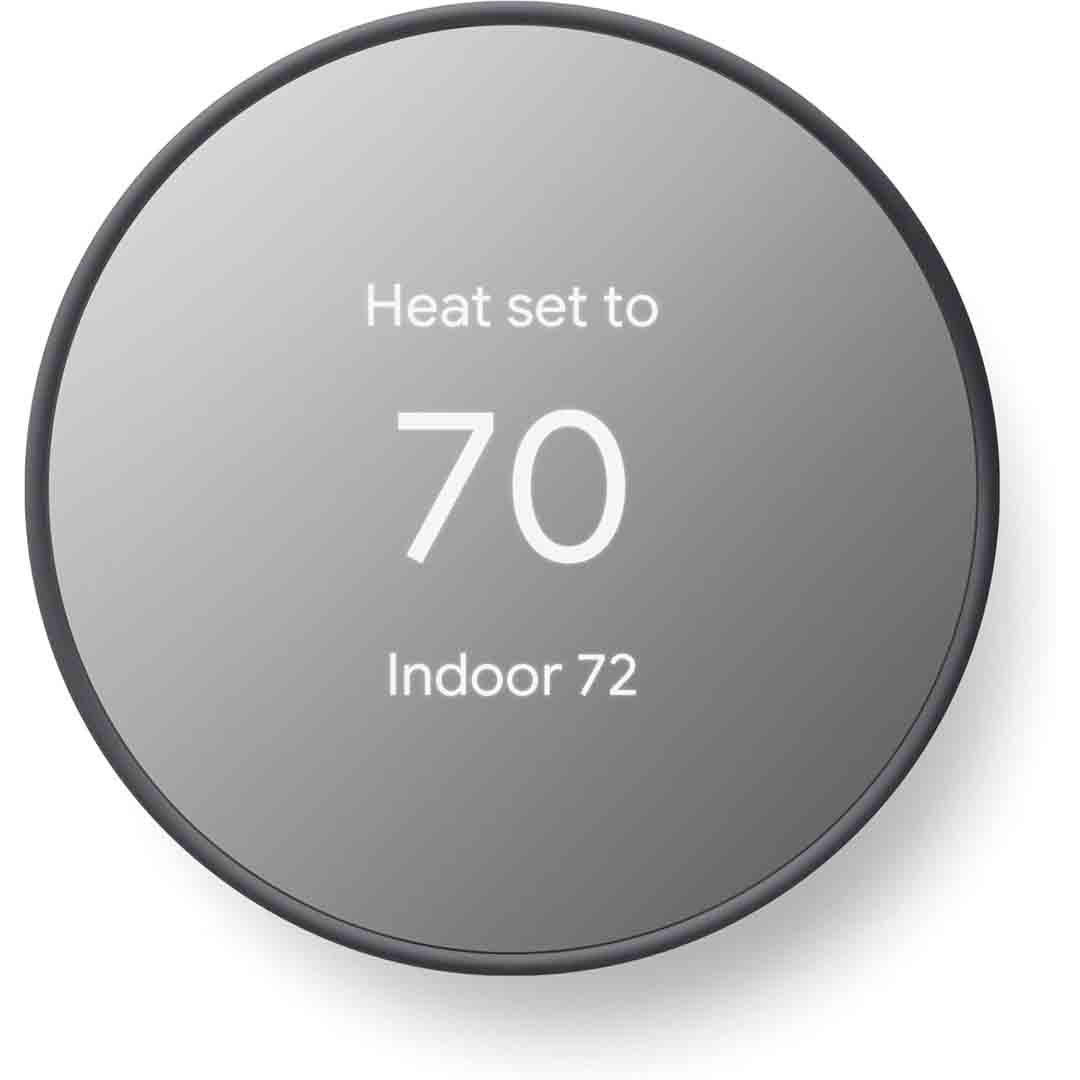
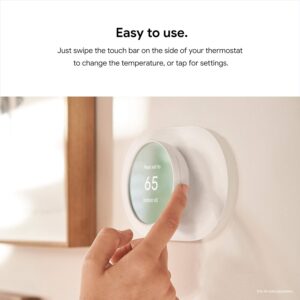
  • After installation, you can manually control the temperature through the touch-sensitive front interface.

  • Use the Alexa app (or voice commands through an Alexa-enabled device) to:

    • Set a specific temperature: “Alexa, set the temperature to 72 degrees.”

    • Change modes: “Alexa, set thermostat to cool mode.”

    • Turn heating or cooling off.

  • The app lets you set personalized heating and cooling schedules to align with your daily routine, such as lowering temperatures at night or warming your home before you wake.

3. Smart Features & Energy Savings

  • Alexa Hunches: When activated, Alexa can automatically modify your thermostat based on occupancy or sleep detection, eliminating the need for manual adjustments.

  • Energy Dashboard: Monitor your energy consumption and receive customized recommendations to lower costs directly through the Alexa app.

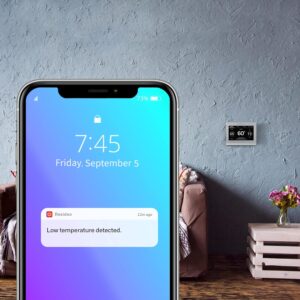
  • Remote Control: Control your thermostat remotely via your smartphone, ideal for adjustments while traveling or returning home early.

  • Maintenance Alerts: Receive notifications to replace filters or inspect your HVAC system to ensure optimal efficiency.

Tips suitable for the Amazon Smart Thermostat

Here are some useful tips to help you get the best performance, comfort, and energy savings from your Amazon Smart Thermostat 👇

Smart Usage & Energy Savings

  1. Use Alexa Routines or Hunches – Activate Alexa’s Hunches feature to allow automatic temperature adjustments when you’re away or sleeping, helping to minimize energy waste.

  2. Set Schedules – Program temperature schedules in the Alexa app to align with your daily routine, such as reducing temperatures during sleep or work hours.

  3. Take advantage of Eco Temperatures – Set your thermostat within energy-saving heating and cooling ranges to reduce system operation while maintaining comfort.

  4. Monitor your Energy Dashboard – Review your energy consumption data in the Alexa app to identify patterns and enhance system efficiency.

Setup & Maintenance

  1. Ensure a stable C-wire connection – A stable power supply prevents Wi-Fi interruptions and supports reliable operation of smart features.

  2. Keep firmware updated – Alexa updates the thermostat’s software automatically, though it’s recommended to periodically check the app or device for new features and enhancements.

  3. Clean the thermostat gently – Wipe with a soft, dry cloth to remove dust, and do not apply liquids directly to the surface.

  4. Verify placement – Mount the thermostat in a location free from direct sunlight, air drafts, or vents to ensure accurate temperature measurements.

Convenience & Control

  1. Use voice commands –Control the thermostat without touching it by issuing voice commands, such as “Alexa, set the thermostat to 70 degrees.”

  2. Enable remote access – Manage your home’s temperature remotely via the Alexa app — ideal for ensuring comfort when returning from work or trips.

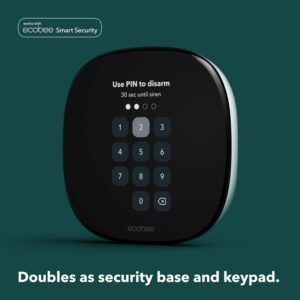
  3. Pair with Ring devices – Connect your Ring devices to enable smart home automation, such as changing the thermostat when your Ring Alarm is armed.

  4. Review comfort settings seasonally – Modify temperature settings with seasonal changes to ensure peak efficiency all year.

Cleaning Guide

Here’s how to safely clean your Amazon Smart Thermostat to keep it looking new and working efficiently 👇

What You’ll Need

  • A soft microfiber cloth

  • Distilled water or 70% isopropyl alcohol (optional)

  • A cotton swab (for edges or tight spots)

Step-by-Step Cleaning Guide

  1. Shut off your heating and cooling system or place the thermostat in Off mode to prevent accidental changes while servicing.

  2. Disconnect the thermostat or switch off its breaker when possible — this provides extra safety.

  3. Carefully clean the screen using a soft, dry microfiber cloth to remove dust and smudges.

  4. For tough smudges, slightly moisten the cloth with distilled water or 70% isopropyl alcohol — avoid spraying liquids directly on the screen or buttons.

  5. Use a dry cotton swab to remove dust from the edges and vents.

  6. Allow it to air-dry for a few seconds before turning the power back on or using the display.

Important Tips

  • Steer clear of strong chemicals, paper towels, or abrasive cleaners, as they may scratch or dull the surface.

  • Keep water or moisture away from the thermostat’s housing and wiring.

  • Wipe the thermostat from time to time, especially in high-traffic or dusty areas.

What to avoid when using the Amazon Smart Thermostat

Here are important things to avoid when using your Amazon Smart Thermostat to keep it safe, accurate, and long-lasting 👇

1. Avoid Incorrect Installation

  • Don’t skip the C-wire — The thermostat needs a steady power supply; without it, it may restart, lose Wi-Fi connectivity, or fail to manage your HVAC system correctly.

  • Don’t install on high-voltage systems (like 120–240V baseboard heaters); Compatible exclusively with 24V HVAC systems.

  • Avoid wiring mistakes — Always mark and connect wires correctly during installation, or seek professional help if uncertain.

2. Avoid Poor Placement

  • Avoid placing the thermostat in direct sunlight, near windows, or close to heat vents, as this may lead to inaccurate temperature readings.

  • Keep the thermostat away from drafty spots or doors, which could cause unnecessary heating or cooling.

  • Keep the thermostat uncovered to ensure proper airflow and accurate temperature sensing.

3. Avoid Moisture & Rough Handling

  • Do not apply water or cleaning solutions directly to the screen or casing.

  • Do not use rough materials, such as paper towels or coarse cloths, that might scratch the display.

  • Keep the device away from steam or humid environments, like bathrooms or kitchens.

4. Avoid Ignoring Maintenance

  • Always install firmware and app updates—they boost performance, fix issues, and enhance energy efficiency.

  • Keep it connected to Wi-Fi; disconnecting for long periods may prevent remote control and smart features from working properly.

  • Pay attention to filter reminders and HVAC service alerts—they help maintain system efficiency and reliability.

In conclusion, the Amazon Smart Thermostat offers an easy, affordable way to control your home’s temperature while saving energy. With Alexa integration, remote access, and automatic adjustments, it delivers comfort, convenience, and efficiency in one sleek, modern device — the perfect upgrade for any smart home.

Honeywell Home Wi-Fi Smart Color Thermostat

The RTH9585WF1004 provides a stylish, contemporary smart thermostat solution featuring a vivid color touchscreen and Wi-Fi access. You can control the temperature remotely through the Honeywell Home app, monitor live weather conditions, and receive notifications for things like extreme indoor/outdoor temperatures or filter replacement. The touchscreen supports custom color themes, allowing it to complement your home décor, adding a touch of personalization.

In terms of scheduling and efficiency, this thermostat offers 7-day programmable settings, allowing you to assign different temperatures for various times or days. This helps maximize comfort while minimizing energy consumption when full heating or cooling isn’t required. It also holds ENERGY STAR® certification, meeting recognized efficiency standards and including features such as humidity and temperature monitoring and external temperature sensing. Essentially, it functions as a smart system that learns your routines through Smart Response technology, reducing unnecessary energy use.

Regarding installation and system compatibility, ensure your HVAC setup supports this model—it’s designed for 24-volt low-voltage systems such as typical forced air, heat pumps, oil, or gas systems. It is not suitable for 120/240 V line-voltage baseboard heating, so that’s an important consideration before purchasing. Additionally, a C-wire (common wire) is required for full Wi-Fi and smart functionality. For those who travel or own secondary properties, the remote control and flexible scheduling make this thermostat especially convenient, offering comfort and energy savings whether you’re home or away.

Specification

Here are the key specifications for the Honeywell Home RTH9585WF1004 Wi‑Fi Smart Color Thermostat (7‑Day Programmable, Touch Screen, ENERGY STAR®, Alexa‑Ready, Gray) — good to have on hand before installation:

Core Specifications

  • Model: RTH9585WF1004 (also shown as RTH9585WF / RTH9585WF1004/U)

  • Dimensions: 4.5 in (W) × 3.5 in (H) × 0.8 in (D)

  • Power / System Requirements:

    • Requires 24 VAC low‑voltage systems (typical for forced air, heat pump, oil/gas, hydronic) — not compatible with line‑voltage (120/240 V) electric baseboard heat systems.

    • A “C‑wire” (common wire) is required to power the Wi‑Fi features.

Features & Connectivity

  • Wireless network access (2.4 GHz, 802.11b/g/n) allowing remote management via the mobile app.

  • Vibrant, customizable touchscreen display — adjust the screen colors to complement your interior design.

  • 7-day customizable schedule — set different temperatures for each day of the week.

  • Smart response/learning features + alerts:

    • Smart Response technology predicts your heating and cooling requirements.

    • Notifications for filter replacement and extreme indoor/outdoor temperatures

  • ENERGY STAR® Certified: Low standby power of 0.93 W; features demand-response, outdoor temperature sensing, and humidity monitoring.

  • Voice / Smart‑Home Compatibility: Works with Amazon Alexa / Google Assistant / SmartThings (dependent on hub) via app/voice control.

Wiring & System Compatibility Details

  • Compatible with single-stage or dual-stage heating and cooling systems, including heat pumps with electric backup.

  • Terminal ratings: For example, W‑O/B, W2 (Aux/E), Y cooling, Y2 cooling — 20‑30 Vac, 1.0 A max; G (fan) 20‑30 Vac, 0.5 A max.

  • Not compatible with: Millivolt setups (such as older gas fireplaces) or 120/240 V high-voltage electric baseboard systems, unless a proper wiring adapter is installed. 

Key Features

Here are the key features of the Honeywell Home RTH9585WF1004 Wi‑Fi Smart Color Thermostat:

  1. Wi‑Fi Connectivity & Remote Control: This thermostat links to your home Wi-Fi, allowing you to adjust temperature, schedules, and settings from your smartphone or tablet, whether at home or away.

  2. Color Touchscreen Display: Features a vibrant full-color touchscreen that can be personalized (background colors) to complement your décor and ensure easy operation.

  3. 7‑Day Programmable Scheduling: The thermostat allows 7-day programming with adjustable time slots and temperatures, offering flexibility to fit your schedule while conserving energy.

  4. Smart Response Learning Technology: The thermostat adapts to your HVAC system’s patterns (heating/cooling response times) and adjusts automatically to reach your desired temperature on time, instead of turning on at the last moment.

  5. ENERGY STAR® Certified & Energy Saving Features: It complies with ENERGY STAR® guidelines, includes features such as outdoor temperature monitoring and humidity tracking, and supports utility demand-response programs.

  6. Smart Home & Voice Assistant Compatibility: Compatible with voice assistants such as Amazon Alexa and Google Assistant, and integrates with smart home platforms (e.g., SmartThings) for voice or app control.

  7. On‑Screen & App‑Based Alerts/Monitor: It sends notifications for filter replacements, extreme indoor or outdoor temperatures, and offers a user-friendly on-screen menu with app-based diagnostics and support.

  8. Full‑Featured Compatibility (Low‑Voltage Systems): Intended for 24 VAC low-voltage HVAC systems (forced air, heat pumps, oil/gas, hydronic) and requires a C-wire; not suitable for 120/240 V line-voltage baseboard heaters.

How to use the Honeywell Home Wi-Fi Smart Color Thermostat

Here’s a clear step-by-step guide on how to use the Honeywell Home RTH9585WF1004 Wi‑Fi Smart Color Thermostat:

1. Installation & Power On

  • Verify that your HVAC system supports 24 VAC low-voltage operation. A C-wire is necessary for Wi-Fi features.

  • Switch off the power to your HVAC system before wiring.

  • Attach the thermostat wires following the provided wiring diagram.

  • Attach the thermostat to the wall plate and turn the power back on. The touchscreen will light up and show the welcome/setup screen.

2. Connect to Wi-Fi

  • Put on the thermostat touchscreen, select Wi-Fi Setup.

  • Select your home Wi-Fi network and enter your password.

  • Download the Honeywell Home app on your smartphone (iOS or Android).

  • Follow the instructions in the app to connect your thermostat to your account for remote management, scheduling, and notifications.

3. Set Up Schedule

  • Set your desired temperatures throughout the day using the week-long programmable schedule.

  • Each day can be programmed separately, or schedules can be duplicated across multiple days.

  • The thermostat will self-adjust heating and cooling based on your set schedule.

4. Using the Touchscreen

  • Tap the screen to adjust temperature manually anytime.

  • Navigate menus to adjust settings, system modes (Heat, Cool, Auto, Off), fan operation, alerts, and display preferences.

  • Adjust the display color to complement your home décor.

5. Smart Features

  • Smart Response Technology: The thermostat adapts to how long your system takes to reach the desired temperature and optimizes operation to achieve it efficiently.

  • Alerts: Get notifications for filter changes, temperature extremes, and connectivity issues on the touchscreen and through the app.

  • Voice Control: When connected to Alexa, Google Assistant, or SmartThings, you can adjust the temperature using voice commands.

6. Energy Saving Tips

  • Leverage the scheduling function to save energy while you’re away or asleep.

  • Turn on smart notifications to maintain peak system performance and receive maintenance reminders.

  • Use the Honeywell Home app to view energy reports and monitor consumption and savings.

Tips suitable for the Honeywell Home Wi-Fi Smart Color Thermostat

Here are some practical tips to get the most out of your Honeywell Home RTH9585WF1004 Wi‑Fi Smart Color Thermostat:

1. Optimize Your Schedule

  • Leverage the 7-day programmable feature to schedule temperatures according to your daily routine.

  • Reduce heating or cooling when you’re away or asleep to conserve energy, and increase it shortly before returning for comfort.

2. Take Advantage of Smart Response

  • Let the thermostat observe your HVAC system’s patterns. Over several weeks, it will adjust heating and cooling to hit your desired temperature on time.

3. Monitor Energy Usage

  • Monitor energy usage and gain savings insights via the Honeywell Home app.

  • Minor changes to temperature settings can result in significant energy savings.

4. Set Alerts

  • Activate notifications for filter replacements and temperature extremes to safeguard your system and ensure indoor comfort.

  • Monitor the app frequently for alerts to avoid unnecessary strain or reduced efficiency.

5. Use Voice Control

  • Connect the thermostat to Alexa, Google Assistant, or SmartThings for voice-activated control.

  • Voice commands such as “Set living room to 72°F” allow for quicker and easier temperature changes.

6. Maintain the Thermostat

  • Maintain a clean, dust-free touchscreen for precise readings and seamless operation.

  • Periodically verify your Wi-Fi connection to maintain dependable remote access.

7. Customize the Display

  • Change screen colors and brightness to match your home décor and improve visibility.

  • Enable sleep or night mode to dim the display during nighttime hours.

Cleaning Guide

Here’s a safe and effective guide on how to clean your Honeywell Home RTH9585WF1004 Wi‑Fi Smart Color Thermostat:

1. Power Off

  • Power down your HVAC system or set the thermostat to “Off” before cleaning to avoid unintended adjustments.

  • If convenient, detach the thermostat from the wall plate for easier cleaning access.

2. Use a Soft Cloth

  • Clean the screen and body with a soft, lint-free or microfiber cloth.

  • Do not use rough fabrics or scrubbing pads that could leave scratches on the display.

3. Dampen Lightly (Optional)

  • For tougher marks, lightly moisten the cloth with water or 70% isopropyl alcohol.

  • Avoid spraying liquids directly onto the thermostat — excess moisture may harm internal components.

4. Gently Wipe

  • Gently clean the screen and edges using circular motions to lift fingerprints, dust, and grime.

  • Quickly dry the surface with a clean microfiber cloth to avoid streaking.

5. Avoid Harsh Chemicals

  • Avoid using ammonia, bleach, or glass cleaners — they may harm the touchscreen and plastic housing.

6. Reattach & Power On

  • If you removed it, reattach the thermostat securely to the wall plate.

  • Power the HVAC system back on and verify that the thermostat is operating correctly.

What to avoid when using the Honeywell Home Wi-Fi Smart Color Thermostat

Here’s a guide on what to avoid when using the Honeywell Home RTH9585WF1004 Wi‑Fi Smart Color Thermostat to ensure safety, accuracy, and longevity:

1. Avoid Direct Exposure to Moisture

  • Avoid installing the thermostat close to sinks, showers, or other high-humidity areas.

  • Do not spray liquids directly onto the touchscreen — excess moisture may harm the internal circuitry.

2. Avoid Extreme Temperatures

  • Avoid placing the thermostat in direct sunlight or areas with extreme temperatures.

  • Very high or low temperatures can impact sensor precision and overall system efficiency.

3. Avoid Dusty or Dirty Environments

  • Keep the thermostat away from dust, dirt, and grease.

  • Accumulated dust on the display or sensors can interfere with temperature accuracy and touch sensitivity.

4. Avoid Frequent Resetting

  • Avoid resetting the thermostat too often — repeated resets may delete schedules, Wi-Fi details, and system learning data.

5. Avoid Incompatible Systems

  • Avoid installing on 120/240 V line-voltage or millivolt systems unless an appropriate adapter is used.

  • Make sure your heating and cooling system supports 24 VAC low-voltage control.

6. Avoid Blocking the Thermostat

  • Avoid installing the thermostat behind doors, curtains, or furniture.

  • Ensure proper airflow around the thermostat for accurate temperature readings.

7. Avoid Neglecting Updates

  • Keep your thermostat up to date using the Honeywell Home app — updates boost performance, resolve issues, and ensure stable Wi-Fi.

In conclusion, the Honeywell Home RTH9585WF1004 is a smart, energy-efficient thermostat with a customizable color touchscreen, 7-day programmable schedule, and Wi‑Fi/voice assistant compatibility. It enhances comfort, saves energy, and adapts to your lifestyle, making it a reliable and stylish choice for modern homes.

Emerson Sensi Touch Smart Thermostat

The Sensi Touch Smart Thermostat (ST75S – Silver) by Emerson features a sleek, contemporary design with a 4.3-inch color touchscreen for clear and effortless temperature control. It offers a complete 7-day scheduling option, enabling personalized heating and cooling settings for each day. With Wi-Fi connectivity, users can conveniently manage comfort levels through the Sensi app, whether at home or away.

A key advantage of the Sensi Touch is its easy, do-it-yourself installation process. It features illuminated, push-to-connect terminals and a built-in level, making setup and wiring straightforward. The thermostat does, however, require a C-wire (common wire) for consistent power. After installation, it connects seamlessly with Amazon Alexa and other smart home platforms, offering voice control and automated climate management.

Emerson places a strong emphasis on data privacy across its Sensi product line, assuring users that their personal information will not be shared or sold to third parties. The thermostat also carries an Energy Star certification, confirming that it complies with strict efficiency standards. With effective scheduling and remote access, homeowners can reduce HVAC energy consumption by up to 23%, leading to noticeable cost savings.

Specification

Here are the detailed specifications and features of the Emerson Sensi Touch Smart Thermostat (ST75 / ST75S series), drawn from the manufacturer’s spec sheet, official docs, and independent reviews. 

Model / Series: ST75 / ST75S (US retail version) 

Power / Voltage: 24 VAC — powered via C-wire (common)

C-Wire Requirement: Required (cannot operate without a C-wire) 

Standby Power Consumption: ~ 1.2 W (in standby) 

Communication / Connectivity: Wi-Fi (2.4 GHz, 802.11 b/g/n) 

Display / Interface: Color touch screen, back-lit display, intuitive menus 

Scheduling: 7-day programmable schedule; up to 8 temperature change points per day 

Geofencing: Supported (uses your mobile device’s location to adjust “home/away”) 

Humidity Sensing: Equipped with an internal humidity sensor for real-time readings 

Accessory / External Control: Not compatible with external humidifier or dehumidifier systems 

System Compatibility: Works with: conventional gas / electric / oil systems; heat pumps (with aux/emergency heat); dual-fuel systems; multi-stage heating / cooling (within limits) 

Auto Changeover: Yes — automatic switching between heating and cooling modes (if system supports) 

Smart Alerts & Monitoring: System alerts (e.g. extreme temperatures, HVAC system issues) 

Temperature Limits / Lockout: Ability to configure high / low limits; keypad lockout to prevent others from changing settings 

Energy-Saving / Demand Response: ENERGY STAR certified; Compatible with utility demand response systems and supports OpenADR communication protocols 

Firmware / Updates: Over-the-air updates supported (for new features, bug fixes) — Integrated into smart thermostat architecture 

Operating Modes: Heat, Cool, Off, Auto, Aux / Emergency (for heat pump) 

Local Control / Failover: The thermostat retains and executes its programmed schedule even without Wi-Fi or cloud connectivity 

Operating Temperature Range: (Not always listed explicitly in consumer docs) — Thermostats are generally rated to operate within standard indoor temperature ranges.

Dimensions & Mounting: In reviews: ~ 5.625 in × 3.4 in × ~1.2 in (approx) 

Warranty: 3-year limited warranty (parts) 

Notes & Additional Details

  1. The installation guide specifies that advanced setup, scheduling, notifications, and customization are handled through the Sensi mobile app, while the thermostat’s display is intended for basic operations such as mode changes, temperature adjustment, and fan control. 
  2. The specifications indicate lighted quick-connect terminals that streamline installation, along with HVAC system monitoring and intelligent alert features. 
  3. The unit holds ENERGY STAR certification and appears in the ENERGY STAR registry under model ID ST75S, featuring a standby power consumption of 1.2 W and support for demand response functionality. 
  4. Independent evaluations commend the Sensi Touch for its responsive display, intuitive interface, and consistent performance, while noting the absence of adaptive learning features and limited accessory compatibility, such as humidifier control, as drawbacks. 
  5. Certain reviews (such as those from Consumer Reports) indicate that the thermostat lacks native vacation programming functionality.

Key Features

Here are the key features of the Emerson / Copeland Sensi Touch Smart Thermostat (ST75 series) — what makes it stand out and what functionality you can expect in real usage:

Key Features & Highlights

Color Touchscreen Interface: Features a large, user-friendly color touchscreen with clear navigation and visual status indicators (e.g., background shifts between heating and cooling modes). 

Programmable Schedule (7-day, up to 8 set points/day): Users can configure individual daily temperature schedules for all seven days through the mobile app, with basic adjustments available directly on the thermostat. 

Geofencing / Location-aware Mode: The thermostat uses geofencing to detect your smartphone’s location and automatically adjust temperature settings based on home or away status, either supplementing or replacing schedules. 

Wi-Fi Remote Control (2.4 GHz): Users can adjust temperature settings, switch modes, and monitor system status remotely through the Sensi mobile application. 

Smart Home / Voice Assistant Integration: Compatible with Amazon Alexa, Google Assistant, Apple HomeKit, and additional smart home ecosystems such as Samsung SmartThings. 

Humidity Sensing & Display: Equipped with a built-in humidity sensor that displays real-time indoor humidity, though it does not interface with external humidification or dehumidification systems. 

Smart Alerts / HVAC Monitoring: Generates mobile notifications when the system detects irregular operating conditions such as extreme temperature readings or potential faults. 

Auto Changeover: Automatically transitions between heating and cooling modes as needed, provided the HVAC system supports dual operation.

Backlit / Back-Glow Lighting: The display and surrounding bezel feature a soft backlight for enhanced visibility in low-light conditions. 

Keypad / Configuration Lockout: Provides the option to define upper and lower temperature limits and lock manual controls to restrict unauthorized user adjustments. 

Temperature Offset / Calibration Adjustment: Allows calibration adjustment to compensate for sensor reading deviations from actual room temperature. 

Local Scheduling / Failover Operation: The thermostat retains and executes scheduled programs locally in the event of a Wi-Fi or cloud service interruption. 

ENERGY STAR / Demand Response Support: The ST75 holds ENERGY STAR certification and is compatible with utility demand response protocols, including OpenADR. 

Easy-Click Illuminated Wiring Terminals: The wiring terminals feature LED backlighting and easy-click connectors to streamline installation 

Dual Fuel / Auto Balance Control: Compatible with dual-fuel configurations (heat pump and furnace) and features an internal balance point control that enables automatic system switching without an external temperature sensor. 

Contractor / Service Features: Includes service interval notifications, system alerts, installer branding options, and a dedicated contractor configuration mode for setup and maintenance.

How to use the Emerson Sensi Touch Smart Thermostat

Here is a step-by-step guide on how to use the key functions:

Part 1: Initial Setup and Mobile App Control

  1. Installation and Wi-Fi Connection (Done via App)
  • Download the App: Download the free Sensi app on your iOS or Android smartphone or tablet.
  • Create Account: Create a Sensi account using a valid email address.
  • In-App Guide: The app provides step-by-step instructions for:
    • Wiring: It guides you through installing the unit on your wall (it will confirm you have a C-wire).
    • Wi-Fi Connection: It uses Bluetooth and your phone’s location services to help you connect the thermostat to your home’s 2.4 GHz Wi-Fi network.
  1. Basic Control in the App
  • After setup, the app’s main screen acts as your remote control.
  • Adjust Temperature: Use the up and down arrows to immediately change the target temperature.
  • Change System Mode: Switch between Heat, Cool, Auto, Off, or Aux (for heat pumps with auxiliary heat).
  • Change Fan Mode: Select Auto (fan runs only with heating/cooling) or On (fan runs continuously). Includes a Circulate mode that operates the fan for a programmed percentage of each hour to maintain consistent air circulation.
  1. Advanced Features in the App

| Feature | Purpose | How to Use |

| Flexible Scheduling | Automatically adjusts temperature based on the time of day and day of the week to save energy. | Go to the Schedule tab in the app. Create custom setpoints (time and temperature) for different periods (e.g., Wake, Leave, Return, Sleep) and apply them to groups of days (e.g., M-F, S-S). |

| Geofencing | Automatically switches to your “Away” temperature when you leave home and switches back to “Home” when you return. | Go to the Schedule tab and select Geofencing. It uses your phone’s location to detect when you’re outside a 3-mile radius from home. |

| Smart Alerts & Reports | Monitors your system’s performance and energy use. | Check the Usage Reports for insights into how long your system has run. The app will also send alerts for issues like extreme temperature/humidity or maintenance reminders (e.g., changing your filter). |

| Keypad Lockout | Prevents unauthorized changes from the physical unit. | Access this feature in the Settings menu of the app to lock the touchscreen.

Part 2: Voice Control (Alexa, Google Assistant, HomeKit)

Since the Sensi Touch is Wi-Fi enabled, you can link it to your preferred smart assistant:

  1. Link Accounts: Go into the settings or “Skills/Actions” menu of your Amazon Alexa, Google Home, or Apple Home app. Search for the “Sensi” skill/action and link it to your Sensi account.
  2. Use Commands: You can now use simple voice commands (make sure to use the name you gave your thermostat):
    • “Alexa, set the downstairs thermostat to 72 degrees.”
    • “Hey Google, turn the A/C off.”
    • “Hey Siri, what is the temperature in the living room?”

Part 3: Manual Control (At the Wall Unit)

Even if your Wi-Fi is down, you can always control the unit directly:

  1. Adjust Temperature: Tap the Up ($\boldsymbol{+}$) or Down ($\boldsymbol{-}$) buttons on the touchscreen to immediately change the set temperature.
    • Note: If a schedule is active, this will typically create a temporary hold until the next scheduled setpoint.
  2. Change Mode: Tap the Mode button to cycle through the system modes (Heat, Cool, Auto, Off, etc.).
  3. Access Menu: Tap the Menu button to access advanced settings, fan options, and manual time setup (if Wi-Fi is disabled).

The recommended setup method is to use the Sensi mobile app, which provides guided instructions for installation and Wi-Fi configuration.

Tips suitable for the Emerson Sensi Touch Smart Thermostat

Here are the best tips and tricks to get the most out of your Sensi Touch Smart Thermostat (ST75S-Silver) — focused on comfort, efficiency, and reliability:

1. Optimize Temperature Schedules

  • Set daily routines: Utilize the 7-day programmable scheduling function to customize temperature settings according to your daily routine (e.g., Wake 6:30 AM, Leave 8 AM, Return 6 PM, Sleep 10 PM).

  • Enable Auto mode to allow the thermostat to automatically transition between heating and cooling as temperature conditions require.

  • Avoid frequent manual changes — Allow programmed schedules or geofencing controls to manage temperature settings automatically.

2. Use Geofencing for Smart Savings

  • Activate geofencing functionality within the Sensi mobile app to allow the thermostat to automatically recognize occupancy based on your device’s location.

  • The thermostat automatically transitions to Eco or Away mode when it detects your absence, minimizing energy consumption.

  • Ideal for variable routines, as it automatically adapts without manual input.

3. Keep It Connected

  • Ensure adequate Wi-Fi coverage at the thermostat’s installation location.

  • Keep it away from walls, metal surfaces, or routers that may disrupt its signal.

  • If the Wi-Fi disconnects, the thermostat will keep operating — simply reconnect through the app once it’s back online.

4. Monitor Energy Use

  • Open the Sensi app’s “Usage Reports” to monitor how many hours your system operates daily.

  • Look for patterns — extended run times could signal dirty filters or an inefficient schedule.

  • Apply these insights to optimize comfort and lower your energy costs.

5. Maintain Indoor Air Quality

  • Create filter change reminders in the app (every 1–3 months, based on your filter type).

  • Maintain your filters regularly — clogged filters make your system work overtime.

  • Ensure vents remain open and clear to maintain steady airflow.

6. Place It in the Right Location

  • Keep it away from direct sunlight, drafts, or heat-producing devices like lamps and appliances.

  • Do not position it where airflow is blocked by furniture or drapes, as this may lead to incorrect readings.

  • Install it at eye height (around 5 feet) for optimal sensor performance.

7. Keep Firmware & App Updated

  • Regularly check the Sensi app for firmware or software updates.

  • Updates enhance performance, strengthen connectivity, and may include new features.

  • Occasionally reboot the thermostat (through the app or breaker) if it stops responding.

8. Care for the Touchscreen

  • Wipe gently with a dry microfiber cloth — avoid using liquids or sprays.

  • Do not apply excessive pressure on the screen.

  • Modify brightness and screen timeout settings to help the display last longer.

9. Protect Your Data & Device

  • Use a strong Wi-Fi password and keep your network secure.

  • Turn on two-factor authentication in your Sensi account if the option is available.

  • Keep your app login private — use Household Access to safely share control.

10. Check System Performance

  • Run both heating and cooling modes at least once every season.

  • If the thermostat fails to activate your system properly, check wiring in the app or settings.

  • Enable Smart Alerts to get notifications when temperature or humidity in your home becomes unsafe.

Cleaning Guide

Here’s exactly how to clean your Sensi Touch Smart Thermostat (ST75S-Silver) safely — without damaging the touchscreen or sensors:

1. Power & Safety First

  • Turning off your HVAC isn’t required, but it’s safer when cleaning near wiring or vents.

  • Do not apply liquids directly to the thermostat — moisture may harm its electronics and touchscreen.

2. Clean the Touchscreen Display

What you’ll need:

  • A soft, lint-free microfiber cloth (like for eyeglasses)

  • (Optional) Apply a few drops of distilled water or 70% isopropyl alcohol to the cloth — never directly on the screen.

Steps:

  1. Lightly clean the screen using circular strokes to eliminate fingerprints, dust, or smears.

  2. If necessary, lightly moisten the cloth (avoid soaking it).

  3. Use a dry part of the cloth to wipe again and eliminate streaks.

  4. Do not use paper towels, glass cleaners, or abrasive pads, as they may scratch or damage the surface.

3. Clean Around the Thermostat

  • Employ a soft, dry brush or a vacuum with a brush attachment to clear dust from vents and along wall edges.

  • Maintaining a clean area around the thermostat helps ensure precise temperature and humidity readings.

  • Do not use compressed air on the vents, as it may force dust into the sensors.

4. Things to Avoid

  •  No liquid cleaners (Windex, multipurpose sprays, etc.)

  •  Do not soak cloths or spray directly on the screen

  •  No rough fabrics or paper towels (they cause micro-scratches)

  •  No harsh chemicals like ammonia or bleach

5. Regular Cleaning Routine

  • Clean the screen every 1–2 weeks to avoid buildup.

  • Wipe down the wall area once a month to prevent sensor blockage.

  • Ensure vents close to the thermostat are clear of dust, dirt, and pet hair.

What to avoid when using the Emerson Sensi Touch Smart Thermostat

Here’s a complete list of things to avoid when using your Sensi Touch Smart Thermostat (ST75S-Silver) — to keep it accurate, efficient, and long-lasting :

1. Avoid Installing It in the Wrong Place

  • Avoid installing it near heat sources such as lamps, ovens, or electronics, which may lead to inaccurate readings.

  • Keep the thermostat out of direct sunlight to prevent it from registering a higher temperature than the room’s actual temperature.

  • Avoid placing it behind curtains, furniture, or doors, as obstructed airflow can affect accuracy.

  • Avoid drafty spots, such as near vents or windows, since temperature fluctuations can affect the thermostat.

Best placement: On an interior wall, about 5 feet above the floor, with free air circulation.

2. Avoid Using Without a C-Wire

  • The Sensi Touch requires a C-wire (common wire) for continuous power.

  • Avoid using it without the required component, as it may turn off, disconnect from Wi-Fi, or fail to function properly.

  • If a C-wire isn’t available, use a Power Extender Kit (PEK) or have a technician install one.

3. Avoid Weak or Unstable Wi-Fi

  • Avoid locations with weak Wi-Fi signals.

  • Weak signals can cause disconnections, delayed commands, or missed updates.

  • Use a Wi-Fi booster or move your router to improve signal strength.

4. Avoid Frequent Resets

  • Avoid frequent resets — doing so will erase schedules and learned settings.

  • Reset only when troubleshooting issues or changing ownership.

  • For small issues, restart the thermostat (Menu → About Thermostat → Restart) instead of performing a full reset.

5. Avoid Harsh Cleaning Methods

  • Avoid spraying water, glass cleaner, or disinfectant directly onto the touchscreen.

  • Avoid paper towels or coarse cloths, as they can scratch the screen.

  • Always use a soft, dry microfiber cloth to clean (lightly dampen if needed).

6. Avoid Rapid or Extreme Temperature Changes

  • Avoid making sudden large temperature adjustments (e.g., 75°F → 60°F).

  • This forces your HVAC system to work harder, consumes more energy, and lowers efficiency.

  • Change the temperature in 1–2°F increments, or rely on schedules and geofencing for gradual adjustments.

7. Avoid Ignoring Maintenance

  • Remember to replace or clean your HVAC filters — clogged filters limit airflow and lower efficiency.

  • Pay attention to system alerts — they may signal airflow problems or unusual temperature and humidity changes.

  • Schedule filter reminders and inspect your system each season.

8. Avoid Sharing Your Login

  • Never share your Sensi account password.

  • Use the app’s Household Access feature to securely share thermostat control.

  • This keeps your data safe and avoids unintended changes.

9. Avoid Skipping Updates

  • Don’t skip updates; they fix issues, improve performance, and bring new functionality.

  • Turn on automatic updates in your phone settings or check for updates regularly in the Sensi app.

10. Avoid Power Interruptions

  • Avoid keeping the thermostat without power for extended periods — it could lose calibration or saved settings.

  • If HVAC power needs to be turned off, do so briefly and restore it quickly.

In conclusion, the Sensi Touch Smart Thermostat (ST75S-Silver) is a smart, reliable, and energy-efficient device that offers easy control through its touchscreen, mobile app, and voice assistants. It’s simple to install, protects user privacy, and helps save energy through scheduling and geofencing. While it requires a C-wire and steady Wi-Fi, it delivers comfortable, efficient, and convenient home temperature control with long-term reliability.

Sensi Smart Thermostat

The Sensi Smart Thermostat ST55 merges cutting-edge innovation with a century of HVAC mastery from Emerson. Crafted to ensure dependable comfort and precision, it unites proven engineering with intelligent home technology for smooth and efficient temperature regulation in any space. Its design integrates effortlessly with existing HVAC systems, providing versatility and peace of mind backed by 100 years of expertise in climate management.

With Wi-Fi capability and an intuitive mobile app, you can remotely manage your home’s climate from anywhere — whether you’re at the office, traveling, or relaxing at home. The thermostat is fully programmable, letting you set personalized schedules that align with your lifestyle for maximum comfort and energy efficiency. It’s also ENERGY STAR® certified, ensuring it meets strict performance standards to help cut energy costs while maintaining comfort. In addition, it works seamlessly with Amazon Alexa, offering simple voice control for hands-free operation.

Installing the Sensi Smart Thermostat ST55 is effortless, thanks to its simple DIY setup that requires no special tools or professional assistance for most HVAC systems. The thermostat also places strong emphasis on data protection, keeping your personal information and home details safe and never shared with third parties. Designed with ease of use, security, and intelligent control in mind, the Sensi ST55 makes it simple to manage your home’s comfort, save energy, and enjoy lasting peace of mind.

Specification

Here are the key specifications for the Sensi Smart Thermostat model ST55 (also appearing as ST55U / ST55C) by Emerson:

Electrical & Basic System Compatibility

  • Power: 20-30 VAC, 50/60 Hz; 1.5 Amps maximum per terminal; 2.5 Amps maximum all terminals combined.

  • Wire configurations supported: Most 24 VAC systems (gas, oil, electric furnaces; single-stage heat pump; multi-stage gas/oil/electric; multi-stage heat pump) without a common (“C-wire”) in many cases.

  • For certain systems (heat-only, cool-only, Apple HomeKit compatibility, heat pumps), a C-wire is required.

Physical / Environmental / Display

  • Dimensions: 5.88″ (width) × 3.75″ (height) × 1.00″ (depth)

  • Display range: Room temperature display 32 °F to 99 °F (0 °C to ~37 °C)

  • Set-point range: 45 °F to 99 °F (7 °C to 37 °C)

  • Operating ambient: 32 °F to +105 °F (0 °C to +41 °C)

  • Storage: -29 °C to +65 °C (-20 °F to ~150 °F) non-condensing humidity up to 90%.

Connectivity & Smart Features

  • Communication: Built-in WiFi (2.4 GHz)

  • Works with: Amazon Alexa, Google Assistant, Samsung SmartThings. Apple HomeKit support is included only when C-wire is present.

  • Programmability: Custom 7-day programming, mobile control from anywhere, and location-based automation.

  • Display features: Illuminated display with energy reports, humidity monitoring, and maintenance notifications.

Energy Efficiency & Certification

  • Certified by ENERGY STAR.

  • Standby power consumption: 0.5 W.

  • Claimed energy savings (by manufacturer): Up to ~23% on HVAC energy usage (actual savings vary depending on equipment, climate, insulation, user behavior).

Miscellaneous / Installation

  • Warranty: 3 years on parts (varies by region) according to vendor listing.

  • Installation: Designed for DIY with step-by-step app guidance; in many homes a C-wire is not required.

  • Additional features: Fan circulating control (user-set % of hour), auto changeover between heat/cool, keypad lockout to prevent unauthorized adjustments.

Key Features

Here are the key features of the Sensi Smart Thermostat (model ST55):

  • Built-in Wi-Fi (2.4 GHz) lets you manage your HVAC system from anywhere using the mobile app.

  • Compatible with leading smart home systems such as Amazon Alexa, Google Assistant, and Samsung SmartThings.

  • Customizable 7-day scheduling lets you set different temperatures for each day and time.

  • Geofencing technology tracks your phone’s location to automatically adjust temperatures when you come and go, helping save energy.

  • Tracks indoor humidity and sends intelligent alerts for temperature extremes, filter changes, and system upkeep.

  • Easy DIY installation: fits the same size as standard thermostats, so no wall repairs or painting needed, and works without a C-wire for most HVAC systems.

  • Strong data-privacy stance: The manufacturer confirms that your personal data is never shared or sold to outside parties.

  • Energy efficiency: ENERGY STAR certified and designed to lower HVAC energy consumption, with potential savings of up to 23% according to the manufacturer.

  • Supports a broad range of heating and cooling setups such as gas, oil, and electric furnaces or heat pumps, with verification recommended for compatibility.

How to use the Sensi Smart Thermostat

Here’s a simple guide on how to use the Sensi Smart Thermostat (ST55) — from setup to everyday operation:

1. Installation and Setup

  1. Download the Sensi App – Download the Sensi Smart Thermostat app, available for both iOS and Android devices.

  2. Create or log in to your Sensi account.

  3. Follow in-app installation steps – Get personalized wiring and installation directions through the app, designed for your exact system type.

  4. Connect to Wi-Fi – During setup, choose your home’s 2.4 GHz Wi-Fi network and enter the password.

  5. Mount and power on – After connecting the wires, snap the thermostat faceplate into place and power up your HVAC system.

  6. After setup, the thermostat automatically connects to your account and shows the main home screen.

2. Programming and Daily Use

  • Set schedules: Set up 7-day heating and cooling schedules directly through the Sensi app or on the thermostat display.

  • Manual control: Change the temperature manually on the thermostat with the arrow buttons or remotely through the mobile app.

  • Geofencing: Enable geofencing in the app to let your thermostat automatically change the temperature as you come and go.

  • Mode selection: Select between Heat, Cool, Auto, or Off modes using the Mode button.

  • Fan control: Choose between Auto, On, or Circulate modes to control how often your fan runs for better air movement.

  • Smart alerts: Get alerts in the app when temperatures or humidity levels are too high or low, or when your filter needs replacing.

3. Smart Features and Voice Control

  • Voice commands: Connect your Sensi thermostat to Alexa, Google Assistant, or SmartThings and use voice commands like:

    • “Alexa, set the thermostat to 72 degrees.”

    • “Hey Google, lower the temperature by 2 degrees.”

  • Monitor energy usage: Check your temperature history in the app to spot ways to save energy.

  • Privacy and security: No data is sold — all information stays protected within your account.

  • Energy efficiency: Turn on the Energy Star mode and allow the thermostat to fine-tune temperatures automatically to conserve energy.

Tips suitable for the Sensi Smart Thermostat

Here are some useful tips to help you get the most out of your Sensi Smart Thermostat (ST55) — for comfort, energy savings, and reliability:

Smart Usage & Energy Savings Tips

  1. Use flexible scheduling: Create custom weekday and weekend schedules in the app to keep your home comfortable when you’re in and save energy when you’re out.

  2. Make gradual changes: Change the temperature gradually by 1–2°F at a time to stay comfortable and save energy.

  3. Enable geofencing: Allow Sensi to automatically change to Away Mode when you leave and return to Home Mode when you come back — saving energy effortlessly.

  4. Turn on energy reports: Check your monthly energy reports in the app to understand how your routines impact your bills.

  5. Use the “Circulate” fan mode: Operate your fan for a few minutes every hour to circulate fresh air evenly across your home.

Maintenance & Reliability Tips

  1. Regularly look for firmware updates in the Sensi app to keep your thermostat running smoothly and efficiently.

  2. Set filter reminders: Rely on the app’s filter reminders to keep your air clean and your system running efficiently.

  3. Avoid disconnecting Wi-Fi for long periods: Staying connected keeps your schedules, remote controls, and location-based features running seamlessly.

  4. Keep sensors clear: Avoid covering the thermostat with furniture or drapes — it needs open airflow to sense the true room temperature.

  5. Lock settings if needed: Enable keypad lock in the app to stop children or visitors from changing the temperature.

Smart Home & Convenience Tips

  1. Use voice control: Connect to Alexa or Google Assistant to control your thermostat with voice commands.

  2. Create routines: Integrate your Sensi thermostat with other smart devices — for instance, let Alexa adjust it to 70°F when you say “Good morning.”

  3. Monitor humidity levels: Let the built-in humidity sensor help keep your home comfortable, especially as seasons change.

  4. Optimize comfort zones: For homes with multiple thermostats or zones, set each one according to the time of day or how rooms are used.

  5. Leverage away mode: Turn on Away mode while traveling to avoid wasting energy on heating or cooling.

Cleaning Guide

Here’s a step-by-step guide on how to clean your Sensi Smart Thermostat (ST55) safely and effectively — without damaging its sensors or screen:

1. Power and Safety First

  • Switch off your HVAC system using the thermostat or circuit breaker before performing any cleaning.

  • This keeps the thermostat from being adjusted and protects against electrical hazards during cleaning.

  • Do not apply water, spray cleaners, or alcohol to the thermostat — liquids can harm the electronics.

2. Clean the Exterior (Screen & Casing)

  1. Take a soft microfiber cloth and lightly moisten it with distilled water or an equal mix of water and isopropyl alcohol.

  2. Lightly clean the screen and plastic casing to remove fingerprints, dust, and smudges.

  3. Wipe dry right away with a clean microfiber cloth to avoid streaks or leftover moisture.

  4. For dust in tight spots or around buttons, gently clean with a soft brush or cotton swab.

3. Clean Around the Sensors and Wall Plate

  • Gently lift the thermostat faceplate — it should detach without much effort.

  • Blow out dust with compressed air or gently brush it away from the temperature and humidity sensors, located in the small vents on the back or sides.

  • Do not touch the sensor parts with your fingers.

  • Wipe the wall behind the thermostat with a dry cloth to keep dust and debris from affecting airflow or temperature readings.

  • Reinstall the faceplate firmly after cleaning and drying.

4. Maintenance Tips

  • Wipe around your thermostat each week to keep dust from accumulating.

  • Keep the thermostat away from candles, humidifiers, or vents, as heat and moisture can affect its accuracy.

  • Do a thorough cleaning every 3–6 months, particularly in dusty or humid areas.

  • Regularly clean or replace HVAC filters — dirty filters restrict airflow and force the thermostat to work harder.

What to avoid when using the Sensi Smart Thermostat

Here are the key things to avoid when using your Sensi Smart Thermostat (ST55) — to prevent damage, ensure accurate performance, and keep your HVAC system running efficiently:

1. Avoid Power and Connection Mistakes

  • Keep your thermostat connected to Wi-Fi — it needs it for app control, schedules, geofencing, and updates.

  • Don’t turn off the power at the breaker suddenly unless needed — it can affect schedules or thermostat settings.

  • Don’t confuse wiring connections — always follow the Sensi app instructions to avoid damaging your thermostat or HVAC system.

  • Make sure to meet “C-wire” requirements if your system needs one, especially for heat pumps or Apple HomeKit setups.

2. Avoid Placement and Environmental Issues

  • Avoid placing the thermostat near heat sources like lamps, TVs, or sunlight, as this can affect temperature accuracy.

  • Don’t place the thermostat behind doors, curtains, or furniture, as restricted airflow can affect accuracy.

  • Keep the thermostat away from damp or humid areas like kitchens or bathrooms to protect the sensors.

  • Keep the thermostat away from dusty or dirty areas, as buildup can interfere with buttons, the display, or sensors.

3. Avoid Misuse and Neglect

  • Avoid resetting the thermostat repeatedly — doing so may erase schedules and learned settings.

  • Don’t change the temperature drastically — big jumps make your HVAC system overwork and use more energy.

  • Pay attention to service notifications and filter changes — ignoring them may compromise performance and comfort.

  • Do not share your login details — use Sensi’s Household Access to let family members control the system safely.

  • Avoid applying strong cleaners or spraying liquids directly on the device — it may harm the screen or internal components.

Pro Tip:

Handle your Sensi thermostat like a smart device — keep it updated, dust-free, and online to ensure smooth operation, accurate readings, and long-term energy savings.

In conclusion,the Sensi Smart Thermostat ST55 combines Emerson’s 100 years of expertise with modern smart home technology for reliable comfort and energy savings. Easy to install, Wi-Fi enabled, and compatible with Alexa and Google Assistant, it offers convenient control and efficient performance. With ENERGY STAR certification, strong data privacy, and smart features like geofencing and scheduling, it’s a dependable, user-friendly choice that makes your home more comfortable, connected, and energy-efficient.

Ecobee Programmable Wifi Smart Thermostat

The ecobee Smart Thermostat Enhanced is an advanced, feature-rich climate control system built to provide comfort and energy savings effortlessly. With integrated radar-based proximity and occupancy detection, it intelligently recognizes when you’re home or away and automatically fine-tunes the temperature for efficiency. Its bright, expanded touchscreen display—50% larger than previous versions—offers easy, intuitive control, while the sleek, minimalist design blends seamlessly into any interior.

Beyond its core functions, this thermostat seamlessly integrates with leading smart home platforms. It’s fully compatible with Amazon Alexa, Google Assistant, and Apple HomeKit / Siri (with the appropriate iOS configuration), allowing users to control temperature settings hands-free or through their preferred smart home app. Powered by the ecobee “eco+” intelligent software suite, it provides adaptive scheduling, humidity balancing, and pre-heating or cooling during off-peak energy periods to maximize efficiency. The device holds ENERGY STAR certification and can reduce annual energy expenses by up to 26% compared to maintaining a constant 72 °F / 22 °C setting.

From a technical and installation standpoint, the ecobee Smart Thermostat Enhanced is compatible with most 24 VAC HVAC systems, including standard furnaces, heat pumps, and boilers. It comes with a Power Extender Kit (PEK), enabling straightforward installation even in homes lacking a common (“C”) wire. The device operates with low power consumption—around 1.6 watts when idle—and is protected by a 3-year limited warranty. Additionally, it provides system alerts for issues like unexpected temperature changes, filter replacement reminders, and supports optional SmartSensors (sold separately) for precise temperature control in hot or cold spots throughout the home.


Specification

Here are key specifications for the ecobee Smart Thermostat Enhanced:

Technical Specifications

  • Power: Hard-wired (24 V AC HVAC systems); includes a Power Extender Kit if a C-wire isn’t present.

  • Compatible HVAC systems: Works with most 24 VAC systems (gas, oil, electric, dual fuel, conventional 2H/2C, heat pump 3H/2C, boilers) per manufacturer.

  • Display: 4″ full-color touchscreen, resolution 540 × 540 pixels.

  • Sensors built-in: temperature, humidity, radar-based occupancy & proximity.

  • Environmental operating range: Temperature −31 °F to 113 °F (≈ -35 °C to 45 °C); Humidity: 5% to 95% RH non-condensing.

  • Power consumption (standby): ~1.39 W (per ENERGY STAR listing)

  • Dimensions: Product: ~103.9 mm × 103.9 mm × 23.9 mm (≈ 4.09″ × 4.09″ × 0.94″)

  • Warranty: 3-year limited warranty.

  • Certification: ENERGY STAR certified.

Feature Highlights

  • Smart features via “eco+” platform: Adapts to your daily routine

  • Remote control via iOS/Android app and compatibility with voice assistants: Amazon Alexa, Google Assistant, Apple HomeKit.

  • Supports optional SmartSensors for individual room temperature detection.

  • Can also serve as a central hub for home monitoring when paired with additional sensors, including motion, door, and window detectors (sensors and subscription required).

Compatibility Considerations

  • Must check wiring: Although a Power Extender Kit is provided, it’s important to confirm your current thermostat wiring and HVAC system compatibility before installation.

  • While compatible with most 24 V HVAC systems, some multi-transformer configurations or atypical wiring arrangements may not be supported or could necessitate additional components. (Refer to user feedback.)

Key Features

Here are the key features of the ecobee Smart Thermostat Enhanced (often just “Smart Thermostat Enhanced”):

Top Features

  1. Smart Energy Savings (eco+)

    • Intelligently analyzes your heating and cooling behavior and self-adjusts to optimize energy efficiency.

    • Certified ENERGY STAR®.

    • Claims up to ~26% annual savings in some situations.

  2. Advanced Occupancy & Sensor Tech

    • Integrated radar-based sensors identify presence and distance, fine-tuning comfort levels and improving energy efficiency.

    • Compatible with optional remote sensors (sold separately) to regulate temperature variations in individual rooms.

    • Adapts settings based on real-time occupancy, not just pre-set schedules.

  3. Full Smart Home & Voice Assistant Integration

    • Works with major smart ecosystems: Amazon Alexa, Google Assistant, Apple HomeKit, SmartThings, IFTTT.

    • Supports mobile app control (iOS/Android), allowing remote access and adjustment from any location.

  4. User Interface & Design

    • Features a 4-inch full-color touchscreen interface with a streamlined, contemporary design.

    • Engineered for simple installation, featuring an included Power Extender Kit (PEK) for systems lacking a common (“C”) wire.

  5. Installation & Compatibility

    • Compatible with many 24 V HVAC systems: conventional furnaces/AC, heat pumps, boilers, etc.

    • Verify your HVAC wiring and system compatibility prior to purchase, particularly if installed outside typical U.S./Canadian configurations.

  6. Additional Smart/Monitoring Features

    • The thermostat can serve as a central hub for home monitoring (when paired with additional sensors), enabling detection of entry, motion, and temperature irregularities.

    • Generates detailed monthly energy usage reports along with efficiency recommendations.

Why These Matter

  • The occupancy and motion-sensing technology allows the thermostat to adapt to actual usage patterns, conserving energy when no one is home.

  • Seamless smart home and voice assistant integration enables hands-free control and enhanced convenience, ideal for users within the Alexa, Google, or Apple ecosystem.

  • The streamlined design and simplified setup (including a Power Extender Kit) make it easier to upgrade from legacy thermostats.

  • Energy efficiency paired with adaptive comfort features—such as pre-heating, pre-cooling, and room prioritization—makes it a functional upgrade, not just a luxury device.

Things to Check

  • Since it relies on advanced sensing and smart integration, it’s essential to verify your HVAC wiring (including the common “C-wire”) and system type for compatibility—particularly important in regions like Nigeria/Lagos, where configurations may vary from North American standards.

  • Although the claimed energy savings (up to ~26%) are achievable under ideal conditions, actual results will vary based on climate, insulation quality, HVAC efficiency, and usage behavior.

  • If you don’t intend to utilize advanced functions such as remote sensors, voice integration, or occupancy detection, the value proposition may be limited compared to a basic programmable thermostat.

How to use the Ecobee Programmable Wifi Smart Thermostat

Here’s a simple, step-by-step guide on how to use the ecobee Smart Thermostat Enhanced — from setup to daily operation:

1. Installation & Setup

What you’ll need:

  • Your HVAC system (24V compatible)

  • Wi-Fi connection

  • Smartphone with the ecobee app (iOS or Android)

  • A screwdriver

Steps:

  1. Disconnect power to the HVAC unit at the main circuit breaker panel.

  2. Detach your old thermostat and note the wire labels (e.g., R, G, Y, W, C).

  3. Install the thermostat baseplate on the wall surface, then connect the HVAC wires to the appropriate labeled terminals.

    • If a common (C) wire isn’t available, install the supplied Power Extender Kit (PEK) within the HVAC control panel.

  4. Connect the thermostat front panel to the wall base, after which the unit should energize.

  5. On-screen, follow the guided installation wizard. It will:

    • Recognize the connected system type

    • Link the device to your wireless network

    • Instructs you to install and pair the ecobee mobile app on your smartphone.

2. App Setup & Remote Control

  1. Open the ecobee app and sign in or create an account.

  2. Add your thermostat using the QR code displayed on the device.

  3. From the app, you can:

    • Control temperature settings from a distance

    • Set heating/cooling schedules.

    • Monitor energy usage.

    • View room temperature and humidity levels.

    • Control temperature settings from anywhere

3. Programming & Daily Use

  • Manual adjustment: Use the thermostat’s touchscreen interface to increase or decrease the temperature setting.

  • Set schedules:

    • Go to Menu → Schedule on the thermostat or app.

    • Create temperature settings for Home, Away, and Sleep modes.

  • Smart features:

    • eco+ automatically optimizes your thermostat schedule for energy efficiency and comfort.

    • Presence sensing reduces energy consumption when spaces are unoccupied.

    • Local weather-based adjustments enable the thermostat to pre-condition your home efficiently.

  • Voice control:

    • Activate compatibility with Alexa, Siri, and Google Assistant.

    • Example commands:

      • “Alexa, set the temperature to 72 degrees.”

      • “Hey Siri, turn off the air conditioning.”

      • “Hey Google, what’s the temperature at home?”

4. Energy Reports & Maintenance

  • Access Home IQ via the app to view comprehensive energy reports and system runtime analytics.

  • Maintain HVAC filter cleanliness on schedule, with reminder notifications provided by the thermostat.

  • Maintain the latest firmware to ensure optimal performance and access to new features.

5. Tips for Best Performance

  • Enable eco+ and let it learn your patterns for 1–2 weeks.

  • Use remote sensors (optional) to manage hot/cold spots.

  • Do not install near direct sunlight or air vents, as this may affect sensor accuracy.

  • Keep microphones enabled to ensure voice command functionality.

Tips suitable for the Ecobee Programmable Wifi Smart Thermostat

Here are some useful tips to help you get the best performance, comfort, and energy savings from your ecobee Smart Thermostat Enhanced:

1. Optimize Energy Savings with eco+

  • Enable “eco+” in the ecobee app — it automatically adjusts heating and cooling based on:

    • Time of day

    • Occupancy patterns

    • Local weather forecasts

    • Local energy consumption levels

  • Configure a comfort band instead of a fixed temperature to allow eco+ to optimize energy use.

  • Allow the thermostat to adapt to your schedule; minimize early adjustments to support accurate learning.

2. Use Smart Home Integration Wisely

  • Link your thermostat with Alexa, Siri, or Google Assistant for hands-free control.

    • Example: “Alexa, set the thermostat to 72 degrees.”

  • Create automation routines, like:

    • “When I say ‘Goodnight,’ lower the temperature to 68°F.”

    • “When I leave home, set to Away mode.”

  • Link your thermostat to HomeKit or IFTTT for programmable actions and routines.

3. Placement & Sensor Tips

  • Ensure the thermostat is placed away from direct sunlight, airflow, or heat-emitting devices to maintain accurate temperature readings.

  • Add ecobee SmartSensors (optional) in rooms that are often too warm or cool.

    • Mount the sensors approximately 5 feet from the floor, ensuring they are not near HVAC vents.

    • These sensors identify room occupancy and assist in regulating temperature across different areas.

4. Set a Smart Schedule

  • Configure Home, Away, and Sleep modes through the thermostat interface or mobile application.

  • Set separate temperature schedules for weekdays and weekends.

  • Make incremental temperature adjustments—even a 1–2°F change can improve energy efficiency over time.

5. Keep It Running Smoothly

  • Regularly monitor the ecobee app for firmware updates, which enhance sensor accuracy and provide new functionality.

  • Clean dust from the thermostat screen occasionally with a soft, dry cloth.

  • When using the PEK, verify all connections are secure within your HVAC control board..

  • Configure filter replacement alerts in the app to ensure optimal air quality and system efficiency.

6. Use Remote Access

  • Control your thermostat from anywhere using the ecobee mobile app.

    • Pre-condition your home’s temperature prior to arrival.

    • Keep an eye on power consumption and moisture levels.

  • Turn on alerts to be notified of low temperatures or sudden humidity changes.

7. For Consistent Comfort

  • Let the thermostat warm or cool your home ahead of your arrival (automatically managed by Eco+)

  • Limit frequent manual adjustments, as they can disrupt the thermostat’s learning.

  • Activate Hold mode only when needed, such as on vacation

Cleaning Guide

Here’s a clear and safe guide on how to clean your ecobee Smart Thermostat Enhanced without damaging it:

1. Power and Safety First

  • Avoid spraying cleaning products straight onto the thermostat; moisture may harm the sensors.

  • Always power down your HVAC system and thermostat before cleaning, either via the circuit breaker or app.

2. Cleaning the Touchscreen

  • Wipe with a gentle, lint-free microfiber cloth, similar to those for glasses or phones.

  • Lightly clean the screen using circular motions to get rid of smudges and fingerprints.

  • If needed, slightly dampen the cloth with:

    • Distilled water, or

    • A 50/50 mix of water and isopropyl alcohol.

  • Never use:

    • Paper towels (they can scratch)

    • Window cleaners or strong chemicals (they can damage the coating)

3. Cleaning the Housing and Frame

  • Wipe the edges and wall plate with a dry or slightly damp microfiber cloth.

  • To remove dust around vents or buttons, use a soft brush or compressed air to clear debris.

  • Don’t apply excessive pressure on the thermostat or screen.

4. Regular Maintenance Tips

  • Wipe down every 2–4 weeks to keep sensors dust-free.

  • Ensure the space around the thermostat is unobstructed; avoid placing furniture, decor, or curtains nearby.

  • Clean the thermostat more frequently if it’s in a dusty or humid spot, such as near vents or the kitchen.

  • Regularly inspect and clean HVAC filters to prevent dust from impacting airflow and sensor performance.

5. What Not to Do

🚫 Don’t use:

  • Bleach, ammonia, or vinegar

  • Aerosol sprays or furniture polish

  • Wet wipes or baby wipes (they leave residue)

What to avoid when using the Ecobee Programmable Wifi Smart Thermostat

knowing what to avoid when using your ecobee Smart Thermostat Enhanced will help you keep it working accurately, safely, and efficiently for years.

Here’s a complete list of things to avoid:

1. Avoid Installing in the Wrong Location

Don’t place the thermostat:

  • In direct sunlight – It can lead to inaccurate temperature readings

  • Near vents, radiators, or windows – Air movement and drafts may interfere with sensor readings.

  • Behind doors, curtains, or furniture – This obstructs airflow and prevents occupancy sensors from working properly.

  • Close to humid areas (kitchen, bathroom) – Too much moisture can damage electronic components.

 Suitable placement: on an interior wall, about 5 feet above the floor, where air flows naturally.

2. Avoid Incorrect Wiring or Power Issues

  • Make sure your HVAC system is 24V compatible before installing.

  • Don’t connect unfamiliar wires; incorrect wiring can harm your thermostat or HVAC system.

  • If your system lacks a C-wire, ensure correct use of the included Power Extender Kit (PEK).

  • Always switch off the circuit breaker before starting installation.

3. Avoid Moisture and Cleaning Mistakes

  • Do not spray any liquids—water, glass cleaner, or otherwise—directly on the thermostat.

  • Do not use paper towels or coarse cloths, as they may scratch the screen.

  • Avoid strong chemicals such as bleach or ammonia cleaners.

  • Keep sensors and vents free of dust and debris to maintain accuracy.

4. Avoid Blocking or Disabling Smart Features

  • Keep the thermostat face uncovered so its motion and occupancy sensors work properly.

  • Keep microphones on and Wi-Fi enabled when using voice assistants like Alexa, Siri, or Google.

  • Keep firmware updates enabled—they can boost energy efficiency and resolve bugs.

  • Don’t turn off “eco+” unless needed for troubleshooting; it helps reduce energy use.

5. Avoid Overriding or Resetting Too Often

  • Avoid frequently adjusting the temperature; it stops the thermostat from learning your patterns.

  • Don’t reset often; it will erase your schedules and settings.

  • Avoid keeping “Hold” mode on for extended periods unless you’re away—it prevents automatic temperature changes.

6. Avoid Ignoring Maintenance

  • Pay attention to filter reminders—clogged filters make your HVAC work harder and raise costs.

  • Don’t operate your system when the HVAC has problems; the thermostat can’t repair mechanical issues.

  • Avoid leaving the thermostat unpowered for long periods; it could lose calibration.

7. Avoid Network & App Issues

  • Keep the thermostat connected to Wi-Fi; disconnecting it may disable app control and remote features.

  • Ensure a strong, stable internet connection—weak signals can disrupt syncing and updates.

  • Keep your ecobee login private; grant access via the app’s Household feature.

Summary:
To keep your ecobee thermostat reliable:

  • Keep it clean, unobstructed, and updated.

  • Install it in a neutral, well-ventilated area.

  • Let it learn and manage your comfort automatically.

In conclusion, the ecobee Smart Thermostat Enhanced is a smart, energy-efficient, and easy-to-use device that helps you save on energy bills while keeping your home comfortable. With features like eco+ learning, voice control, and smart home integration, it offers modern convenience and reliable performance. Overall, it’s a great choice for anyone seeking comfort, control, and efficiency in one smart thermostat.

Google Nest Smart Thermostat for Home

The Google Nest Thermostat in Charcoal is a stylish, ENERGY STAR-rated intelligent thermostat created to improve home comfort while encouraging energy savings. Its modern, minimalist design includes a mirrored glass surface and a 2.4-inch color LCD screen, combining practicality with visual appeal. Compatible with the majority of 24V heating and cooling systems—such as furnaces, air conditioners, boilers, and heat pumps—the Nest Thermostat provides versatile functionality for a wide range of household setups.

Setup is straightforward and can usually be finished in less than 30 minutes using the step-by-step instructions available in the Google Home app. In most homes, the Nest Thermostat functions without a C-wire, making installation easier for many users. However, certain systems—like heating-only, cooling-only, or heat pump configurations—may require a C-wire or another compatible power accessory.

In addition to its sleek design and simple setup, the Nest Thermostat Charcoal delivers sophisticated features focused on energy savings and user convenience. It employs sensors to determine when the house is unoccupied, automatically switching to Eco Temperatures to reduce energy consumption. Homeowners can manage the thermostat remotely through the Google Home app, making adjustments from anywhere. Furthermore, the device monitors your HVAC system, sending notifications if potential problems arise, and offers customizable scheduling to align temperature settings with personal preferences.

Specification

Here’s a detailed overview of the Google Nest Thermostat (Charcoal), model GA02081-US, focusing on its technical specifications:

Dimensions & Weight

  • Diameter: 3.3 inches (84 mm)

  • Depth: 1.07 inches (27.25 mm)

  • Weight: 4.9 oz (139 g)

  • Trim Plate Dimensions:

    • Width: 5.92 inches (150.4 mm)

    • Height: 4.35 inches (110.4 mm)

Display

  • Type: 2.4-inch QVGA IPS liquid crystal display

  • Resolution: 240 x 320 pixels

  • Features: Digital brightness enhancement film and mirrored glass lens

Connectivity

  • Wi-Fi: 802.11b/g/n (2.4 GHz, 5 GHz)

  • Bluetooth: Bluetooth Low Energy

Power & Battery

  • Power Source: Hardwired via HVAC system

  • Battery: Built-in rechargeable lithium-ion battery

  • Voltage Requirement: 20–30V AC

  • Power Consumption: Less than 1 kWh/month

System Compatibility

The Nest Thermostat is designed to work with most 24V heating and cooling systems, including:

  • Furnaces

  • Air conditioners

  • Boilers

  • Heat pumps (with either forced air or radiant delivery)

  • Conventional systems with one stage of heating and cooling and a second stage of either heating or cooling

  • Heat pumps with one stage of heating and cooling and either auxiliary or emergency heat

  • HVAC fans

Smart Features

  • Scheduling: Set up eco-friendly schedules through the Google Home app

  • Geofencing: Modifies temperature according to your location

  • Eco Mode: Automatically shifts to Eco mode to conserve energy when the home is unoccupied

  • HVAC Monitoring: Keeps an eye on heating and cooling performance and provides alerts when irregularities occur

  • Voice Control: Works with Google Assistant and other Matter-certified smart voice assistants

Installation & Wiring

  • Wire Configuration: C-wire, 4-Wire

  • Wire Terminals:

    • C: Common 24V power

    • Y: Cooling

    • W: Heating

    • R: Power

    • G: Fan operation

    • O/B: Heat pump reversing valve

  • Power Source: Hardwired, Battery-powered

  • Battery Size: AAA (2 required)

Key Features

The Google Nest Thermostat (Charcoal, GA02081-US) is a modern smart thermostat designed to enhance home comfort and energy efficiency. Here are its key features:

  • Energy Savings: Self-adjusts to conserve energy while you’re out, potentially cutting heating costs by 10–12% and cooling costs by 15%

  • Remote Control: Control your home’s climate remotely through the Google Home app on your phone

  • Quick Schedule: Effortlessly create efficient temperature routines using the app, adjustable whenever required

  • System Monitoring: Notifies you of HVAC issues so you can monitor your home’s climate system

  • Easy Installation: Built for easy self-installation, usually finished in less than 30 minutes using the Google Home app instructions

  • Compatibility: Compatible with the majority of 24V HVAC systems, such as furnaces, air conditioners, boilers, and heat pumps

  • Voice Control: Supports Google Assistant and all Matter-certified voice platforms for voice-activated operation

How to use the Google Nest Smart Thermostat for Home

Here’s a clear and practical guide on how to use the Google Nest Thermostat (Charcoal), covering setup, daily use, and smart features:

1. Installation & Setup

  1. Turn Off Power: Turn off the breaker before handling your HVAC system to prevent electrical hazards

  2. Remove Old Thermostat: Gently remove your current thermostat, noting which wires are connected to each terminal; photographing them can help as a reference

  3. Mount Nest Base: Secure the Nest base to the wall using the provided screws and trim plate, making sure it is level

  4. Connect Wires: Connect each wire to its matching terminal (R, C, W, Y, G, O/B) and confirm it snaps securely

  5. Attach Display: Attach the Nest display to the base; it will magnetically lock into place

  6. Turn On Power: Turn the breaker back on. The thermostat will turn on and begin the step-by-step setup.

2. Initial Configuration

  • Language & Wi-Fi: Use the on-screen instructions to choose your language and set up Wi-Fi

  • System Type: The Nest thermostat automatically identifies your HVAC system but may prompt you to verify the configuration (heating, cooling, heat pump, etc.)

  • Google Account: Connect the thermostat to your Google account using the Google Home app to enable complete remote control and smart functionality

3. Daily Use

  • Adjust Temperature: Spin the outer dial clockwise to increase heat or counterclockwise to cool down

  • Touch Display: Touch the display to open quick settings such as Home/Away modes, fan operation, and scheduling

  • Set a Schedule: Set up a weekly temperature routine using the Google Home or Nest app to optimize comfort and save energy

4. Smart Features

  • Eco Mode: Self-adjusts heating and cooling when the house is unoccupied

  • Geofencing: Detects your phone’s location to toggle between Home and Away modes automatically

  • Energy Reports: Weekly energy report lets you track usage and reduce costs

  • HVAC Alerts: Delivers alerts when your system requires servicing

  • Voice Control: Control the thermostat with voice commands via Google Assistant: “Hey Google, set it to 72°F.”

5. Maintenance

  • Keep Clean: Clean the display and base using a dry microfiber cloth; do not use liquids

  • Check Wi-Fi: Make sure the thermostat remains connected for full smart features

  • Battery & Power: When running on battery backup or low power, follow the app’s instructions to recharge or modify wiring

Pro Tip: Over time, Nest adapts to your temperature preferences. At first, it might propose minor adjustments to save energy, and the more you use it, the better it optimizes comfort and efficiency.

Tips suitable for the Google Nest Smart Thermostat for Home

Here’s a practical list of tips to get the most out of your Google Nest Thermostat (Charcoal):

Temperature & Scheduling Tips

  1. Set a Consistent Schedule – Set up a weekly schedule in the Google Home app to fit your daily routine; even a 1–2° adjustment can reduce energy usage.

  2. Use Eco Temperatures – Switch your thermostat to Eco mode while you’re out; it lowers heating and cooling to conserve energy.

  3. Avoid Extreme Temperatures – Avoid turning the heat too high or the AC too low—balanced temperatures save energy and keep you comfortable.

Smart Features Tips

  1. Enable Geofencing – Allow the thermostat to sense when you’re away or home and adjust the temperature on its own.

  2. Voice Commands – Control your thermostat hands-free with Google Assistant, for example, “Hey Google, set the temperature to 72°F.”

  3. Check Energy Reports – Weekly reports let you monitor energy habits and find opportunities to save power.

Maintenance & Care Tips

  1. Keep it Clean – Clean the display using a dry microfiber cloth; do not apply liquid cleaners directly.

  2. Check Wi-Fi Connectivity – Make sure your Wi-Fi connection is stable so remote control and smart functions operate smoothly.

  3. Update Firmware – Regularly update your thermostat through the Google Home app to access new features and improvements.

Energy Efficiency Tips

  1. Combine with Smart Home Devices – Connect with smart lights, plugs, and sensors to build an energy-saving home network.

  2. Use Away Modes – If you have more than one thermostat, switch unused rooms to Away or Eco mode to save energy.

  3. Leverage Auto-Schedule – Allow Nest to learn your routine for a week or two so it can adjust temperatures automatically.

Comfort Optimization Tips

  1. Avoid Obstructions – Avoid placing furniture or drapes in front of the thermostat; they can interfere with accurate temperature readings.

  2. Use Multiple Sensors – If your home has multiple zones, Nest Temperature Sensors help balance comfort in each room.

  3. Combine with Humidity Control – Connecting your thermostat to a humidifier or dehumidifier helps keep indoor comfort balanced during extreme weather.

Cleaning Guide

Here’s a step-by-step guide on how to clean your Google Nest Thermostat (Charcoal) safely without damaging it:

Cleaning the Display and Base

  1. Power Off (Optional)

    • It’s not normally necessary to shut down your HVAC system, but you can turn off the breaker if you prefer.

  2. Remove Dust

    • Gently clean the display and Nest base with a soft, dry microfiber cloth.

    • Do not use rough fabrics, paper towels, or abrasives that might damage the surface.

  3. Spot Cleaning

    • To remove fingerprints or smudges, slightly moisten a microfiber cloth with water—do not spray water directly on the thermostat.

    • Wipe the surface gently—avoid applying pressure to the screen.

  4. Avoid Chemicals

    • Do not use:

      • Alcohol, ammonia, bleach, or general household cleaners.

      • Any liquid cleaners directly on the device.

Cleaning the Wires and Terminals (Occasionally)

  1. Turn Off Power – Always shut off the circuit breaker before handling any wiring.

  2. Check Connections – Make sure all wires are firmly attached and clean from dust or corrosion.

  3. Use a Dry Cloth – Clean gently and keep liquids away from the terminals.

Tips for Longevity

  • Clean gently and keep liquids away from the terminals.

  • Keep the space around the thermostat clean and clear to maintain accurate temperature readings.

  • Keep the thermostat out of direct sunlight and away from heat sources, as these can cause dust buildup and screen fading.

Pro Tip: A slightly damp microfiber cloth with water is typically enough—your Nest thermostat requires minimal upkeep.

What to avoid when using the Google Nest Smart Thermostat for Home

Here’s a comprehensive guide on what to avoid when using your Google Nest Thermostat (Charcoal) to ensure it works efficiently and lasts longer:

Temperature & Usage

  1. Avoid Extreme Temperatures – Extreme thermostat settings can overwork your HVAC system and increase energy consumption.

  2. Avoid Frequent Manual Overrides – Frequently changing the temperature by hand can interfere with Nest’s ability to learn your routine.

  3. Avoid Blocking Sensors – Keep furniture, drapes, and décor away from the thermostat to allow proper airflow and accurate temperature readings.

Installation & Power

  1. Avoid Improper Wiring – Keep the thermostat free from obstructions like furniture or drapes to ensure accurate temperature sensing.

  2. Avoid Removing Without Power Off – Never detach the thermostat from its base while power is on—switch off the breaker first.

  3. Avoid Using Without C-Wire if Required – Certain HVAC systems require a C-wire or power adapter; missing it may lead to battery or connection problems.

Cleaning & Maintenance

  1. Avoid Spraying Liquids – Do not spray water or cleaning solutions directly onto the thermostat.

  2. Avoid Abrasive Materials – Avoid using abrasive cloths, paper towels, or harsh chemicals on the display or base.

  3. Avoid Ignoring Firmware Updates – Skipping updates may stop new features or efficiency upgrades from functioning correctly.

Connectivity & Smart Features

  1. Avoid Disconnecting Wi-Fi – Smart functions such as remote access, Eco mode, and alerts depend on a reliable Wi-Fi connection.

  2. Avoid Resetting Frequently – Frequent resets can erase schedules and learning history, requiring the thermostat to start over.

  3. Avoid Blocking Voice Control – When using Google Assistant, don’t mute the mic or cover the thermostat—voice commands won’t register.

Pro Tip: Keep your Nest connected, updated, and in an open space so it can automatically adapt to your habits and improve energy efficiency.

In conclusion, the Google Nest Thermostat is a smart, energy-efficient device that makes home temperature control easy and convenient. With features like Eco mode, geofencing, and remote control via the Google Home app, it helps save energy while keeping your home comfortable. Easy to install, compatible with most HVAC systems, and voice-controlled, it’s a modern, practical choice for any home.

Sensi Smart Thermostat

The Sensi Smart Thermostat ST55 merges more than a century of HVAC experience with cutting-edge smart-home innovation to provide accurate and convenient temperature management. Crafted for both comfort and energy efficiency, this thermostat enables homeowners to control heating and cooling remotely through the Sensi mobile application. Its programmable capabilities allow users to create daily or weekly routines, maintaining a comfortable environment while maximizing energy savings. Equipped with Wi-Fi, the ST55 integrates effortlessly with smart home systems, allowing control via smartphone, tablet, or voice-activated assistants.

Hassle-free installation is a major feature of the Sensi ST55. This thermostat is designed for easy DIY setup, offering clear guidance and compatibility with most HVAC systems. Homeowners can take advantage of intuitive wiring diagrams and an accessible interface that keeps the learning process simple. In addition to convenience, the thermostat is Energy Star rated, allowing users to lower energy costs while supporting eco-friendly practices. Its design demonstrates Sensi’s dedication to dependability and long-lasting performance, built on decades of HVAC expertise.

Data security and smart-home compatibility are also at the heart of the Sensi experience. The ST55 integrates smoothly with Amazon Alexa, allowing voice-activated control for seamless comfort adjustments. Sensi prioritizes user privacy, keeping personal information protected while still providing tailored insights and energy reports. Via the mobile app, homeowners can monitor system performance, receive maintenance notifications, and make instant adjustments, offering full control over indoor climate management. In summary, the Sensi Smart Thermostat ST55 combines convenience, energy savings, and secure smart-home functionality in a dependable, easy-to-use device.

Specifications

The Sensi Smart Thermostat ST55 is a Wi-Fi-capable, ENERGY STAR®-rated device engineered for simple setup and effective home temperature management. Produced by Copeland, a company boasting more than a century of HVAC experience, the ST55 merges advanced smart functionality with dependable performance.

Key Specifications:

  • Dimensions: 5.88″ W x 3.75″ H x 1.00″ D
  • Display: 5″ LED screen
  • Temperature Range: 50°F to 99°F (set-point), 32°F to 99°F (display)
  • Operating Ambient: 32°F to 105°F (0°C to 41°C)
  • Humidity Range: 90% non-condensing max
  • Electrical Rating: 20 to 30 VAC, 50/60 Hz
  • Compatibility: Compatible with the majority of heating and cooling systems; some setups may require a common wire (C-wire).
  • Warranty: 3-year limited warranty

Features:

  • Wi-Fi Connectivity: Enables remote management through the Sensi mobile app, supporting both iOS and Android devices.
  • Voice Control: Works with Amazon Alexa for hands-free operation.
  • Programmable Scheduling: Provides a 7-day customizable schedule to maximize energy efficiency.
  • Geofencing: Modifies temperature according to your location to reduce energy use.
  • Smart Maintenance Alerts: Offers notifications for HVAC maintenance and filter replacement.
  • Privacy Protection: Sensi never shares your personal data with third parties.

The Sensi ST55 is built for simple DIY setup, featuring clear, step-by-step guidance and requiring no common wire in most setups. Its modern design and intuitive interface make it an ideal option for homeowners looking to improve comfort while saving energy.

Key Features

The Sensi Smart Thermostat ST55 combines cutting-edge functionality with an intuitive design, making it an excellent option for homeowners looking for comfort, energy savings, and control.

Easy DIY Installation

Engineered for easy setup, the ST55 usually doesn’t need a common wire (C-wire) in most configurations. The provided step-by-step instructions, along with mobile app support, make installation simple and convenient, with many homeowners finishing the process in less than 30 minutes.

Smart Connectivity & Voice Control

Equipped with integrated Wi-Fi, the ST55 enables remote management through the Sensi mobile app, supporting both iOS and Android devices. It also connects effortlessly with leading smart home systems—such as Amazon Alexa, Google Assistant, Apple HomeKit, Samsung SmartThings, and Wink—allowing for voice control and automated routines.

7-Day Scheduling & Geofencing

The thermostat offers customizable 7-day programming, letting you define temperature settings for every day of the week. Its geofencing feature senses your location and automatically adjusts the temperature when you leave or return home, promoting both comfort and energy efficiency.

Energy Efficiency & Smart Alerts

As an ENERGY STAR®-rated device, the ST55 can lower HVAC energy usage by around 23%. It provides intelligent notifications, such as reminders for filter changes and system performance alerts, helping keep your HVAC system operating efficiently.

Privacy Protection

Sensi places a strong emphasis on user privacy, guaranteeing that your personal data is never shared with third parties, offering reassurance while delivering smart-home features.

Blending user-friendliness, advanced smart capabilities, and energy-saving performance, the Sensi Smart Thermostat ST55 is a dependable option for contemporary home temperature management.

How to use the Sensi Smart Thermostat

Here’s a clear guide on how to use the Sensi Smart Thermostat ST55:

1. Power On and Connect

Once the thermostat is installed and your HVAC system is correctly wired, turn on the device. The display will illuminate and walk you through the initial setup process. Link the thermostat to your home Wi-Fi network via the Sensi mobile app (compatible with iOS and Android). This connection allows for remote management, scheduling, and compatibility with voice assistants such as Amazon Alexa.

2. Set Temperature and Schedule

You can control the temperature manually via the thermostat’s touchscreen or through the mobile app. For added convenience, set up 7-day programmable schedules to automatically adjust temperatures for each day of the week. Geofencing can also be enabled in the app to modify settings based on your location, maintaining energy efficiency when you’re away and comfort when you return.

3. Monitor and Maintain

Via the Sensi app, you can track your HVAC system’s performance, receive maintenance notifications (such as filter replacement reminders), and access energy usage reports. The thermostat can alert you if temperatures become abnormal or if your system requires service. Additionally, compatible voice assistants allow for hands-free temperature adjustments.

4. Optional Features

  • Remote Access: Control heating and cooling on the go via the app. 
  • Energy Saving: Monitor and improve energy consumption. 
  • Integration: Connect with other smart home devices for automated control.

This blend of manual operation, mobile app control, and intelligent features keeps your home comfortable, energy-efficient, and simple to manage.

Tips suitable for the Sensi Smart Thermostat

Here are practical tips for getting the most out of the Sensi Smart Thermostat ST55:

  1. Optimize Placement: Mount the thermostat on an indoor wall, avoiding direct sunlight, air drafts, or heat sources such as radiators to ensure precise temperature readings. 
  2. Use the App Regularly: Use the Sensi mobile app to track energy consumption, control settings from anywhere, and create schedules that fit your routine. 
  3. Enable Geofencing: Activate geofencing to adjust heating and cooling based on your whereabouts, reducing energy use while the house is empty. 
  4. Schedule Wisely: Use the weekly scheduling function to reduce unnecessary energy consumption while sleeping or away from home. 
  5. Check Compatibility: Make sure your HVAC system works with the thermostat, and properly install a C-wire if required to avoid connection issues. 
  6. Voice Commands: Connect with Amazon Alexa, Google Assistant, or other compatible platforms for voice-activated control and ease of use. 
  7. Regular Maintenance: Follow reminders for routine filter changes and system checks to ensure optimal HVAC performance and reliable thermostat readings. 
  8. Avoid Overheating or Overcooling: Avoid depending only on manual controls—leverage programmable schedules and smart functions to keep comfort consistent while saving energy. 
  9. Firmware Updates: Update the thermostat firmware via the Sensi app to enhance performance, security, and access to new features. 
  10. Privacy Considerations: Rest assured that your personal information remains private—Sensi does not share or sell it; use the app responsibly and avoid sharing your password.

Cleaning guide

Here’s a clear guide on how to clean the Sensi Smart Thermostat ST55:

1. Power Off (Optional but Recommended)

Although the thermostat can be wiped while on, turning it off avoids unintended touchscreen actions during cleaning.

2. Use a Soft, Dry Cloth

  • Carefully wipe the exterior with a dry, gentle microfiber cloth. 
  • This helps eliminate dust, fingerprints, and minor smudges without damaging the screen or casing.

3. For Slightly Stubborn Smudges

  • Moisten a microfiber cloth slightly with plain water (avoid soaking). 
  • Gently wipe the surface, then immediately dry it with a clean, dry cloth.

4. Avoid Harsh Chemicals

  • Avoid using bleach, ammonia, alcohol, or harsh cleaners, as they may harm the screen or plastic housing. 
  • Never immerse the thermostat in water or spray liquids directly on it.

5. Routine Maintenance

  • Light dusting from time to time is usually adequate for maintenance. 
  • Keep the display and edges clean from dust to maintain proper function and clear visibility.

This approach cleans the thermostat safely without harming the electronics or display.

What to avoid when using the Sensi Smart Thermostat

Here’s a list of things to avoid when using the Sensi Smart Thermostat ST55 to ensure proper function and longevity:

  1. Direct Sunlight or Heat Sources: Do not position the thermostat near sunlight, lamps, or heat sources, as this may affect temperature accuracy. 
  2. Drafty or Blocked Locations: Avoid placing the thermostat near vents, fans, drafty windows, or behind furniture, as this can disrupt airflow and affect temperature accuracy. 
  3. Excessive Distance from HVAC System: Ensure the thermostat stays within the correct range of your system wiring; avoid lengthy or makeshift extensions that may reduce performance. 
  4. Harsh Cleaning Agents: Avoid bleach, ammonia, alcohol, and abrasive cleaning agents, and never immerse the thermostat in water. 
  5. Rough Handling: Avoid dropping, hitting, or applying excessive force to the device—the casing and internal electronics are delicate. 
  6. Unnecessary Opening: Only open the battery compartment when changing the CR2 battery; do not interfere with the internal components. 
  7. Exceed Sensor Limits: When using multiple Sensi sensors, do not connect more than the supported quantity to avoid setup issues. 
  8. Over-reliance on Manual Adjustments: Excessive use of manual adjustments can disrupt scheduled programs and geofencing energy-saving functions. 
  9. Ignoring Alerts: Do not ignore low-battery warnings or system alerts, as this may compromise performance and delay maintenance. 
  10. Poor Wi-Fi Connection: Do not place the thermostat in spots with poor Wi-Fi reception, which may limit app control and smart features.

In conclusion, the Sensi Smart Thermostat ST55 is a reliable, easy-to-use device that combines smart-home features, energy efficiency, and DIY-friendly installation. It offers Wi-Fi control, programmable schedules, geofencing, and voice integration while prioritizing data privacy. Overall, it provides homeowners with comfort, convenience, and efficient HVAC management in a sleek, dependable package.

Google Nest Temperature Sensor 3 Count Pack

The Google Nest Temperature Sensor (3-pack) is a collection of cordless climate detectors built to function seamlessly with supported Nest thermostats like the Nest Learning Thermostat (3rd or 4th generation) and Nest Thermostat E. Unlike the thermostat’s integrated sensor, each of these satellite units can be positioned in frequently used spaces (such as bedrooms or living rooms), ensuring heating or cooling is adjusted to where comfort is most important.

Setup is simple: once the sensor is added to your Google Home or Nest app profile, you position it at about chest level (to avoid distorted readings from hot air near the ceiling or cool drafts near the floor) and within Bluetooth reach of the thermostat (up to around 50 feet, though walls or obstacles may shorten this). The unit runs on a CR2 lithium battery and typically lasts up to three years before replacement is needed. After installation, you can program which sensor your thermostat should follow at different times, or even combine readings from several sensors to optimize system performance.

The advantage of the Nest sensors lies in maintaining more even comfort levels and potentially enhancing HVAC efficiency. For homes where heating and cooling are inconsistent (for instance, bedrooms running too warm upstairs or distant areas lagging behind the thermostat), these sensors help smooth out those imbalances by giving the system a clearer picture of the room’s true climate. 

Specifications

Here are the key specifications and technical details for the Google Nest Temperature Sensor (as commonly sold — note that a 3-pack just bundles three units with the same specs):

Technical Specifications

  • Dimensions: ~ 1.9 in (diameter) × 0.8 in (height) (≈ 50 mm × 22 mm)
  • Weight: ~ 1.6 oz (≈ 45 g)
  • Operating (Ambient) Temperature Range: 32 °F to 104 °F (0 °C to 40 °C) (indoor use only)
  • Power / Battery: One CR2 3 V lithium battery (included); typical battery life up to 2 years under normal use
  • Wireless / Connectivity: Bluetooth Low Energy (BLE), with effective communication range up to about 50 ft (≈ 15 m) in perfect conditions (walls, obstacles, interference can reduce this)
  • Accuracy: Measurement accuracy of approximately ±1.5% (for the temperature range)

Compatibility & Functional Limits

  • Compatible Thermostats: Nest Learning Thermostat (3rd & 4th generation) and Nest Thermostat E
  • Sensor Support / Limits: You can connect as many as six sensors to one supported Nest thermostat. In houses with multiple thermostats (separate “zones”), as many as 18 sensors can be installed altogether.
  • Scheduling / Control: Through the Google Home or Nest app, you can set a timetable for which sensor the thermostat relies on at various times of day.
  • Other Limits / Notes:
    • The sensor tracks temperature alone (it does not detect humidity or movement).
    • If the sensor stops transmitting (for example, due to dead battery or being out of range), the thermostat will revert to its internal sensor.
    • Made for indoor applications only and not certified for outdoor or rugged exposure.
    • The battery compartment can be opened (for instance, by twisting) to swap the cell, and the app will notify you when the battery is low. 

Key Features

Here are some key features of the Google Nest Temperature Sensor (3-pack):

  1. Remote temperature sensing & control
    The sensor lets you position temperature checkpoints in frequently used rooms instead of depending only on the thermostat’s integrated sensor. The thermostat can be set to follow that sensor’s reading rather than its own when you choose. You may also schedule which sensor—or room—directs the thermostat at various times of the day.
  2. Wireless & long battery life
    Each sensor pairs with the Nest thermostat using Bluetooth Low Energy (BLE), offering an effective range of about 50 feet (≈15 m) in open conditions, though barriers like walls may shorten it. Powered by a CR2 3V lithium battery (included), the sensor generally lasts up to 2 years—or as long as 3 years in newer models—with regular use.
  3. Multi-sensor support & flexible scheduling
    Each Nest thermostat supports a maximum of six linked sensors. This setup gives you options: you can schedule control from a preferred sensor or merge readings from multiple sensors. The newer generation introduces the ability to smooth out comfort levels by averaging inputs from more than one sensor.

How to use the Google Nest Temperature Sensor 3 Count Pack

Here’s a clear guide on how to use the Google Nest Temperature Sensor (3-pack) with your compatible Nest thermostat:

1. Set up and pair the sensor

  • Open the Google Home app (or Nest app if still supported in your region).
  • In the app, go to Add > Set up device > Nest Temperature Sensor.
  • Proceed with the guided steps to capture the QR code from the rear of the sensor or input the pairing code manually.
  • The app will notify you once the sensor successfully links to your thermostat.

2. Place the sensor in the right location

  • Select the space where you’d like more precise temperature control (e.g., bedroom, nursery, lounge).
  • Place the sensor around chest level on a table, shelf, or wall—keep it away from floors, ceilings, or vents.
  • Keep the device within BLE reach, typically up to 50 feet in open areas, but reduced when obstructions are present.
  • Keep it away from direct sun, drafts, or nearby heat/cooling sources that may distort the temperature reading.

3. Control how the thermostat uses it

  • In the app, go to your thermostat > Settings > Sensors.
  • Select the sensor to control the thermostat immediately, or set up a timetable (e.g., bedroom at night, living room by day).
  • If you’re using more than one sensor, you can combine their readings to create an average for steadier comfort.
  • The thermostat will regulate heating or cooling automatically according to the temperature reported by the active sensor.


Tips suitable for the Google Nest Temperature Sensor 3 Count Pack

Here are some practical tips for getting the best performance out of your Google Nest Temperature Sensor (3-pack):

Placement Tips

  • Keep it at chest height: It delivers a more realistic sense of comfort, reflecting what occupants feel rather than the heat rising overhead or the chill near the ground.
  • Avoid drafts and heat sources: Avoid positioning the sensor close to vents, heaters, radiators, windows, or direct sun, as this may produce inaccurate readings.
  • Choose high-use rooms: Place sensors in the rooms where comfort is most important, like the bedroom at night or the living room during daytime hours.

Usage & Scheduling Tips

  • Create a daily schedule: Through the app, direct your thermostat to follow the bedroom sensor for nighttime hours and the living room sensor during the daytime. This maintains comfort and energy savings.
  • Use averaging (if supported): If you’re running more than one sensor, you can turn on averaging so the thermostat evens out temperature swings across the house.
  • Test and adjust: Test various sensor positions for a few days. If a room doesn’t feel right, shift the device slightly until you discover the ideal spot.

Maintenance Tips

  • Check battery life: Each sensor is powered by a CR2 battery, usually lasting 2–3 years. The app will notify you when it’s low, so replace it quickly.
  • Stay in range: If the sensor frequently loses connection, try placing it nearer to the thermostat or adjusting its position to strengthen Bluetooth reception.
  • Clean gently: Clean the outside with a gentle, dry cloth to keep dust from impacting operation. Do not use liquids or sprays.

Cleaning guide

Here’s how to safely clean your Google Nest Temperature Sensor without damaging it:

Step-by-Step Cleaning

  1. Turn off your HVAC system (optional but recommended): This prevents the thermostat from reacting to changing readings while you move or adjust the sensor.
  2. Remove the sensor from its spot: Carefully lift it from the shelf, wall, or tabletop.
  3. Wipe the exterior: Wipe with a soft, dry microfiber cloth to clear dust and fingerprints. This is generally sufficient for routine upkeep.
  4. For stubborn dirt: Moisten the cloth lightly with water (do not saturate). Wipe gently and dry right away with a clean, dry cloth.
  5. Check the battery cover: If dust accumulates around the battery cover, clean gently. Only open the cover when changing the battery.

Important Don’ts

  • Avoid strong cleaning agents such as bleach, ammonia, or alcohol, as they may harm the casing.
  • Avoid abrasive materials like scouring pads or paper towels, as they can scratch the surface.
  • Avoid submerging the sensor in water or spraying liquids directly on it.

Light dust removal occasionally is all that’s needed to keep the sensor functioning well.
 

What to avoid when using the Google Nest Temperature Sensor 3 Count Pack

Here are the main things you should avoid when using the Google Nest Temperature Sensor (3-pack):

Placement & Environment

  • Keep the sensor away from direct sun or heat sources like lamps, radiators, or heaters, as they may produce inaccurate high readings.
  • Keep the sensor away from vents, fans, or drafty windows, as airflow can distort temperature readings.
  • Do not place the sensor outdoors or in moist locations—it’s designed for indoor use only and not built to withstand weather.
  • Keep the sensor out of corners or behind furniture, as restricted airflow may affect measurement accuracy.

Handling & Maintenance

  • Avoid dropping, hitting, or pressing the sensor forcefully—its delicate casing and electronics may be damaged.
  • Avoid opening the sensor unnecessarily—only access the battery cover when changing the CR2 battery.
  • Do not use strong chemicals, scrubbing pads, or submerge in water—simply wipe with a dry or lightly damp microfiber cloth.
  • Do not overlook low-battery alerts; a depleted sensor won’t report temperature, so the thermostat defaults to its built-in sensor.

Connectivity & Use

  • Do not place the sensor too far away; its Bluetooth range is roughly 50 ft under ideal conditions, less if blocked by walls or devices.
  • Do not exceed the sensor limit for a single thermostat—it supports up to 6 sensors, and adding more may cause setup issues.
  • Don’t anticipate additional functions—the Nest Sensor provides temperature data only, not humidity or occupancy sensing.

In conclusion, the Google Nest Temperature Sensor (3-pack) is a convenient add-on for Nest thermostats that improves comfort by measuring temperatures in the rooms that matter most. It’s easy to install, battery-powered, and works wirelessly, making it simple to manage multiple rooms. While it only measures temperature (not humidity or motion), it’s ideal for fixing hot and cold spots and gives you more precise, room-by-room control of your home’s climate.

Honeywell Wi-Fi 7-Day Programmable Thermostat

The Honeywell RTH6580WF Wi-Fi 7-Day Programmable Thermostat is an intuitive and cost-effective smart thermostat designed to deliver accurate temperature regulation and smooth integration into contemporary smart home systems. Equipped with a large, easily readable digital screen and real-time clock, it enables users to schedule up to four time slots per day for each day of the week, providing personalized comfort throughout the week. The thermostat offers temperature precision within ±1°F, ensuring consistent and dependable climate control.

A key highlight of the RTH6580WF is its Wi-Fi capability, which provides remote control through the Honeywell Home app for iOS and Android devices. This feature allows users to modify settings, track energy consumption, and receive notifications for temperature changes or connectivity issues from virtually anywhere. Additionally, the thermostat works with major smart home systems, including Amazon Alexa, Google Assistant, and Samsung SmartThings, enabling voice commands and seamless integration with existing smart home setups.

Installation is simple, although a C-wire (common wire) is necessary for power. The thermostat is compatible with most 24V HVAC systems, including forced air, hydronic, heat pump, oil, gas, and electric systems, but it is not suitable for millivolt systems or 120/240V setups such as baseboard heaters. Users have commended the RTH6580WF for its user-friendly design, dependable performance, and the convenience of remote operation, making it an excellent choice for those seeking an affordable yet feature-packed smart thermostat.

Specification

Here are the detailed specifications for the Honeywell RTH6580WF Wi-Fi 7-Day Programmable Thermostat:

Dimensions

  • Height: 3.5 inches (89 mm)
  • Width: 5.75 inches (146 mm)
  • Depth: 1.5 inches (38 mm)
  • Color: Premier White®

Power & Connectivity

  • Power Source: 24V (requires a common wire, C-wire)
  • Wi-Fi: 802.11b/g/n (2.4 GHz only)
  • Standby Power: 0.04W

Compatibility

  • Heating Systems: Up to 3 Heat / 2 Cool Heat Pump Systems
  • Cooling Systems: Up to 2 Heat / 2 Cool Conventional Systems
  • Not Compatible With: Millivolt systems (e.g., gas fireplaces) and 120/240V systems (e.g., baseboard electric heat)

Smart Features

  • Mobile App: Available for iOS and Android devices
  • Voice Control: Compatible with Amazon Alexa, Google Assistant, IFTTT, and Apple HomeKit
  • Smart Response: Adapts to your heating and cooling patterns to guarantee your home attains the set temperature precisely when needed.
  • Auto Changeover: Seamlessly alternates between heating and cooling to keep your desired temperature.
  • Weather Forecast: Check local weather conditions via the app or online portal.
  • Alerts: Receive reminders for filter maintenance and unexpected temperature changes.

Display & Controls

  • Type: LCD Screen
  • Backlit: Yes
  • Information Displayed: Indoor temperature, time, fan status, Wi-Fi status
  • Control Type: Touchscreen

Included in the Box

  • Thermostat
  • Wallplate (attached to thermostat)
  • Screws and anchors
  • Quick Start Guide
  • Thermostat ID Card
  • Wire Labels
  • User Guide
  • Quick Reference Card

Warranty

  • Duration: 1 Year

Key features 

Here are the key features of the Honeywell RTH6580WF Wi-Fi 7-Day Programmable Thermostat:

  1. Wi-Fi Connectivity
    • Connects to your home Wi-Fi (2.4 GHz only).
    • Manage your thermostat from anywhere using the Honeywell Home app on iOS and Android.
  2. 7-Day Programmable Scheduling
    • Supports up to four programmable periods each day.
    • Personalize daily schedules to maximize comfort and save energy.
  3. Smart Response Technology
    • Adapt to your system’s heating and cooling patterns.
    • Guarantee your home attains the set temperature exactly when needed.
  4. Auto Changeover
    • Effortlessly changes between heating and cooling as needed.
    • Keeps your home comfortable without the need for manual changes.
  5. Voice Control Compatibility
    • Compatible with Amazon Alexa, Google Assistant, and additional smart home systems.
    • Allows voice-controlled temperature adjustments.
  6. Energy Star Certified
    • Engineered to save energy and cut utility costs.
  7. Large Backlit Display
    • High-visibility LCD display
    • Displays temperature, time, fan status, and Wi-Fi connectivity.
  8. Alerts & Notifications
    • Notifies you when it’s time to change filters or if temperatures vary unexpectedly.
    • Keep updated to ensure optimal performance and system longevity.
  9. Easy Installation
    • Supports most 24V heating and cooling systems (needs C-wire).
    • Wallplate, screws, anchors, and wire labels included.
  10. Mobile App Control
    • Control the temperature remotely.
    • Check schedules, monitor energy consumption, and get notifications.


How to use the Honeywell Wi-Fi 7-Day Programmable Thermostat

Here’s a clear guide on how to use the Honeywell RTH6580WF Wi-Fi 7-Day Programmable Thermostat:

1. Initial Setup

  • Power On: The thermostat turns on automatically once installed.
  • Connect to Wi-Fi: Connect to your home Wi-Fi via the touchscreen by selecting the network and entering the password. Supports 2.4 GHz networks only.
  • Set Date & Time: The thermostat guides you to enter the correct date and time for precise scheduling.

2. Programming Your Schedule

  • 7-Day Schedule: Schedule each day separately with up to 4 time blocks (Wake, Leave, Return, Sleep).
  • Adjust Temperature: Choose the temperature for each time period, and the thermostat will automatically toggle between heating and cooling.
  • Smart Response: The thermostat learns your home’s heating and cooling patterns and pre-adjusts to reach desired temperatures on time.

3. Manual Temperature Control

  • Touchscreen Adjustment: Use the touchscreen arrows to raise or lower the temperature manually.
  • Temporary Overrides: Adjusting the temperature manually doesn’t overwrite your schedule; programmed settings take over at the next period.

4. Using the Mobile App

  • Download App: Available on iOS and Android.
  • Remote Control: Control temperature, check schedules, and get notifications remotely.
  • Notifications: Get notifications for filter replacements and irregular temperature changes.

5. Voice Control

  • Set Up Voice Assistants: Pair your thermostat with Alexa, Google Assistant, or supported smart home platforms.
  • Hands-Free Control: Adjust temperature and monitor status with voice control.

6. Additional Tips

  • Auto Changeover: Turn on this feature to let the thermostat alternate between heating and cooling automatically.
  • Energy Savings: Lower your thermostat remotely or via schedule to cut energy costs when not home.
  • Maintenance Alerts: Monitor filter and system notifications to maintain HVAC efficiency.

Tips suitable for the Honeywell Wi-Fi 7-Day Programmable Thermostat

Here are some practical tips for using and maintaining the Honeywell RTH6580WF Wi-Fi 7-Day Programmable Thermostat effectively:

1. Ensure Proper Installation

  • Ensure your system includes a C-wire, or use an adapter if required.
  • Install the thermostat on an inside wall, avoiding direct sunlight, drafts, windows, and heat sources for precise readings.

2. Optimize Your Schedule

  • Program a 7-day schedule tailored to your routine for optimal energy savings.
  • Schedule four daily periods—Wake, Leave, Return, Sleep—to save energy when the house is empty.
  • Use Smart Response Technology to let the thermostat learn your HVAC system’s schedule.

3. Use Mobile & Voice Control

  • Download the Honeywell Home app to control your thermostat, manage schedules, and track energy usage.
  • Connect with Amazon Alexa or Google Assistant for hands-free operation.

4. Monitor Energy Usage

  • Monitor the app frequently to track energy usage patterns.
  • Modify schedules or temperature settings to reduce energy costs while maintaining comfort.

5. Maintenance & Alerts

  • Monitor alerts for filter changes and temperature irregularities.
  • Maintain a clean thermostat by gently wiping the touchscreen with a dry or lightly damp cloth.

6. Troubleshooting Tips

  • In case of Wi-Fi disconnection, reboot the thermostat or check your network router.
  • If there are schedule problems, reset it in the app and set up the periods again.
  • Make sure all wiring is properly secured if the thermostat is not powering.


Cleaning guide

Here’s a simple and safe guide on how to clean the Honeywell RTH6580WF Wi-Fi 7-Day Programmable Thermostat:

1. Power Off (Optional but Recommended)

  • Although the thermostat uses low voltage, it’s best to shut off the HVAC or cut power at the breaker before cleaning.

2. Use a Soft Cloth

  • A microfiber or soft cloth works best.
  • Do not use paper towels or coarse cloths, as they may scratch the screen.

3. Lightly Damp Cloth

  • If required, slightly dampen the cloth.
  • Avoid spraying water or cleaning solutions directly on the thermostat.

4. Gentle Wiping

  • Gently clean the touchscreen and exterior to remove dust, fingerprints, and smudges.
  • Do not apply excessive pressure on the touchscreen.

5. Avoid Harsh Chemicals

  • Avoid ammonia, bleach, or harsh cleaners, as they may harm the touchscreen and plastic casing.

6. Dry Thoroughly

  • Once wiped, dry the surface with a cloth to remove leftover moisture.
  • Make sure water does not enter the wiring or vents.

7. Optional: Clean Around Wallplate

  • Dust may collect along the wallplate edges; gently remove it with a soft brush or cotton swab.

Tip: Wipe your thermostat every 1–2 months or whenever dust appears. A clean screen ensures clear visibility and smooth touchscreen operation.


What to avoid when using the Honeywell Wi-Fi 7-Day Programmable Thermostat

Here’s a clear list of things to avoid when using the Honeywell RTH6580WF Wi-Fi 7-Day Programmable Thermostat to ensure safety, proper function, and longevity:

1. Avoid Direct Sunlight & Heat Sources

  • Avoid installing the thermostat in direct sunlight or near lamps, ovens, or air vents.
  • Too much heat may lead to incorrect temperature readings.

2. Avoid Moisture Exposure

  • Avoid spraying water or cleaning solutions directly on the thermostat.
  • Do not install the thermostat in damp spaces or close to sinks, bathrooms, or humidifiers.

3. Avoid Physical Damage

  • Avoid applying excessive pressure or using sharp items on the touchscreen.
  • Do not drop the thermostat or knock it into walls when installing.

4. Avoid Incorrect Wiring

  • Avoid installing unless a C-wire or compatible adapter is available.
  • Ensure all wiring is secure and covered to prevent malfunctions or electrical risks.

5. Avoid 5 GHz Wi-Fi Networks

  • The thermostat only supports 2.4 GHz Wi-Fi.
  • The thermostat cannot connect to 5 GHz networks.

6. Avoid Ignoring System Alerts

  • Always pay attention to filter reminders and abnormal temperature warnings.
  • Skipping regular upkeep may lower efficiency or harm the HVAC unit.

7. Avoid Frequent Manual Overrides

  • Refrain from repeatedly bypassing the preset schedule, as it may weaken energy-saving performance and Smart Response accuracy.

8. Avoid Harsh Chemicals When Cleaning

  • Avoid cleaning the screen or housing with harsh chemicals like bleach or ammonia.

Tip: Handle the thermostat with care, use programmed schedules, and keep it correctly installed for dependable performance and precise readings.

In conclusion, the Honeywell RTH6580WF Wi-Fi 7-Day Programmable Thermostat is an easy-to-use, energy-efficient thermostat that combines 7-day scheduling, Smart Response learning, Wi-Fi control, and voice assistant compatibility. Its intuitive touchscreen, mobile app, and alerts make managing your home’s heating and cooling convenient, while proper installation and maintenance ensure reliable performance for years.