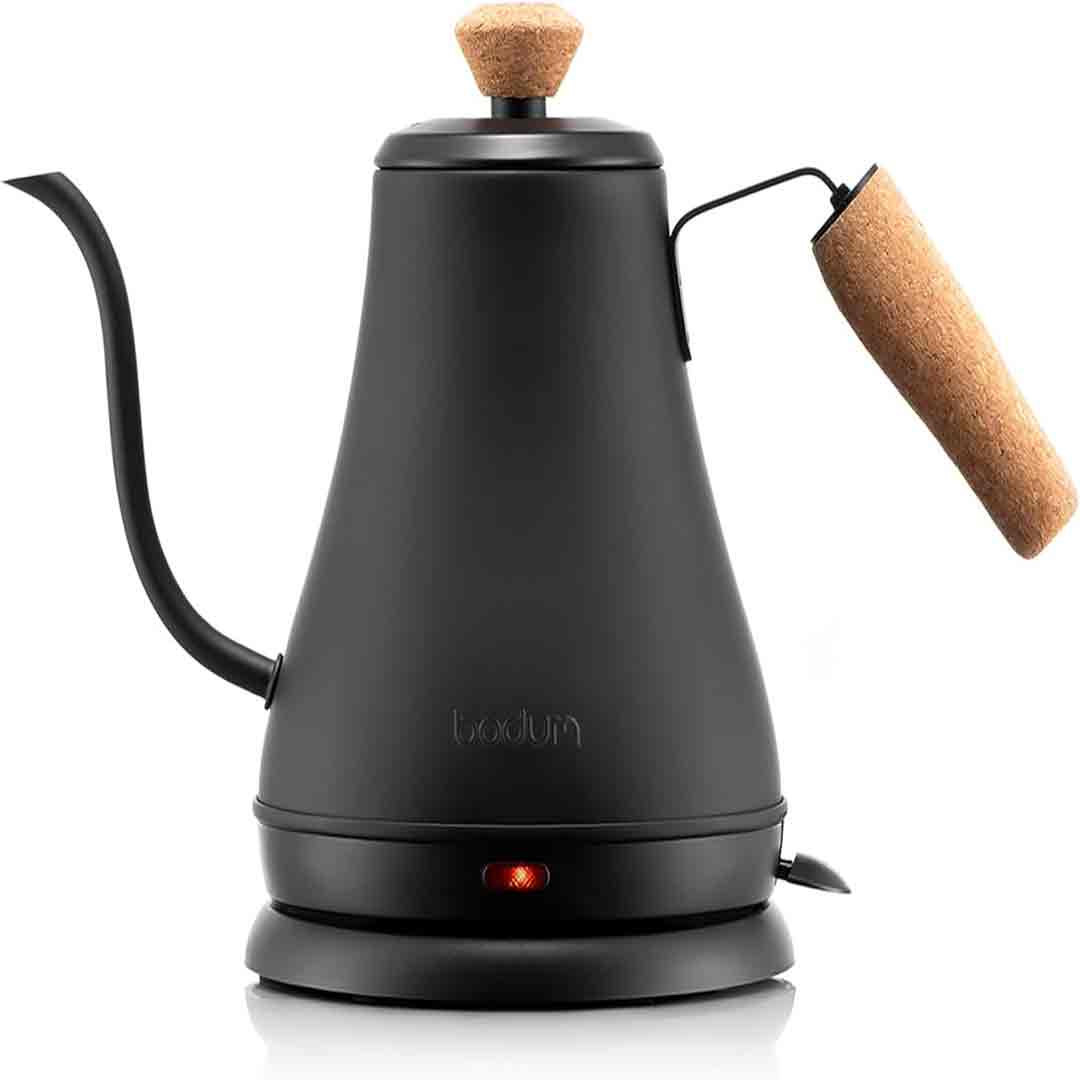
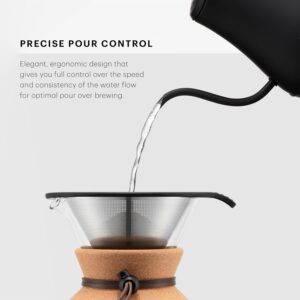
The Bodum 27oz Bistro Gooseneck Electric Water Kettle is a stylish and functional appliance that suits the needs of coffee and tea lovers. Its 27-ounce capacity allows for the preparation of several cups of pour-over coffee, steeping loose-leaf tea, or heating water for other uses. With a precisely designed gooseneck spout, it provides controlled and consistent water flow, ideal for perfecting the pour-over brewing process. Made from premium stainless steel, its matte black finish complements modern and minimalist kitchen decor.
A notable highlight of the Bodum Bistro kettle is its user-focused design, which emphasizes comfort and convenience. The handle is easy to grip and remains cool to the touch, providing safety and ease during pouring. Equipped with a high-performance heating element, the kettle boils water rapidly and efficiently. Its push-button lid and automatic shut-off feature add to its practicality, preventing overheating or dry boiling and offering peace of mind. These attributes make it an ideal choice for both beginners and seasoned brewers who prioritize precision and safety in their brewing process.
Visually, the Bodum 27oz Bistro kettle showcases an elegant simplicity that complements a range of kitchen aesthetics. Its matte black finish is fingerprint-resistant, ensuring it stays clean and sleek with minimal upkeep. Compact and lightweight, the kettle is convenient to store or display on the countertop without occupying too much space. Whether you’re crafting a pour-over coffee, brewing fine tea, or just boiling water, this kettle seamlessly blends style and practicality to enhance your daily beverage rituals.
Specifications
Here are the specifications for the Bodum 27oz Bistro Gooseneck Electric Water Kettle, Matte Black:
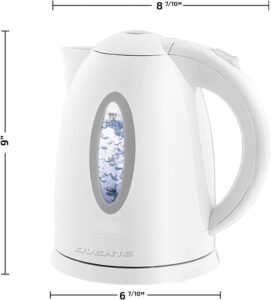
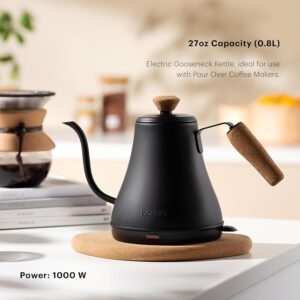
- Capacity: 27 ounces (0.8 liters)
- Material: Stainless steel body with a matte black finish
- Spout Type: Gooseneck for precision pouring
- Power: 1200 watts
- Voltage: 120V (compatible with standard US outlets)
- Handle: Comfortable, cool-touch handle for secure and effortless pouring
- Base: Rotating 360-degree base for hassle-free placement and cordless pouring
- Safety Features: Automatic shut-off and boil-dry protection
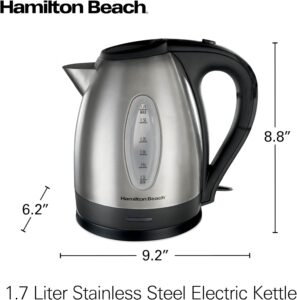
- Dimensions: Approximately 11.5 x 7.1 x 8.5 inches
- Weight: Lightweight design, around 2.4 pounds
- Color: Matte black
- Heating Element: Enclosed design for optimal heating and hassle-free maintenance
This kettle is crafted for accuracy and ease, ideal for enthusiasts of premium brewing techniques such as pour-over coffee or fine teas.

Key features
- Gooseneck Spout:
- Accurate pouring for steady water flow, perfect for pour-over coffee and tea preparation.
- Facilitates perfect extraction with precise and consistent pouring.
- Efficient Heating:
- 1200-watt hidden heating element for fast and reliable water boiling.
- Boils up to 27 ounces of water in just minutes, perfect for time-saving mornings.
- Ergonomic Design:
- Ergonomic, heatproof handle guarantees safe and controlled pouring.
- Lightweight design for effortless handling and maneuvering.
- Safety Features:
- Auto shut-off feature prevents overheating and conserves energy.
- Dry-boil protection prevents the kettle from operating when there is no water.
- Stylish and Durable Construction:
- Constructed from premium stainless steel with a stylish matte black coating.
- Smudge-proof surface for a sleek, contemporary appearance.
- 360-Degree Swivel Base:
- Cordless design for effortless lifting, pouring, and positioning from any direction.
- Space-saving base minimizes kitchen counter mess.
- Compact and Lightweight:
- Compact size makes storage and countertop placement a breeze.
- Ideal for small kitchens, offices, or dorm rooms.
The blend of practicality, safety, and design makes this kettle an excellent option for coffee and tea lovers.
How to use the Bodum 27oz Bistro Gooseneck Electric Water Kettle
Here is a step by step guideline on how to Use the Bodum 27oz Bistro Gooseneck Electric Water Kettle:
- Fill the Kettle:
- Detach the kettle from the base and open the lid by pressing the button on the handle.
- Add fresh, cold water to the kettle, ensuring the water level stays below the 27-ounce maximum.
- Place the Kettle on the Base:
- Close the lid securely and place the kettle back onto the 360-degree rotating base.
- Ensure the base is connected to a standard 120V electrical outlet.
- Turn On the Kettle:
- Turn on the power switch (typically found at the base or handle) to begin heating.
- The indicator light (if available) will illuminate to signal that the kettle is heating.
- Wait for the Water to Heat:
- The indicator light (if available) will illuminate to signal that the kettle is heating.
- The kettle will shut off automatically when the water reaches its boiling point, usually within a few minutes depending on the water level.
- Pour the Water:
- Remove the kettle from the base and use the gooseneck spout for controlled, accurate pouring.
- The ergonomic, heatproof handle provides a secure and comfortable hold.
- Clean and Store:
- Turn off and unplug the base, then wait for the kettle to cool down.
- Clean the interior by rinsing with water and wipe the exterior with a wet cloth.
- Keep the kettle and base in a dry location when not in use.
This kettle is ideal for crafting pour-over coffee, steeping tea, or heating water for beverages with accuracy and convenience.
Tips and recipes suitable for the Bodum 27oz Bistro Gooseneck Electric Water Kettle
Tips for Using the Bodum 27oz Bistro Gooseneck Electric Water Kettle:
- Use Fresh Water: Always use fresh, cold water in the kettle for the best-tasting coffee or tea. Using stale water may impact the flavor of your brew.
- Preheat Your Cup or Teapot: Add a small amount of hot water to your teapot or cup before brewing to preheat it and help retain the drink’s temperature.
- Control the Pour: Use the gooseneck spout to pour gently and consistently, ideal for pour-over coffee or delicate tea leaves.
- Descale Regularly: If you spot mineral deposits, descale the kettle by boiling a mixture of equal parts water and white vinegar, then rinse it well.
- Optimal Brewing Temperature: For coffee, allow the water to cool for 30–60 seconds after boiling to reach the optimal temperature (195°F–205°F). For green or white tea, let it cool a bit longer.
- Store Properly: Once cleaned, ensure the kettle stays dry and store it out of direct sunlight to preserve the matte black finish.
Recipes Perfect for the Bodum Gooseneck Kettle:
Classic Pour-Over Coffee
- Ingredients: Freshly ground coffee beans (medium-coarse grind), filtered water
- Instructions:
- Warm the water to approximately 200°F, just shy of boiling.
- Insert a filter into your pour-over dripper and rinse it with hot water to eliminate any paper flavor.
- Use 1 gram of coffee for every 16 grams of water (approximately 2 tablespoons per 8-ounce cup).
- Gently pour water over the grounds in a circular motion, allowing it to bloom for 30 seconds, then continue pouring steadily until you’ve brewed the desired amount.
Green Tea
- Ingredients: 1 teaspoon loose-leaf green tea, water
- Instructions:
- Warm the water to around 175°F (allow boiled water to cool for 1–2 minutes).
- Place green tea leaves in a teapot or infuser.
- Gently pour hot water over the leaves and let them steep for 2–3 minutes.
- Strain and serve right away.
Honey Lemon Ginger Tea
- Ingredients: 1-inch piece of fresh ginger (sliced), 1 tablespoon honey, 1–2 lemon slices, water
- Instructions:
- Bring water to a boil.
- Place ginger slices in a cup and pour hot water over them.
- Allow it to steep for 5–7 minutes, then stir in honey and add lemon slices.
- Mix well and enjoy this comforting drink, ideal for chilly days.
These suggestions and recipes unlock the kettle’s full potential, elevating your coffee and tea experience!

A Cleaning guide
- Daily Cleaning:
- After using, disconnect the kettle and allow it to cool completely.
- Rinse the inside with warm water to clear out any remaining water or residue. Do not immerse the kettle or its base in water.
- Gently wipe the outside with a soft, damp cloth to preserve the matte black finish.
- Deep Cleaning (Weekly or as Needed):
- Descale the Kettle:
- Combine equal amounts of white vinegar and water (1:1 ratio) and fill the kettle to about half.
- Boil the mixture and allow it to sit for 15–20 minutes to dissolve mineral buildup.
- Dispose of the solution, rinse the kettle thoroughly with clean water, and bring fresh water to a boil once or twice to remove any vinegar leftovers.
- Stubborn Mineral Deposits:
- For stubborn limescale buildup, use a soft brush or non-abrasive sponge to gently scrub the inside after soaking it in the vinegar solution.
- Descale the Kettle:
- Clean the Spout:
- To clean the spout, run a warm water and mild dish soap mixture through it, or use a slender bottle brush to eliminate any residue inside.
- Maintenance for the Base:
- Use a dry or lightly damp cloth to wipe the base and connection points. Make sure both the base and kettle are fully dry before reconnecting.
- Polish the Exterior:
- Wipe the matte black finish with a microfiber cloth to keep it smooth and free of streaks or fingerprints. Avoid abrasive sponges or cleaners that might scratch the surface.
Tips:
- Refrain from using strong chemicals, steel wool, or abrasive cleaning tools that may harm the kettle’s finish.
- Consistent cleaning helps prevent mineral deposits and ensures the kettle runs smoothly while preserving its stylish look.

What to avoid when using the Bodum 27oz Bistro Gooseneck Electric Water Kettle
- Overfilling the Kettle:
- Do not fill past the maximum line (27 ounces). Overfilling can cause water to spill during boiling, which could damage the kettle or lead to burns.
- Heating Without Water:
- Never switch on the kettle when it’s empty, as this can trigger the boil-dry protection or gradually damage the heating element.
- Submerging in Water:
- Avoid submerging the kettle or its base in water or placing it under running water, as this may damage the electrical parts and render the kettle unsafe.
- Using Harsh Cleaning Tools:
- Steer clear of abrasive sponges, steel wool, or harsh chemical cleaners on the kettle, as they can scratch or damage the stainless steel and matte black finish.
- Boiling Non-Water Liquids:
- Only use the kettle to heat water. Boiling milk, tea, coffee, or other liquids can create tough-to-remove residues that may impact the kettle’s performance.
- Leaving Water Inside:
- Do not leave water in the kettle for extended periods, as it can lead to mineral buildup and alter the taste of future brews. Always empty and rinse it after use.
- Touching the Kettle During Use:
- Avoid contact with the stainless steel body while the kettle is in use or shortly after boiling, as the exterior can get hot and cause burns. Use the heat-resistant handle to handle it safely.
- Pulling the Cord Roughly:
- Refrain from tugging on the power cord when disconnecting the base. Always grasp the plug to prevent harm to the cord or base.
- Blocking the Spout or Lid:
- Avoid blocking the gooseneck spout or covering the lid while the kettle is in use, as this can create pressure and cause hot water to splash.
By following these measures, you can enhance your kettle’s longevity and safety, while enjoying an optimal brewing experience.
In conclusion, the Bodum 27oz Bistro Gooseneck Electric Water Kettle is a stylish, durable, and efficient tool perfect for coffee and tea lovers. Its precise gooseneck spout, ergonomic design, and quick heating make it ideal for brewing. With proper care and usage, it ensures consistent performance and elevates your beverage experience.