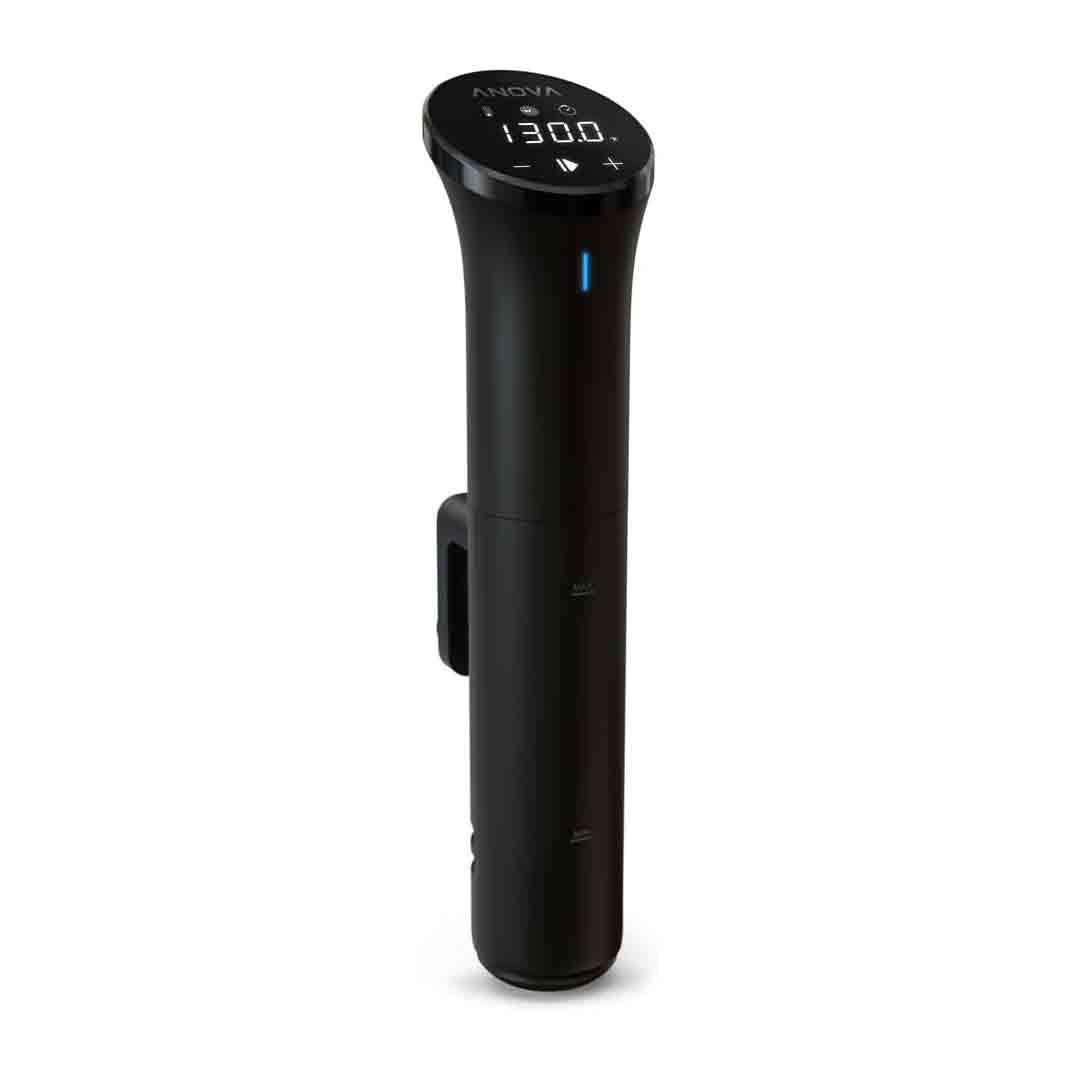
The Anova Nano 2.0 is a compact sous-vide circulator built for home cooking precision. Its sleek wand-style design attaches securely to any pot, circulating water to hold a consistent temperature for long durations. It offers adjustable heat settings from 32 °F to 197 °F (0 °C to 92 °C), allowing you to prepare everything from vegetables and seafood to meats and poultry with ease.
In terms of performance, it offers impressive accuracy and consistency. Independent evaluations showed that it held water bath temperatures within roughly ±0.2 °F of the set point over extended periods — a level of precision ideal for home chefs. The only downside is that its heating rate is slower compared to some higher-wattage models, so it can take a bit longer to reach the desired temperature when heating larger water volumes.
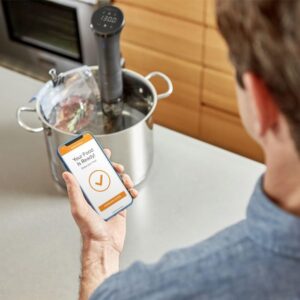
From a user-experience perspective, the Nano 2.0 combines intuitive onboard controls with Bluetooth app connectivity, making it simple for beginners yet flexible enough for those who prefer remote operation. However, some reviewers mention that its clamp design and compact build can limit use with extra-large or deep containers, and the Bluetooth range isn’t as strong or stable as that of WiFi-enabled alternatives. Still, for those seeking precise sous-vide cooking without a premium price tag, the Anova Nano 2.0 remains a compelling and cost-effective option.
Specification
Temperature Range: 0 °C to 92 °C (32 °F to 197 °F) with ±0.1 °C (±0.2 °F) accuracy.
Power: 750 Watts.
Flow Rate: 8 L/min (litres per minute) as per manufacturer specs.
Dimensions: 78 mm (W) x 105 mm (D) x 325 mm (H) (≈ 3.07″ W × 4.1″ D × 12.8″ H).
Weight: approx. 0.63 kg (1.39 lbs) per manufacturer.
Materials & Finish: Plastic + stainless steel; unit is IPX7 rated for water & splash resistance.
Connectivity: Bluetooth BLE 4.2 (iOS & Android app support).
Minimum immersion water level sensor: Minimum water depth needed before shut-off is built in.
Colour & Model: Black, Model AN400-US00.
Warranty: 2-year manufacturer warranty.
Key Features
Here are the key features of the Anova Culinary Sous Vide Precision Cooker Nano 2.0:
- Precision temperature control: It maintains water bath temperature to within about ±0.1 °C (±0.2 °F).
- Wide temperature range: Operates within a temperature range of about 0 °C to 92 °C (32 °F to 197 °F), allowing you to prepare a wide variety of foods, from fresh vegetables to perfectly cooked steaks.
- Compact, space-saving design: Standing at about 12.8 inches (325 mm) tall and featuring a clip-on design for attachment to a pot, it’s compact enough for small kitchens and convenient to store in a drawer.
- Bluetooth connectivity & companion app: Operated through the Anova Culinary app for iOS and Android via Bluetooth, allowing you to manage and monitor your cooking remotely.
- Good circulation and stable water bath performance: In testing, it circulated dye evenly within about 48 seconds and kept water temperatures remarkably stable over extended periods.
- Durable, easy-to-clean build: Constructed from a blend of plastic and stainless steel, and rated IPX7 for water resistance, offering durability and protection against splashes.
- Fixed clamp mounting onto a pot/container for immersion: Simple to mount, making it suitable for most standard stock pots.
- App recipe library and guided cooking: The app offers access to thousands of recipes, making sous-vide cooking easier and more approachable for home users.
How to use the Anova Culinary Sous Vide Precision Cooker Nano 2.0
Here’s a clear step-by-step guide on how to use the Anova Culinary Sous Vide Precision Cooker Nano 2.0 (and sous-vide cooking in general) — it’ll help you get great results even if you’re new to the method:
1. Setup the water bath & device
- Fill a heat-resistant pot or deep container with enough water to cover the circulator’s minimum fill line.
- Secure the Nano 2.0 to the side of your container using its built-in clamp, ensuring the water level stays between the “min” and “max” indicators on the device.
- Turn on the unit and adjust the target temperature based on your recipe (e.g., 54 °C for medium-rare steak) using either the built-in controls or the mobile app.
- Allow the water to heat up until it reaches your chosen temperature. The circulator should stay active to maintain a stable water bath.
2. Prepare the food & cook
- Season your ingredients—whether it’s meat, seafood, or vegetables—as you normally do. Then place them in a vacuum-sealed or durable, heat-resistant zip bag, making sure to remove excess air using a vacuum sealer or the water displacement method.
- When the water bath reaches the desired temperature, lower the sealed bag into the water, making sure it’s completely submerged. If it floats, add a small weight to keep it fully immersed.
- Adjust the cooking time based on the type and thickness of your food. Sous-vide cooking generally requires longer durations than traditional techniques but delivers uniform and reliable results.
- Allow the Nano 2.0 to keep the water steady at the exact cooking temperature for the entire duration.
3. Finish & serve
- When the cooking cycle finishes, take the bag out of the water bath. For items such as steak or pork chops, gently pat the surface dry before serving or searing.
- For most proteins, give them a brief finish by searing in a hot skillet or on a grill for 30–60 seconds per side to enhance flavor and texture. This final step completes the sous-vide process.
- Serve right away, or if you’ve prepared it in advance, chill the sealed bag in an ice bath and store it in the refrigerator. When ready to eat, reheat in the sous-vide water bath before finishing.
- After cooking, power off and detach the immersion circulator. Clean it following the manufacturer’s guidelines—this usually means wiping the exterior and descaling if required—then store it safely for future use.
Tips and recipes suitable for the Anova Culinary Sous Vide Precision Cooker Nano 2.0
Here are some expert tips and delicious recipes perfectly suited for the Anova Culinary Sous Vide Precision Cooker Nano 2.0:
Pro Tips for Using Your Anova Nano 2.0
- Preheat before sealing – Always allow the water bath to reach the desired temperature before adding your food. This guarantees consistent and even cooking throughout.
- Use high-quality bags – Vacuum-sealed pouches or BPA-free freezer-grade zip bags are ideal. Eliminate as much air as possible to keep the bag from floating during cooking.
- Keep it submerged – If the bags start to float, secure them to the pot’s edge with clips or weigh them down using stainless steel sous-vide weights.
- Don’t overcrowd the pot – Make sure the water flows freely around each bag to promote uniform cooking.
- Finish with heat – Sous-vide cooking delivers precise doneness throughout, but you’ll still want to sear, grill, or torch meats afterward to create a flavorful golden crust.
- Use ice baths for storage – If you’re not serving right away, chill the cooked food in an ice bath before placing it in the refrigerator.
- Season lightly before, flavor boldly after – Simple seasoning with salt and pepper is all you need for sous-vide. Add sauces, glazes, or marinades after cooking to achieve the best flavor and presentation.
- Keep your Nano clean – Periodically operate the unit in a vinegar and water solution to eliminate mineral deposits.
Tried-and-True Sous Vide Recipes
Sous Vide Steak (Medium Rare)
- Temperature: 54 °C / 129 °F
- Time: 1.5 – 2 hours
- Steps: Season steak with salt, pepper, and herbs. Seal in a bag and cook. Pat dry, then sear 30 sec per side in a hot pan with butter and garlic.
- Result: Tender, edge-to-edge pink perfection.
Sous Vide Chicken Breast
- Temperature: 60 °C / 140 °F
- Time: 1.5 hours
- Steps: Season with olive oil, salt, pepper, and rosemary. After cooking, sear skin-side down in a skillet for crispiness.
- Result: Juicy, never-dry chicken with perfect texture.
Sous Vide Salmon
- Temperature: 50 °C / 122 °F
- Time: 45 minutes
- Steps: Place lemon, dill, and butter in the bag before sealing. Cook, then serve right away topped with fresh herbs or a delicate cream sauce.
- Result: Silky, tender salmon with restaurant-quality flavor.
Sous Vide Vegetables (Carrots, Broccoli, Asparagus)
- Temperature: 85 °C / 185 °F
- Time: 30 – 45 minutes
- Steps: Mix with butter, herbs, and a pinch of salt prior to sealing.
- Result: Vibrant color, perfect bite, and enhanced natural sweetness.
Sous Vide Eggs (Soft-Boiled Style)
- Temperature: 75 °C / 167 °F
- Time: 13 minutes
- Steps: Place the eggs, shells intact, directly into the water bath. Once cooked, crack them open for café-style soft eggs with rich, creamy yolks.
Cleaning Guide
Here’s a simple step-by-step guide on how to clean your Anova Culinary Sous Vide Precision Cooker Nano 2.0 safely and effectively:
After Each Use (Quick Clean)
- Unplug and cool down – Always disconnect the Nano 2.0 from power and allow it to cool fully before cleaning. Do not submerge the upper section or motor housing in water.
- Wipe the exterior – Gently clean the exterior with a soft, slightly damp cloth. Do not use abrasive cleaners or immerse the upper section in water.
- Clean the stainless-steel skirt and impeller area –
- Remove the detachable metal skirt by turning it counterclockwise.
- Clean the skirt and impeller under warm, sudsy water.
- Employ a small brush, such as a bottle brush or toothbrush, to clear away food particles.
- Dry thoroughly – Wash and thoroughly dry all detachable parts before putting them back together.
- Reattach the skirt – Line up and turn clockwise until firmly in place.
Monthly or Deep Cleaning (Descaling)
- Prepare a cleaning bath – Combine equal amounts of white vinegar and water in the cooking vessel.
- Run the Nano 2.0 – Attach it to the container, pour water up to the minimum mark, and adjust the temperature to roughly 60 °C / 140 °F.
- Circulate the solution for 20–30 minutes to dissolve mineral deposits inside the heater and pump system.
- Rinse and dry – Pour out the vinegar solution, rinse thoroughly with fresh water, and dry the device before storing.
Important Care Tips
- Do not immerse the top section (black housing) in water, as it houses the electronics.
- Do not use rough or abrasive pads, as they may damage the surface.
- Avoid bleach and harsh chemical cleaners, as they may harm internal parts.
- In regions with hard water, perform descaling more often, about every 2–3 weeks.
What to avoid when using the Anova Culinary Sous Vide Precision Cooker Nano 2.0
Here are the key things to avoid when using your Anova Culinary Sous Vide Precision Cooker Nano 2.0, to keep it working safely and efficiently:
1. Don’t submerge the top housing
- The top part of the Nano, containing the display and power cord, is not water-resistant.
- Only immerse the stainless-steel lower half. Submerging the top can harm electronics and void the warranty.
2. Avoid using shallow or unstable containers
- Always select a deep, heat-resistant container where water reaches the “MIN” mark but stays under the “MAX” line.
- Using shallow water or thin containers may cause temperature errors, overheating, or automatic shutdowns.
3. Don’t overcrowd the bath
- Overfilled bags prevent proper water circulation, which can cause uneven cooking.
- Keep gaps between the bags and make sure water can flow freely around them.
4. Don’t let the water drop below the minimum line
- The Nano 2.0 automatically shuts off when water is low, but running it dry may lead to overheating or internal damage.
- Keep an eye on the water level, particularly during extended cooking, since evaporation may reduce it.
5. Avoid harsh cleaning methods
- Avoid abrasive scrubbers, bleach, and dishwasher use on the Nano.
- Clean exclusively with mild soap and water, and keep the motor head dry.
6. Don’t plug in before placing it properly
- Always secure the unit to the pot before adding water to the correct level and plugging in.
- Connecting it too soon may cause accidental startup or overheating if the impeller isn’t underwater.
7. Avoid over-seasoning or open bags
- Using too much oil or spices can enter the water and create buildup on the Nano.
- Make sure bags are fully sealed to avoid water leaks.
8. Don’t ignore descaling
- When water looks cloudy or shows mineral spots, perform a vinegar-water cleaning cycle to prevent reduced performance.
In conclusion, the Anova Culinary Sous Vide Precision Cooker Nano 2.0 is a compact, reliable, and easy-to-use device that delivers precise, restaurant-quality cooking at home. With accurate temperature control and simple operation, it ensures consistently perfect results for any meal. Durable, efficient, and ideal for beginners or pros alike, it’s a smart choice for anyone looking to elevate their cooking with precision and ease.