WHALL Stainless Steel bread toaster

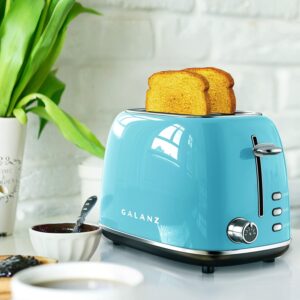
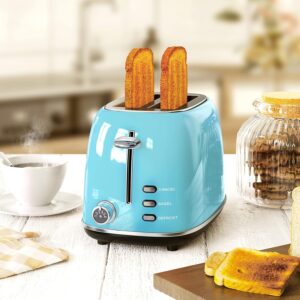
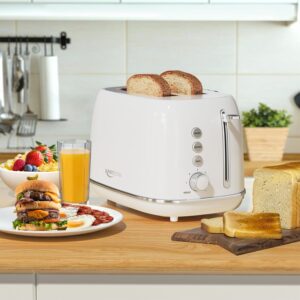
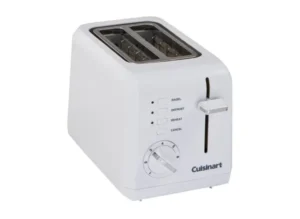
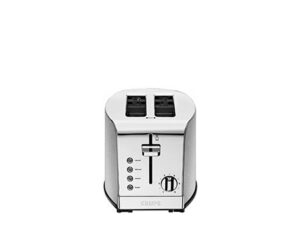
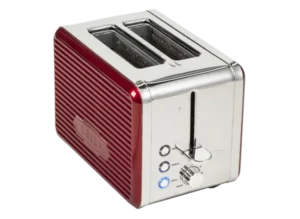
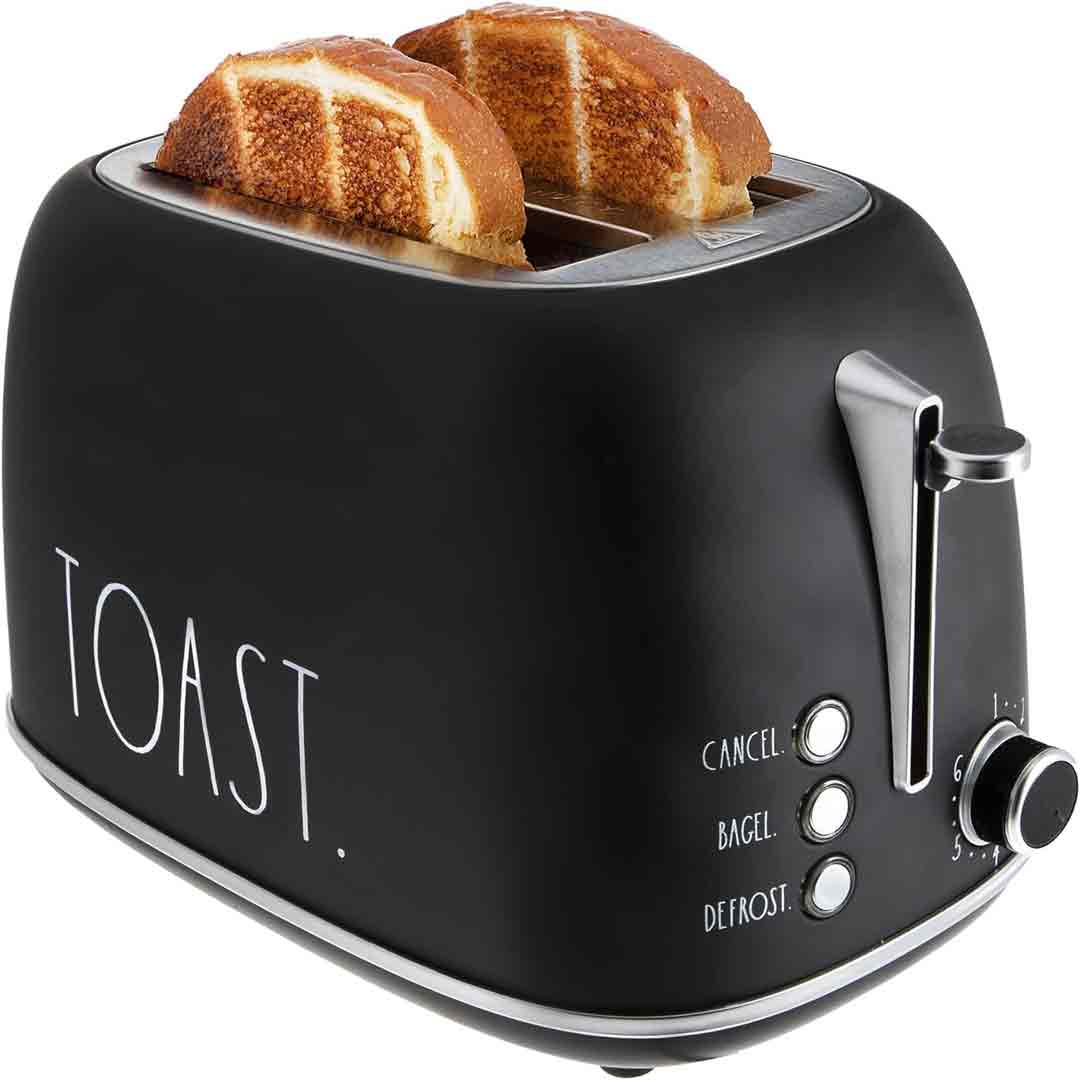
WHALL Toaster: Take Control of Your Toast with Style

Seeking a toaster with precise temperature control? The WHALL Stainless Steel Toaster boasts a whole range of features designed to give you perfect toast every time, no matter your bread preference. Let’s explore what makes this toaster such a valuable asset for your kitchen.

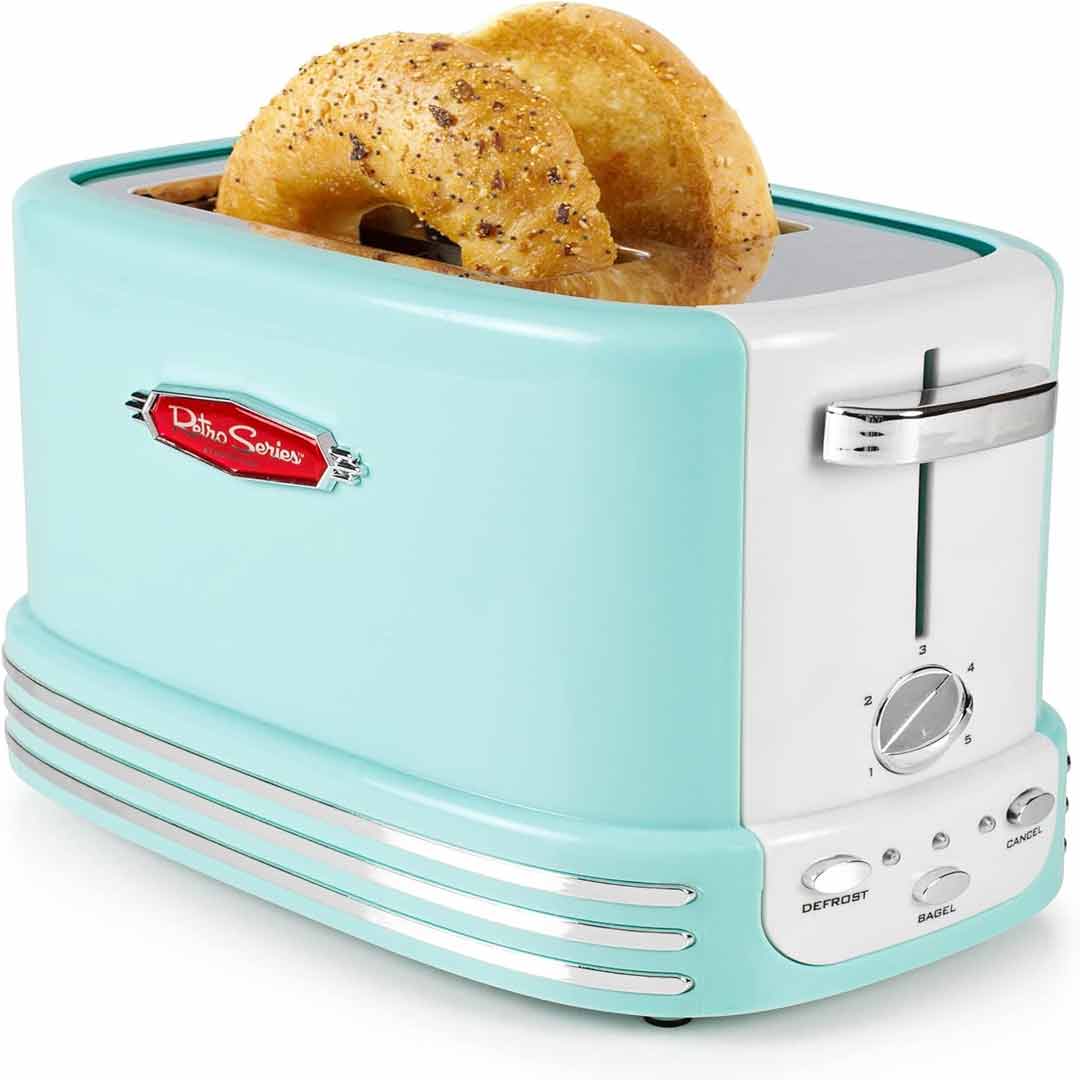
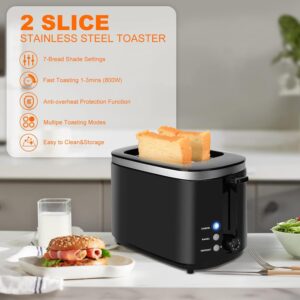
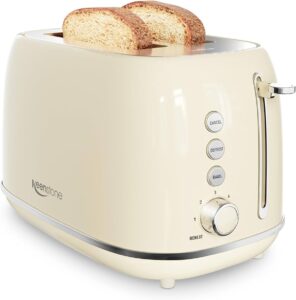
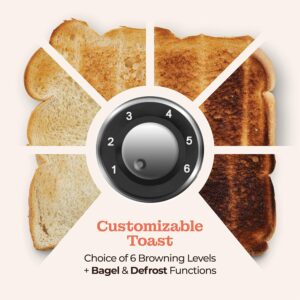
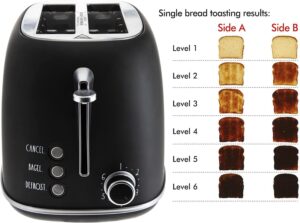
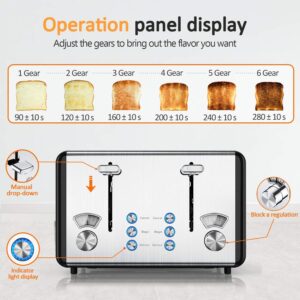
Precision Toasting: 6 Shade Settings

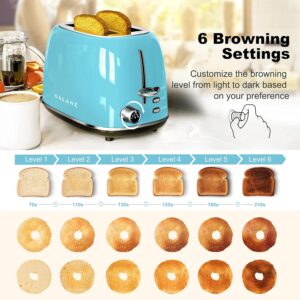
Waving goodbye to inconsistent toast! This 6-setting toaster empowers you to get the exact browning you crave. From a light and buttery breakfast slice to a dark and boldly flavored piece, this toaster caters to a wide range of preferences.

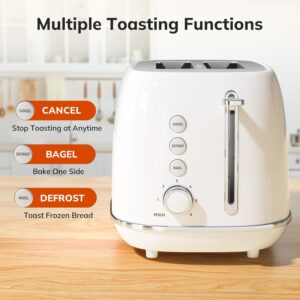
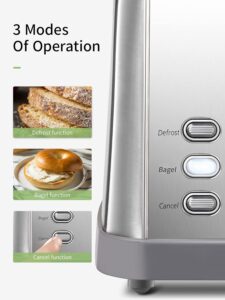
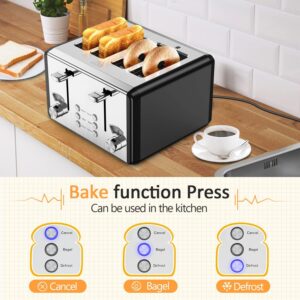
Beyond Bread: Bagel and Defrost Functions

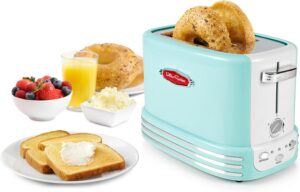
This WHALL toaster isn’t just for bread lovers. This toaster browns bagels to perfection, with a delightful contrast of textures. The defrost function lets you enjoy frozen waffles, pastries, or bread without the wait, thanks to its even-cooking capabilities.

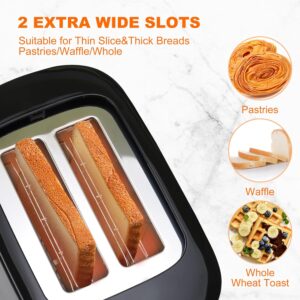
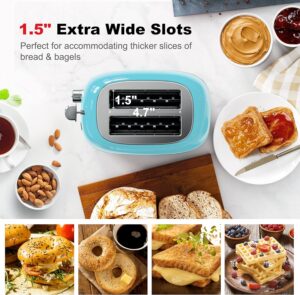
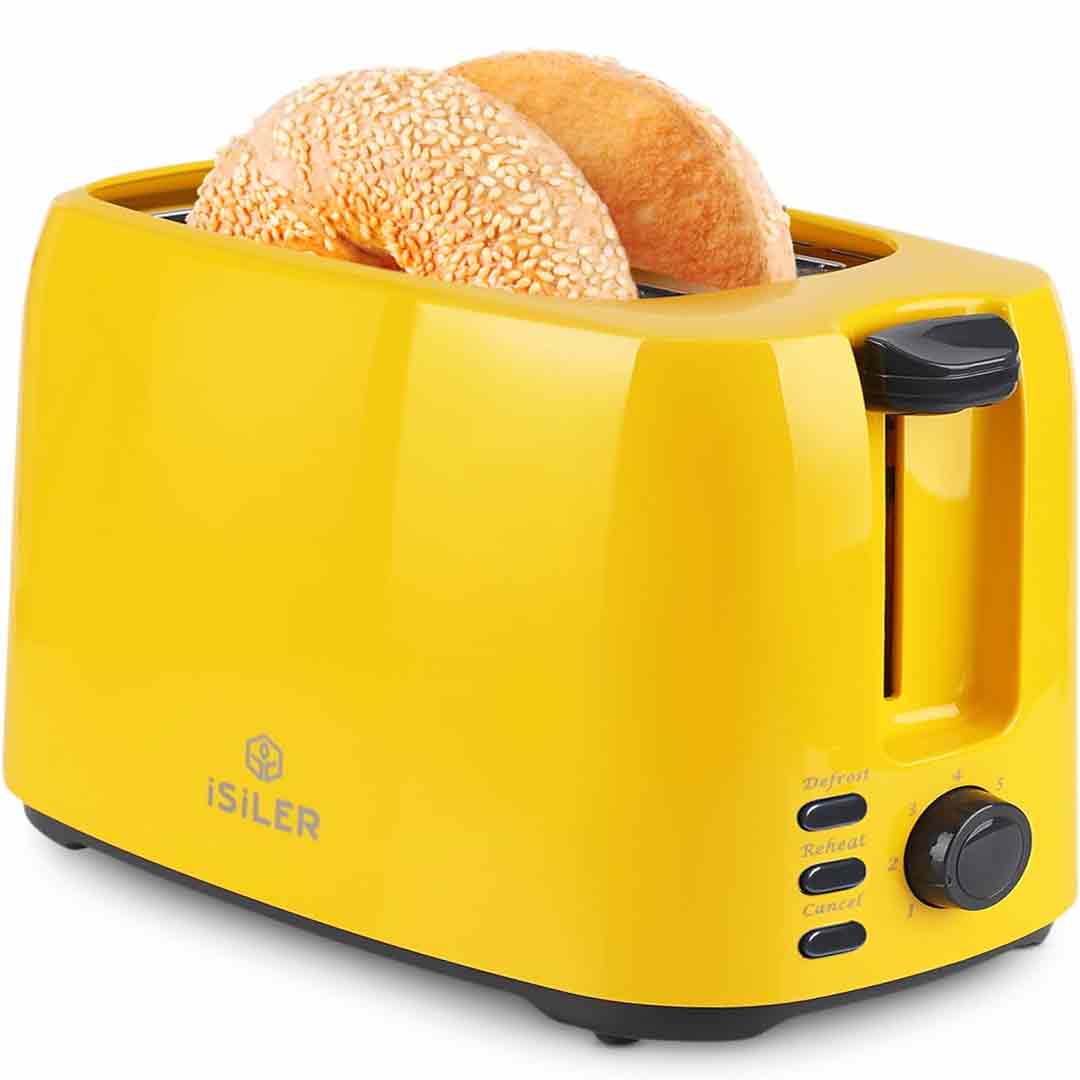
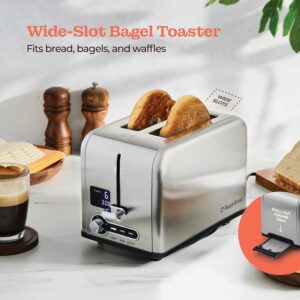
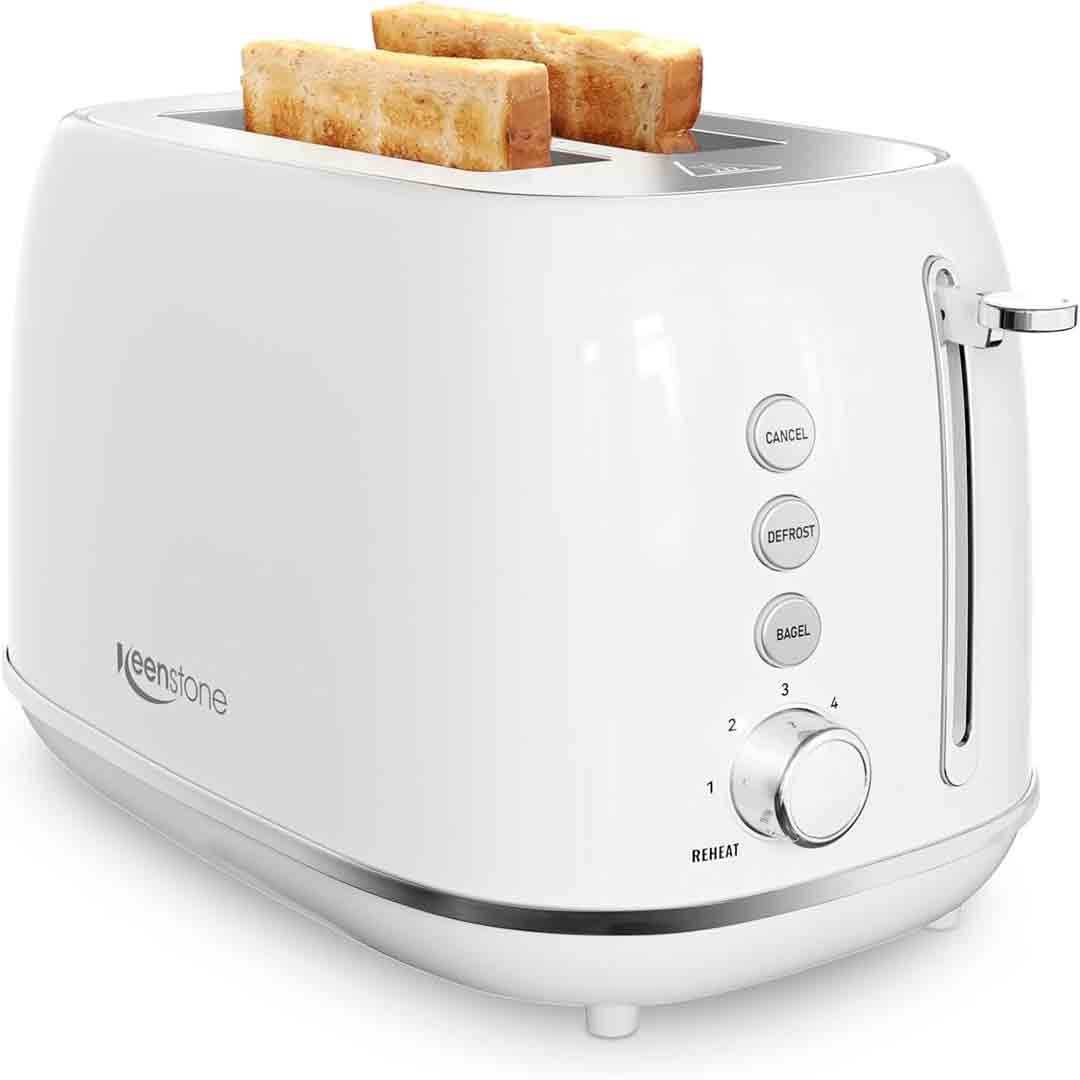
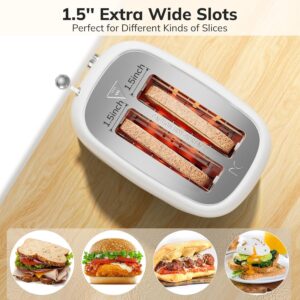
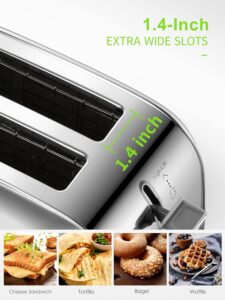
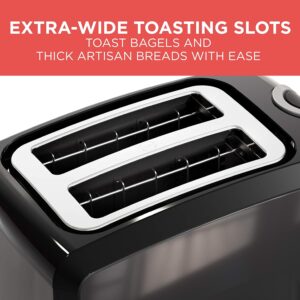
Wider Slots for Versatility

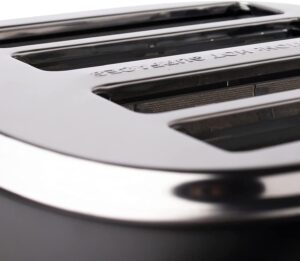
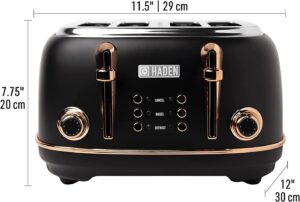
The 1.5-inch wide slots are perfect for thick bagels, Texas toast, and a variety of bread sizes. No more forcing slices in and risking uneven toasting or mangled bread.

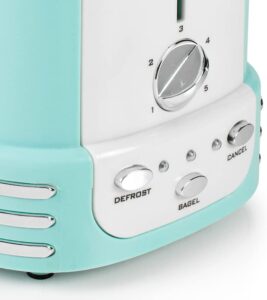
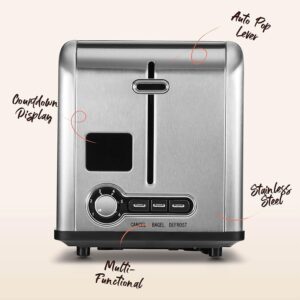
User-Friendly Features:

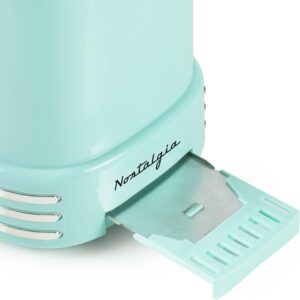
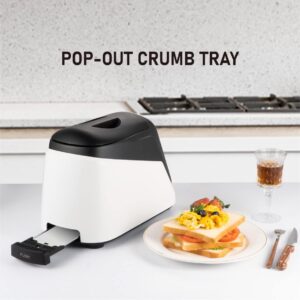
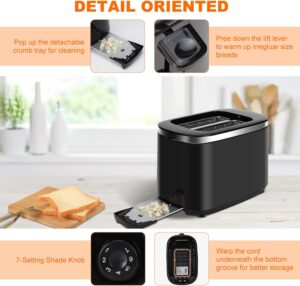
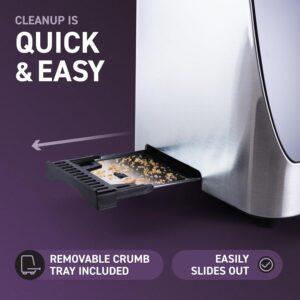
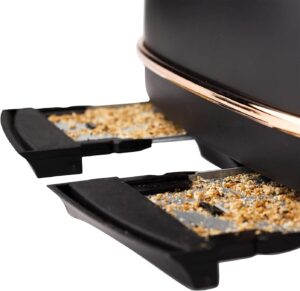
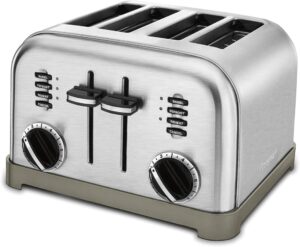
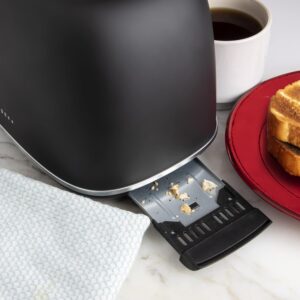
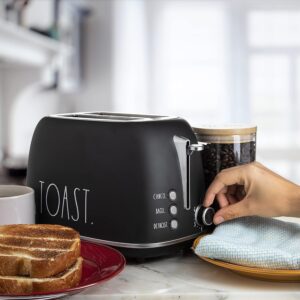
The WHALL toaster has a high-rise mechanism that allows for effortless removal of even the tiniest slices of bread. The pull-out crumb tray simplifies cleaning, and the stop button lets you interrupt the toasting cycle whenever needed.

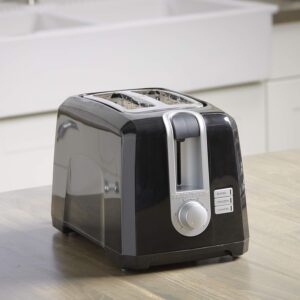
Sleek Design with a Touch of Modernity

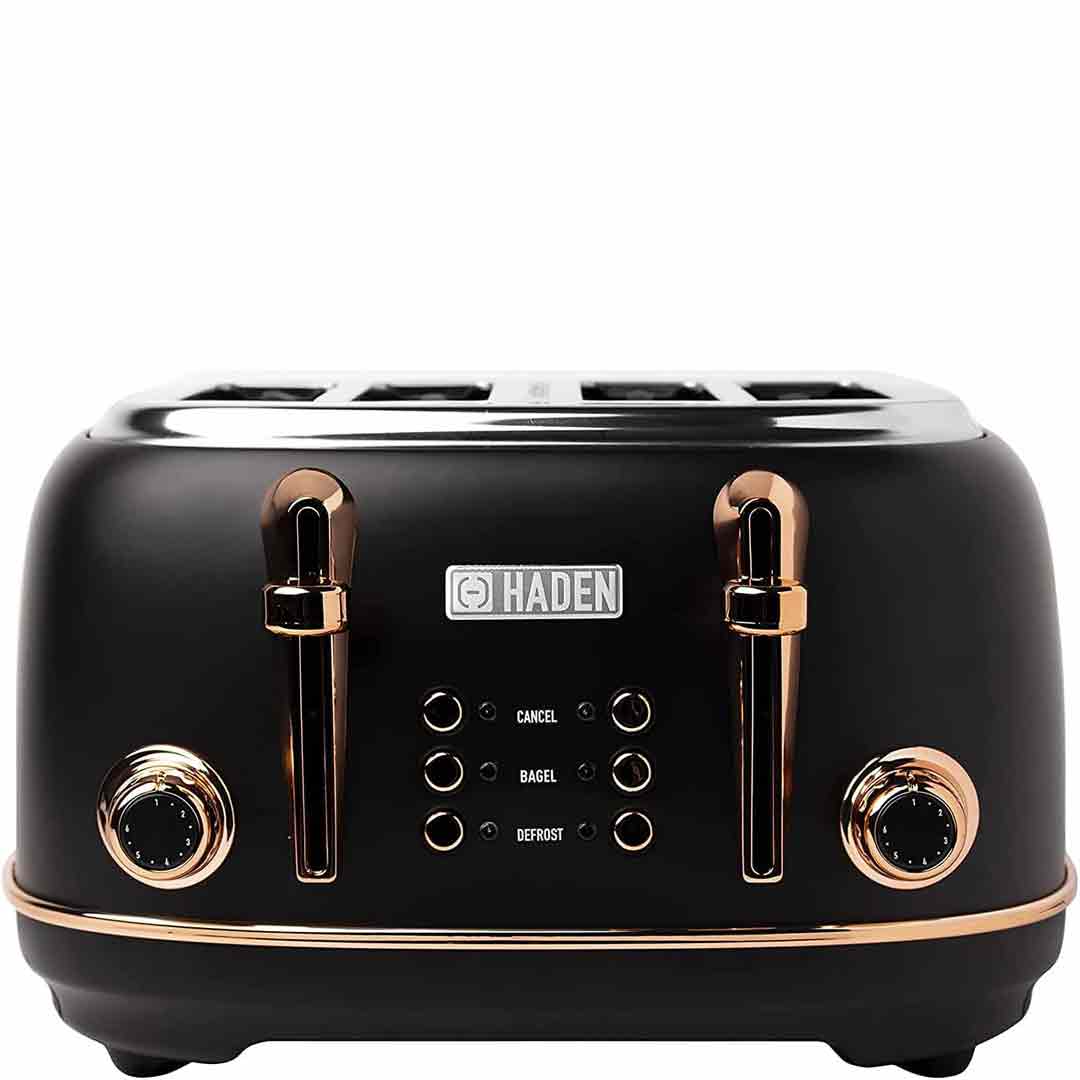
This toaster isn’t just functional, it’s also stylish. The sleek stainless steel exterior adds a sophisticated look to your kitchen, while the space-saving design ensures it won’t take up precious counter real estate.

The Verdict: Toast Like a Pro

The WHALL Stainless Steel Toaster empowers you to achieve your ideal toast, making it a great choice for discerning breakfasters. Boasting a comprehensive set of features, an intuitive design, and a stylish appearance, this toaster is built to last and become a reliable companion in your kitchen.

Is the WHALL Toaster Right for You?

Craving a toaster that elevates your bread-browning experience? The WHALL Stainless Steel Toaster is a compelling option. This toaster caters to all toasting preferences with its adjustable settings, wide slots, and user-friendly functions, making it a surefire way to achieve consistently perfect toast.


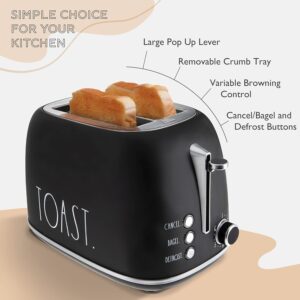
About the WHALL Stainless Steel bread toaster

Considering all it offers, the WHALL Stainless Steel Toaster sounds like a truly adaptable and user-friendly toaster that empowers you to create ideal toast consistently.Here’s a breakdown of its key features:

Toasting Control:

  • 6 Shade Settings: This feature offers a spectrum of browning options, from a subtle kiss of gold to a deep, delightfully crunchy toast. Unevenly toasted bread will be a thing of the past!

Bread Versatility:

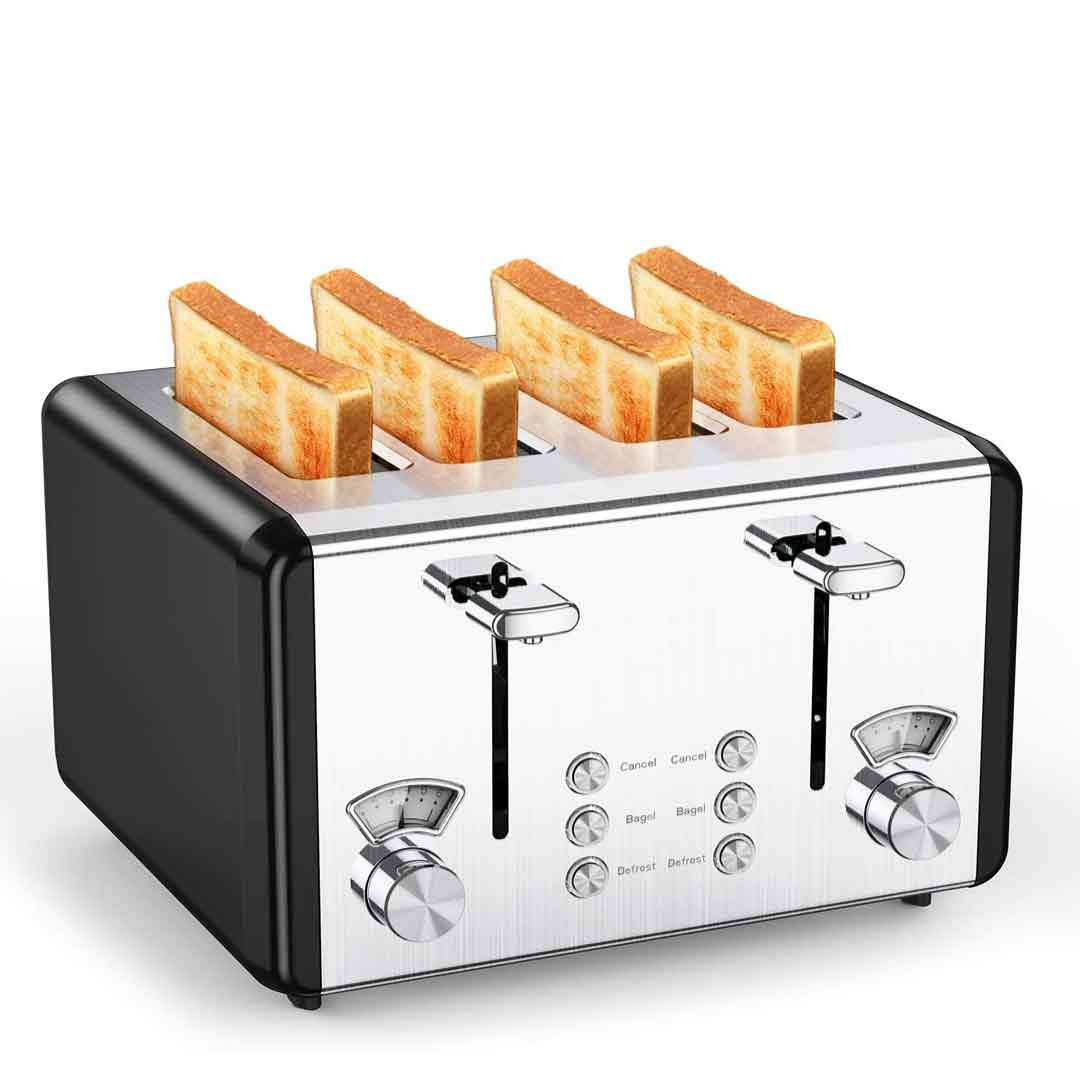
  • 1.5-Inch Wide Slots: These expansive slots are designed to fit a wider spectrum of bread types and sizes. From hefty bagels and Texas toast to standard sliced bread, everything fits perfectly without being crammed or inconsistently browned.

Special Functions:

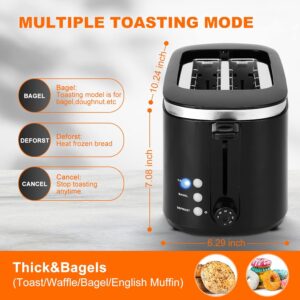
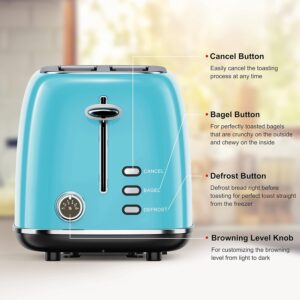
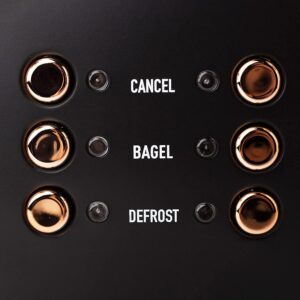
  • Bagel Function: With this setting, your bagels will emerge perfectly toasted, boasting a warm, chewy interior and a beautifully browned, crispy crust. Say goodbye to the frustration of unevenly toasted bagels!


  • Defrost Function: With this setting, you can toast frozen waffles, pastries, and even bread directly from the freezer. This function streamlines your mornings by toasting frozen items directly, guaranteeing consistent results throughout.

User-Friendly Design:

  • High Lift Lever: This handy lever lets you easily remove even the most miniature bread pieces, eliminating the risk of burnt fingers.


  • Removable Crumb Tray: The pull-out crumb tray simplifies cleaning in this toaster, as it catches all the crumbs for easy disposal.


  • Cancel Function: With this cancel function, you can save your toast from burning if you realize you’ve gone a bit overboard on the browning time.

Additional Considerations:

  • Stainless Steel Design: Boasting a streamlined and contemporary design, this toaster seamlessly integrates into any kitchen style.


  • Compact Design: This toaster’s compact design minimizes the footprint it occupies on your countertop.

However, it’s always a good idea to consider some potential drawbacks before you buy:

  • Some user reviews online mention that this toaster might toast a bit slower than some other models.

To sum up, The WHALL Stainless Steel Toaster could be your perfect match. It boasts versatility for various breads, user-friendly functions, and a sleek design. While it might toast a tad slower, this could be a minor trade-off for its well-rounded functionality, especially if counter space is at a premium.
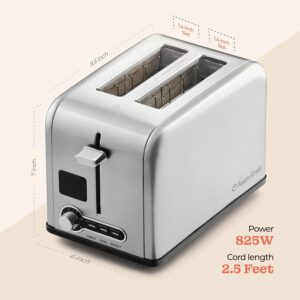
 

Specifications

  • Motor Power:

1500W

  • Color:

Silver

  • Dimensions:

13.7″D x 14.41″W x 7.8″H

  • Weight:

5.85 pounds

  • Material:

Stainless steel

  • Usage:

Indoor

  • Speed Control:

Fixed

  • Noise Level:

Low decibels

  • Display Type:

Analog

  • Storage Options:

Compact design

  • Adjustable Settings:

Yes

  • Timer Function:

Yes

  • Safety Features:

Auto shut-off

  • Usage Scenario:

Kitchen

  • Warranty Period:

1 year


Key Features

The WHALL Stainless Steel Toaster packs a punch with features that will transform your toast-making routine.Here’s a breakdown of its strengths:

Toasting Customization:

  • 6 Bread Shade Settings: This setting grants you complete control over browning, letting you achieve anything from a hint of gold to a rich, dark finish. No more mornings wasted with unevenly toasted bread!

Bread Versatility:

  • 1.5-Inch Wide Slots: These generously sized slots offer ample space for any bread type or thickness you throw their way.These versatile slots can accommodate anything you throw their way, from thick Texas toast to standard sandwich bread, all without sacrificing even browning.

Special Functions for Convenience:

  • Bagel Function: This bagel function guarantees irresistibly toasted bagels: a delightful balance of warm, soft centers and satisfyingly crisp crusts.It employs a special heating method to ensure even browning throughout, toasting both sides to achieve a consistent result.


  • Defrost Function: This convenient feature eliminates the need to thaw frozen breakfast items. Simply pop in waffles, pastries, or even bread straight from the freezer and enjoy perfectly toasted treats in no time.


  • Cancel Function: The cancel button is your safety net! Even if you misjudge the browning time, a quick press stops the cycle and saves your toast from burning.

User-Friendly Design:

  • High Lift Lever: This lever makes it easy to remove even the smallest pieces of bread without burning your fingers. No more struggling to fish out those tricky corners.


  • Removable Crumb Tray: Cleaning up is a breeze with this pull out tray that catches all the crumbs. Simply slide it out, empty it, and slide it back in for a clean toaster.

This overview highlights the WHALL Stainless Steel Toaster’s key features, showcasing its versatility and user-friendliness for your kitchen

How to use the WHALL Stainless Steel bread toaster

Here’s a general guide on how to use the WHALL Stainless Steel Toaster, based on common toaster functions and the features you described:

1. Prepare your bread: Select your favorite bread – no matter the size or thickness – these 1.5-inch wide slots can handle it all! If using frozen items, activate the defrost function beforehand.


2. Adjust the shade settings: Choose your ideal level of toasting with the 6-shade control panel. Lower settings produce a light golden hue, while higher settings deliver a deeper, crispier finish.


3. Special Functions (Optional):

  • Bagel Function: For perfectly toasted bagels, utilize the dedicated bagel button. This setting applies targeted heat to achieve a warm, soft center and a delightfully crisped exterior.


  • Defrost Function: For frozen breads or pastries, utilize the defrost function before choosing your desired browning level. This setting conveniently thaws the item while simultaneously toasting it.


4. Lower the bread carriage: Press the lever downwards to initiate the toasting cycle by lowering the bread carriage.


5. Cancel Function (Optional): In the event of accidentally selecting an excessively high shade setting or desiring to interrupt the toasting cycle prematurely, press the cancel button. This will raise the bread carriage, preventing your toast from burning.


6. Toasting Complete: Upon completion of the toasting cycle, the bread carriage will automatically elevate, signifying that your toast is ready for consumption.


7. Retrieve your toast: The high-lift lever facilitates the safe retrieval of your toast, preventing burns to your fingers.


8. Cleaning: For safe cleaning, always unplug the toaster and let it cool down completely. Then, simply remove the crumb tray for effortless disposal of crumbs.

Additional Tips:

  • For comprehensive cleaning instructions and any specific details related to your WHALL toaster model, refer to the user manual which can likely be found online.


  • For safety reasons, never insert oversized items or metal objects into the toaster slots. This will help prevent both damage to the appliance and potential fire hazards.


  • Never dip the toaster in water for cleaning.

By following these steps and considering the additional tips, you should be able to use your WHALL Stainless Steel Toaster for perfectly browned toast every time!


Tips and Recipes suitable for the WHALL Stainless Steel bread toaster

Tips for Using Your WHALL Stainless Steel Toaster:

Here are some tips to get the most out of your WHALL Stainless Steel Toaster:

  • First Use: To ensure a perfect toast experience right from the start, we recommend using a medium shade setting (around 3 or 4) for your first use. You can then fine-tune it to your liking in subsequent uses.


  • Even Browning: Place bread slices in the center of the slots for even browning on both sides.


  • Different Bread Types: Unlock the full potential of your toaster! Different breads, like the denser sourdough compared to the airy white bread, may require adjustments to the shade settings for perfect browning. Experiment and discover your ideal settings for each bread type.


  • Frozen Items: With frozen items, the defrost function will thaw and toast them in one go. However, toasting time can vary depending on thickness. Begin with a lower shade and check progress to avoid burning.


  • Cleaning: Crumb tray maintenance is key! Regular cleaning ensures a clean toaster and prevents burnt crumbs that could create smoke or pose a fire risk.

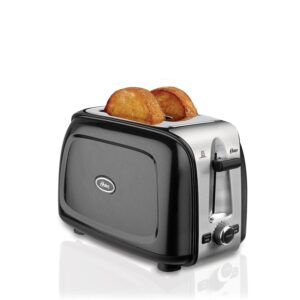
Recipes Suitable for the WHALL Toaster:

While your toaster is primarily for bread, it can be a multifunctional tool for quick and easy snacks or appetizers. Here are some recipe ideas that can be made using your WHALL toaster:

Savory Toasts:

  • Bruschetta: Transform baguette slices into crispy crostini by toasting them on a low setting. Drizzle with olive oil, top with a vibrant mix of diced tomatoes, fragrant garlic, and fresh basil for a timeless and flavorful appetizer.


  • Avocado Toast: Craft a wholesome and satisfying breakfast by toasting whole-wheat bread slices. Spread them with creamy mashed avocado, then add a delightful sprinkle of crumbled feta cheese, a burst of citrus with lemon juice, and a touch of heat with red pepper flakes.


  • Melted Cheese Toast: Toast any bread you love, top it with your melty cheese muse (cheddar, mozzarella, brie – the options are endless!), and toast on low until it reaches ooey-gooey bliss. Craving more? Feel free to add sliced ham or other toppings to create your perfect savory masterpiece.

Sweet Toasts:

  • Cinnamon Toast: Toast slices to a light golden brown, then spread with softened butter and sprinkle them with a fragrant cinnamon sugar mixture. Toast on low heat for a warm and comforting sweet snack.


  • Fruit and Cheese Toast: Toast your favorite bread to a golden crisp, then spread with creamy ricotta or mascarpone cheese. Pile on fresh, vibrant fruit slices like juicy strawberries, plump blueberries, or sliced bananas. Drizzle with honey or maple syrup for a touch of sweetness and a delightful textural contrast.


  • French Toast Sticks: Cut slices into sticks or squares, then gently coat them in a fragrant egg mixture infused with milk and vanilla extract. Toast on low heat until golden brown and cooked through, creating a crispy exterior and a soft, custard-like center. Drizzle with syrup, dust with powdered sugar, or top with fresh fruit for a delectable and customizable breakfast.

Remember:For safe toasting, stick to bread! Avoid using fillings or toppings that are prone to dripping or melting too much, as they could ignite inside the toaster.

By using these tips and recipe ideas, you can get the most out of your WHALL Stainless Steel Toaster and enjoy different kinds of delicious toasted treats!


A Cleaning guide

Here’s a step by step guide on how to clean your WHALL Stainless Steel Toaster:

Safety First:

  • Unplug the toaster: For safe cleaning, always unplug your toaster from the power outlet before you start.


  • Cool down completely:Patience is key! To avoid burns, wait for your toaster to cool completely before cleaning.

Cleaning Process:

1. Crumb Tray: The easiest clean-up starts here! Find the removable crumb tray at the toaster’s bottom. Simply slide it out and discard the crumbs in a trash bin.


2. Exterior: Stainless steel shines best with a gentle touch. Wipe the exterior with a damp cloth to remove everyday marks. For stubborn grime, a mild dish soap solution can work wonders. Just remember, harsh chemicals and scouring pads are a no-no, as they can damage the surface.


3. Interior (Optional): Direct water cleaning is a no-go for the toaster’s interior. But fear not! Here are some methods for dealing with any loose crumbs that may have accumulated inside. Here are two methods:

  • Unplug and Invert: While the toaster is unplugged and cool, carefully turn it upside down and gently shake it over a trash bin. This might removesome crumbs.


  • Bread Trick: Toast a slice of bread at the lowest setting (almost like a dry run). This can help absorb any loose crumbs inside the toaster. Discard the toasted bread after this cleaning process.

Drying:

  • Once you’ve finished cleaning, use a dry cloth to remove any leftover moisture from the exterior. Make sure the toaster air dries completely before plugging it back in.

Additional Tips:

  • For the most up-to-date cleaning tips, check out the WHALL toaster manual online (if available). Different models may have slight variations in their cleaning needs.


  • For optimal performance and to avoid fire hazards, make sure to clean the crumb tray regularly. This prevents crumbs from building up and potentially causing smoke or fire.


  • Never immerse the toaster in water for cleaning.

By following these steps, you can keep your WHALL Stainless Steel Toaster clean and ensure it functions properly for a long time.


What to avoid when using the WHALL Stainless Steel bread toaster

Here are some things to avoid when using your WHALL Stainless Steel Toaster to ensure safety and optimal performance:

Fire Hazards:

  • Oversized Items: For optimal toasting results, choose items that fit snugly within the slots. This helps prevent them from getting stuck and keeps your toaster functioning safely.


  • Metal Objects: For safe toasting, avoid metal! Knives, forks, and aluminum foil conduct electricity and can cause sparks or fire if placed in the toaster slots. 


  • Foil-Wrapped Items: Foil and toasters don’t mix! Wrapping food in foil before toasting can cause sparks and become a fire hazard.


  • Overfilled Toaster: For safe and even toasting, avoid overloading the slots. Cramming too much bread or other items can block airflow and lead to overheating.


  • Crumb Buildup: For optimal performance and to avoid fire hazards, make sure to clean the crumb tray regularly. This prevents excessive crumb buildup, which could ignite.

General Use:

  • Wet or Buttered Bread: For safe toasting, avoid using wet bread or bread with too much butter. The moisture can cause the toaster to malfunction or spark. For a safer option, toast your bread first, then add butter afterwards.


  • Unattended Toasting: For safe toasting, always supervise your toaster while it’s in use. This is especially important when trying a new bread type or using the defrost function for the first time.


  • Flammable Materials: For a safe and enjoyable toasting experience, make sure your toaster has plenty of space around it. Keep it away from flammable materials like curtains, dish towels, or paper products.


  • Cleaning with Water: Never submerge the toaster in water or any liquids. This can damage the electrical components and cause a hazard.


  • Forceful Ejection: Avoid damaging your toaster! Never use knives or utensils to pry out stuck bread. This can damage the interior and potentially cause electrical problems. If bread gets stuck, unplug the toaster first, let it cool completely, then carefully remove the bread.

Additional Tips:

  • For the most up-to-date safety information, be sure to check the online user manual for your specific WHALL toaster model (if available).


  • Power down for safety! Always remember to unplug your toaster when it’s not in use.

By following these precautions, you can enjoy safe and effective use of your WHALL Stainless Steel Toaster for many delicious toasty treats.

In conclusion, If you crave perfectly toasted bread with options, the WHALL Stainless Steel Toaster is a strong contender. It offers 6 shade settings, wide slots for various breads, bagel and defrost functions, and a user-friendly design. While the exact specifications are unavailable and WHALL might be a lesser-known brand, this toaster seems like a well-rounded choice for those who prioritize control and functionality over brand recognition. Consider the price and number of slices (2 or 4) you need before deciding.

bread maker, bread, home appliances

7 Essential Home Appliances for Making Bread at Home

In the warm embrace of your kitchen, the smell of freshly baked bread is an invitation to simple pleasures. Whether you’re a seasoned baker or a novice exploring the world of dough and yeast, having the right home appliances can transform your bread-making experience. Today, we’re diving into seven must-have home appliances for making bread at home. These tools not only simplify the process but also allow you to experiment with a variety of bread types and textures. Let’s explore how each one works and why it deserves a spot in your kitchen.

the oven

1. The Oven: The Traditional Bread-Baking Marvel

The oven is the quintessential tool for bread making. Whether you have a conventional oven, convection oven, or even a high-tech steam oven, it provides the ideal environment for baking bread. The consistent heat and spacious interior allow you to bake multiple loaves or large batches at once.

How It Works: An oven works by using dry heat, typically ranging from 350°F to 475°F (175°C to 245°C), which envelops the dough and cooks it evenly. For bread, it’s crucial to preheat the oven to ensure it reaches the correct temperature before placing the dough inside. Some ovens come with a steam function, which is perfect for creating a crispy crust while keeping the inside moist.

Pro Tip: Place a pan of water at the bottom of the oven while baking bread. The steam helps achieve a crusty exterior and soft, airy interior, a hallmark of perfect homemade bread.


Bread Maker The Automated Bread Baking Genius

2. Bread Maker: The Automated Bread Baking Genius

For those who love convenience and consistency, a bread maker is a game-changer. This all-in-one machine mixes, kneads, proofs, and bakes your bread with minimal effort on your part.

How It Works: Simply add your ingredients—flour, water, yeast, and salt—into the bread maker, select the desired program, and let the machine do the rest. It follows a programmed cycle that includes kneading the dough, allowing it to rise, and baking it to perfection. You can choose from various settings to make different types of bread, including white, whole wheat, gluten-free, and even speciality breads like sourdough.

Pro Tip: Experiment with different add-ins like seeds, nuts, or dried fruits to create unique bread flavours. Most bread makers have a beep to alert you when it’s time to add these extras.


Air Fryer

3. Air Fryer: The Quick and Crisp Bread Solution

The air fryer isn’t just for frying; it’s a versatile appliance that can bake bread quickly and efficiently. Its compact size and rapid air circulation make it an excellent choice for smaller batches or quick breads.

How It Works: An air fryer circulates hot air around the dough at high speeds, creating a crispy outer layer while cooking the inside evenly. This method is great for making mini loaves, bread rolls, or even breadsticks. The key is to preheat the air fryer and ensure you have a suitable baking pan that fits inside.

Pro Tip: Use the air fryer for bread recipes that require a shorter baking time, such as banana bread or quick bread. The result is a crispy crust with a moist interior in a fraction of the time it would take in a conventional oven.


Stand Mixer

4. Stand Mixer: The Kneading Powerhouse

While not a baking appliance per se, a stand mixer is indispensable for anyone serious about bread making. Its powerful motor and dough hook attachment makes quick work of kneading, saving you time and effort.

How It Works: After combining your ingredients, the stand mixer’s dough hook kneads the dough, developing the gluten network essential for bread’s structure and texture. You can set the mixer to different speeds, allowing you to control the kneading process precisely. This is especially useful for recipes that require long kneading times, like sourdough or brioche.

Pro Tip: Start kneading on a low speed to combine the ingredients, then gradually increase to a medium speed. This ensures the dough is kneaded evenly without overheating the mixer.


Waffle Maker as bread maker sub

5. Waffle Maker: The Unexpected Bread Delight

Surprisingly, a waffle maker can be a fantastic tool for making unique bread-like creations. It’s perfect for quick, individual servings and adds a fun twist to your bread-making routine.

How It Works: Simply pour your bread dough or batter onto the waffle maker and close the lid. The appliance cooks the dough from both sides simultaneously, resulting in a crispy exterior and fluffy interior. This method works wonderfully for creating flatbreads, focaccia, or even savoury bread waffles with herbs and cheese.

Pro Tip: Use a non-stick spray or brush the waffle plates with oil to prevent sticking. Experiment with adding toppings like shredded cheese or garlic butter before closing the waffle maker for an extra burst of flavour.


Dutch Oven as bread maker sub

6. Dutch Oven: The Artisan Bread Essential

A Dutch oven is perfect for baking rustic, artisan-style bread. Its heavy, thick walls and tight-fitting lid create an ideal environment for making bread with a crusty exterior and soft, chewy interior.

How It Works: Preheat the Dutch oven to your conventional oven to ensure it’s hot when you add your dough. The high heat and steam trapped inside the pot help create a beautiful crust. The heavy lid keeps the moisture in, which is crucial for developing a great crust. Once the bread has baked for a while with the lid on, you can remove it to allow the crust to brown further.

Pro Tip: Use parchment paper to transfer the dough into the hot Dutch oven to avoid burns and sticking. Sprinkle some flour or cornmeal on the bottom of the pot for added texture and flavour.

 Slow Cooker


7. Slow Cooker: The Low-and-Slow Bread Maker

A slow cooker might not be the first appliance that comes to mind for bread making, but it’s excellent for a hands-off approach and can produce surprisingly good results.

How It Works: After preparing your dough, place it in a parchment-lined slow cooker. Set it on high for 2–3 hours. The slow cooker provides a moist cooking environment, which is perfect for bread that requires a longer, gentle bake. The result is a soft, slightly dense loaf with a golden crust.

Pro Tip: Place a kitchen towel or paper towel under the lid to absorb any excess moisture and prevent it from dripping onto the bread. This ensures better crust formation.

Breadmaking at home is a delightful and rewarding experience, made even better with the right tools. From the traditional oven and innovative air fryer to the versatile waffle maker and the steady slow cooker, each appliance offers unique advantages. Whether you’re looking for quick solutions or aiming to create artisan masterpieces, these seven essential home appliances for making bread will elevate your baking game and bring the joy of homemade bread into your kitchen.

Remember, the key to great bread is not just in the recipe but in the equipment you use. So, equip your kitchen with these tools and start baking your way to delicious, homemade bread today.

Check out our Products
FOLLOW US ON INSTAGRAM

15 Top-Rated Bread Makers on Amazon by Buyer Reviews

Are you a bread enthusiast who loves the idea of fresh, homemade bread but isn’t sure where to start? Or perhaps you’re an experienced baker looking for the best bread maker to elevate your baking game. In this post, we’ll explore 15 top-rated bread makers on Amazon that have garnered rave customer reviews. From budget-friendly options to high-end machines with all the bells and whistles, there’s something for everyone. Dive in to discover the perfect bread maker to suit your needs!


Elite Gourmet Maxi-Matic Bread Maker

15. Elite Gourmet Maxi-Matic Bread Maker
⭐⭐⭐⭐ (4.1/5)

The Elite Gourmet Maxi-Matic is an affordable option without compromising features. It offers 19 settings and a large LCD display, making it perfect for those looking to make a variety of bread types without breaking the bank.

Why Buyers Love It:

  • Budget-friendly
  • Multiple settings
  • Easy to operate


Aicok Bread Maker

14. Aicok Bread Maker
⭐⭐⭐⭐ (4.2/5)

Aicok’s bread maker is praised for its user-friendly interface and 15-hour delay timer, making it convenient for busy schedules. It comes with 19 automatic programs, including gluten-free and whole-wheat options.

Why Buyers Love It:

  • Easy to use
  • Delay timer
  • Good for various recipes


kbs pro stainless steel bread machine

13. KBS Large 17-in-1 Bread Machine
⭐⭐⭐⭐ (4.4/5)

The KBS bread machine stands out with its stainless steel design and a 17-in-1 preset menu, perfect for those who want to experiment with different recipes, from basic white bread to sweet cakes and jams.

Why Buyers Love It:

  • Sleek design
  • Wide range of settings
  • Durable


Secura Bread Maker Machine

12. Secura Bread Maker Machine
⭐⭐⭐⭐ (4.3/5)

The Secura bread maker features 19 preset menus and a fruit and nut dispenser, making it easy to bake a wide variety of breads and cakes. The stainless steel exterior also adds a touch of elegance to your kitchen.

Why Buyers Love It:

  • Wide variety of settings
  • Fruit and nut dispenser
  • Easy to use


Sunbeam 2-Pound Bread Maker

11. Sunbeam 2-Pound Bread Maker
⭐⭐⭐⭐ (4.2/5)

The Sunbeam 2-pound bread maker is a budget-friendly option that doesn’t skimp on features. It offers 12 baking functions and a large viewing window, making it easy to monitor the baking process.

Why Buyers Love It:

  • Economical
  • Multiple baking functions
  • large viewing window


T-fal ActiBread Bread Maker

10. T-fal ActiBread Bread Maker
⭐⭐⭐⭐ (4.3/5)

The T-fal ActiBread is noted for its easy-to-use controls and the ability to make a variety of breads, including gluten-free and whole wheat. It has 15 preprogrammed settings and a non-stick pan for easy cleaning.

Why Buyers Love It:

  • User-friendly
  • Variety of settings
  • Gluten-free options


SKG Automatic Bread Machine

9. SKG Automatic Bread Machine
⭐⭐⭐⭐ (4.4/5)

The SKG bread machine is an affordable option that comes with a 15-hour delay timer and a keep-warm function, allowing you to bake bread on your schedule. It has 19 automatic programs and an easy-to-use touch panel.

Why Buyers Love It:

  • Great value for money
  • Delay timer for convenience
  • Keep-warm function


Cuisinart CBK-110 Compact Automatic Bread Maker

8. Cuisinart CBK-110 Compact Automatic Bread Maker
⭐⭐⭐⭐ (4.5/5)

Another great compact option from Cuisinart, the CBK-110 offers 12 preprogrammed settings and a sleek design that fits well in any kitchen. It’s perfect for smaller households and offers three loaf sizes.

Why Buyers Love It:

  • Space-saving design
  • Easy to operate
  • Affordable


Zojirushi BB-HAC10 Mini Bread Maker

7. Zojirushi BB-HAC10 Mini Bread Maker
⭐⭐⭐⭐⭐ (4.7/5)

Ideal for smaller kitchens, the Zojirushi BB-HAC10 is compact yet powerful. It’s perfect for making smaller loaves and offers multiple settings, including a dough cycle and a cake cycle, making it versatile despite its size.

Why Buyers Love It:

  • Compact and efficient
  • Ideal for small loaves
  • High-quality bread


Panasonic SD-YD250 Automatic Bread Maker


6. Panasonic SD-YD250 Automatic Bread Maker
⭐⭐⭐⭐ (4.3/5)

This Panasonic model is praised for its reliability and durability. It has a yeast dispenser for perfect bread every time and offers multiple baking modes, including settings for basic bread, French bread, and pizza dough.

Why Buyers Love It:

  • Reliable and durable
  • Convenient yeast dispenser
  • Versatile baking modes


Oster Expressbake Bread Maker

5. Oster Expressbake Bread Maker
⭐⭐⭐⭐ (4.4/5)

Oster’s Expressbake is known for its quick baking cycle, allowing you to have fresh bread in under an hour. It includes 12 settings and a large LCD display for easy operation. It’s great for those who need bread quickly without compromising on quality.

Why Buyers Love It:

  • Fast baking cycle
  • Easy to use
  • Good value for money


Hamilton Beach 29882 Bread Maker

4. Hamilton Beach 29882 Bread Maker
⭐⭐⭐⭐ (4.5/5)

This affordable bread maker is perfect for those who are new to bread making. It has a compact design and offers 12 settings, including a gluten-free option and a jam cycle, making it a versatile addition to your kitchen.

Why Buyers Love It:

  • Budget-friendly
  • Compact and easy to store
  • Simple to use


Cuisinart CBK-200 Convection Bread Maker

3. Cuisinart CBK-200 Convection Bread Maker
⭐⭐⭐⭐⭐ (4.6/5)

Cuisinart’s CBK-200 is a reliable and budget-friendly option that does not compromise on quality. It comes with 16 preprogrammed menu options, including gluten-free, low-carb, and artisan bread settings, making it perfect for beginners and seasoned bakers alike.

Why Buyers Love It:

  • Affordable yet high-quality
  • Multiple menu options
  • Convection fan for even baking


Breville BBM800XL Custom Loaf Bread Maker

2. Breville BBM800XL Custom Loaf Bread Maker
⭐⭐⭐⭐⭐ (4.7/5)

The Breville BBM800XL stands out for its custom loaf-size feature and smart LCD display. It offers settings for various types of bread, dough, and even jams, making it highly versatile. The machine also features a collapsible kneading blade that minimizes the hole at the bottom of the loaf.

Why Buyers Love It:

  • Customizable loaf sizes
  • Easy-to-read, intuitive display
  • Durable and reliable


Zojirushi BB-PDC20BA Home Bakery Virtuoso Plus Breadmaker


1. Zojirushi Home Bakery Virtuoso Plus Breadmaker
⭐⭐⭐⭐⭐ (4.8/5)

The Zojirushi Home Bakery Virtuoso Plus is a top contender in the bread-making world. Known for its consistency and versatility, this machine features dual kneading blades, an LCD display, and various settings for different types of bread, including gluten-free and whole wheat. Its sturdy build and superior performance make it a favourite among customers.

Why Buyers Love It:

  • Consistent, high-quality bread
  • Versatile with multiple settings
  • Easy-to-use and clean

Choosing the right bread maker can transform your kitchen experience, making it easier than ever to enjoy fresh, homemade bread. Whether you’re looking for a compact machine, a model with versatile settings, or a budget-friendly option, these **top-rated bread makers on Amazon** offer something for everyone. From the reliable Zojirushi Home Bakery Virtuoso Plus to the user-friendly Aicok Bread Maker, you’re sure to find the perfect fit for your baking needs.

Check out our Products
FOLLOW US ON INSTAGRAM

Nostalgia Retro bread toaster

A Touch of Aqua in Your Kitchen: The Nostalgia Retro Toaster Review

Want to bring a splash of color and a touch of nostalgia to your kitchen countertop?  Look no further than the Nostalgia Retro Toaster in a stunning aqua finish. This isn’t just a pretty face, though! This toaster’s features make it ideal for anyone with a passion for both delectable toasted treats and captivating design.

Straight Outta the Diner

The toaster makes a bold statement with its eye-catching aqua color. Channeling the spirit of classic 1950s diners and kitchens, it brings a touch of retro flair to your countertop. The wide, two-slice design and polished chrome accents put the finishing touch on the retro look, transforming this toaster from a practical appliance into a conversation piece.

More Than Just Looks

Beyond its eye-catching retro style, the Nostalgia Retro Toaster is a functional powerhouse. It comes equipped with features…Here’s what we love:

  • Accommodates all your breadly needs: No matter what your bread preference, the wide slots can accommodate everything from thin cuts to thick bagels, toasting them to perfection without any squeezing
  • Find your perfect toast: Nostalgia empowers you to create the perfect toast, offering 5 browning levels that range from a subtle, sun-kissed glow to a robust, satisfyingly dark char.
  • Waffles? Yes, please! This toaster isn’t just a bread champion! Craving a warm, fluffy waffle in a pinch? The wide slots can conquer those frozen breakfast treats too!
  • Easy cleanup: Cleaning up after your toast cravings is a cinch with the removable crumb tray. No more wrestling crumbs out of hidden corners!
  • Compact and convenient: Despite its retro charm, this toaster boasts a surprisingly compact design. This makes it ideal for kitchens where counter space is at a premium. Plus, the built-in cord storage keeps your countertop clutter-free.

The Verdict

If you’re looking for a toaster that’s as beautiful as it is functional, then look no further than the Nostalgia Retro Toaster. Calling all lovers of retro style and quality craftsmanship! The Nostalgia Retro Toaster is for you. With its wide slots, browning level options, and user-friendly features, this toaster will seamlessly integrate into your daily breakfast routine. Plus, the affordable price tag makes it an attractive option for budget-minded shoppers.

So, if you’re looking for a toaster that adds a touch of personality to your kitchen and delivers delicious results, the Nostalgia Retro Toaster in aqua is an ideal choice!


About the Nostalgia Retro bread toaster

The Nostalgia Retro Toaster is a 2-slice toaster that features a vintage design, compact size, and wide toasting slots. It can toast bread, bagels, and waffles, and it comes with 5 toasting levels, a crumb tray, and cord storage. The aqua hue evokes a nostalgic vibe and adds a stylish touch that seamlessly blends with any kitchen décor.

Here are some key points about the Nostalgia Retro Toaster:

  • Wide 2-Slice Vintage Design: This toaster seamlessly blends classic aesthetics with ultimate versatility. Its extra-wide slots can handle bagel halves, thick bread, English muffins, and more.
  • Compact Size: The toaster is designed to fit perfectly on your kitchen counter without taking up too much space.
  • 5 Toasting Levels: The toaster comes with 5 different toasting levels, allowing you to customize your toast to your desired level of crispiness.
  • Crumb Tray: The toaster has a crumb tray that makes cleaning easy and convenient.
  • Cord Storage: The toaster has cord storage, which keeps your countertop organized and clutter-free.
  • Aqua Color: The toaster comes in a stylish aqua color that adds a pop of color to your kitchen.
  • Retro Style: The toaster has a retro-style design that adds a touch of nostalgia to your kitchen.
  • Extra-Wide Slots: The toaster has extra-wide slots that can accommodate thicker slices of bread, making it perfect for toasting bagels, waffles, and bread.


Specification

Here are the specifications of the Nostalgia Retro Toaster – Wide 2-Slice Vintage Design:

  • Capacity: 2 slices
  • Slot Width: Wide – Accommodates bagels and thick bread slices [Source: Nostalgia Products]
  • Power: 900 watts [Source: Nostalgia Products]
  • Settings:
    • 5 Browning Levels
    • Bagel Function – For even toasting of cut sides [Source: Nostalgia Products]
    • Defrost Function – Toasts frozen bread [Source: Nostalgia Products]
    • Cancel Function – Stops the toasting cycle
  • Exterior:
    • Design: Vintage style
    • Material: Not specified, but likely plastic or metal with a painted finish
    • Color: Aqua
  • Dimensions: Not specified on the official product page, but likely falls under the category of “compact” toasters
  • Other Features:
    • Crumb Tray – Removable for easy cleaning
  • Cord Wrap – For storing the cord neatly 

KEY FEATURES

The Nostalgia Retro Toaster – Wide 2-Slice Vintage Design boasts several features that blend functionality with a touch of retro charm:

  • Toasting Versatility: With wide slots, this toaster can handle not only regular bread slices but also bagels, thick bread, and even waffles.
  • Precise Browning Control: Choose from 5 browning levels to achieve your perfect toast color, from a light golden hue to a dark and crispy finish.
  • Bagel Function: This setting automatically adjusts the toasting cycle to evenly toast the cut side of bagels and English muffins without burning the outside.
  • Defrost Function: Don’t wait for frozen bread to thaw. simply place the bread in the toaster and use the defrost setting for perfect toast.
  • Cancel Function: Need to stop the toasting cycle midway? No problem. The cancel function allows you to interrupt the process at any time.
  • Easy Cleaning: A detachable crumb tray makes cleaning up a breeze.
  • Compact Design: This toaster is designed to comfortably fit on your kitchen counter without taking up too much space.
  • Vintage Design: The toaster’s exterior features a stylish retro look, adding a touch of nostalgia to your kitchen.
  • Cord Storage: Keep your countertop organized with the built-in cord wrap that allows for neat storage of the power cord.
  • Illuminated Controls: The buttons for bagel, defrost, cancel, and browning levels are illuminated for easy recognition, especially in low-light conditions. 


How to use the Nostalgia Retro bread toaster

Here’s a step by step guide on how to use your Nostalgia Retro Toaster:

Before you begin:

  • Make sure the crumb tray is pushed in completely.
  • Plug the toaster into a power outlet.

Toasting Bread and Bagels:

  • Place your bread or bagel slices into the wide slots. Accommodates two standard slices of bread or bagel halves.
  • Adjust the browning level: The toaster usually has a dial with 5 settings (from light to dark). Choose your desired level of toastiness.
  • Standard toasting: Lower the lever down until it clicks. The bread will automatically toast and pop up when finished.
  • Bagel setting: If your toaster has a bagel button, press it to activate the bagel setting. This will toast the inside of the bagel cut surface while warming the outside. Then, lower the lever.
  • Cancel function (optional): If you need to stop the toasting cycle early, press the cancel button (if available).

Using the Defrost Function (if available):

  • Place your frozen bread or bagels in the slots.
  • Press the defrost button (if available). This will thaw and toast your frozen bread in one cycle.
  • Once you lower the lever, the toaster will take care of both defrosting and toasting your bread.

Additional Tips:

  • Thicker breads or uneven slices may require a lower setting initially. Toast again for a darker shade, if desired, to prevent burning.
  • For safe handling of hot waffles or bread, especially if difficult to grasp, use tongs for removal.
  • Let the toaster cool down completely before cleaning.
  • Regularly empty the crumb tray to avoid crumbs building up and burning. You can easily slide the crumb tray out from the bottom for cleaning.
  • Wrap the cord underneath the toaster for neat storage when not in use (if your model has cord storage).

Nostalgia Retro Toaster sounds like a multifunctional appliance! Enjoy your perfectly toasted bread, bagels, and waffles!

Tips and Recipes suitable for the Nostalgia Retro bread toaster

Nostalgia Retro Toaster Tips and Recipes:

Tips:

  • Beyond Bread: This toaster can tackle more than just bread! Try toasting English muffins, hamburger buns, or even thick slices of challah bread.
  • Melty Goodness: Unleash your topping creativity! Toast your bread and add cheese for a yummy, on-the-go bite. Top with avocado, tomato, or a sprinkle of everything bagel seasoning for extra flavor.
  • Pizza Pockets: Got the itch to explore?Make mini pizza pockets using puff pastry or crescent dough. Toast until it reaches a perfect golden brown, then dive into a warm and melty masterpiece.
  • Waffle Fix:Missing a waffle iron? No problem! Use frozen waffles and the defrost function to get ideal warmed and crispy waffles in minutes. Top with syrup, fruit, whipped cream, or even savory options like cheese and scrambled eggs.

Recipes:

  • French Toast: Here’s a quick and easy recipe perfect for the Nostalgia Toaster: Ingredients (makes 2 servings):

1. 2 slices of thick-cut bread (brioche, challah, or Texas toast work well.

2. 1 egg, beaten

3. 1/2 cup milk

4. 1/4 teaspoon cinnamon (optional)

5. Butter or cooking spray

6. Toppings (syrup, fruit, whipped cream, powdered sugar)

Instructions:

1. Whisk the egg, milk, and optional cinnamon together in a shallow dish.

2. Heat a pat of butter or a few spritzes of cooking spray in a pan over medium heat.

3. Completely immerse each bread slice in the egg mixture, allowing it to absorb for a few seconds.

4. Place the soaked bread in the pan and cook for 2-3 minutes per side, or until golden brown.

5. Use the toaster’s wide slots to gently reheat or crisp up the French toast if needed.

6. Enjoy immediately topped with your favorites!

  • Grilled Cheese: This classic gets a toaster upgrade!

Ingredients (makes 1 serving):

1. 2 slices of bread

  • 1-2 slices of your favorite cheese (cheddar, mozzarella, swiss all work well)
  • Butter or mayonnaise
  • Instructions:

1. Spread butter or mayonnaise on one side of each bread slice.

2. Place cheese slices in between the bread.

3. Lower the lever on your toaster and toast until golden brown and the cheese is melted. You may need to re-toast depending on the thickness of your bread and cheese.

4. Cut in half and enjoy!

Remember: These are just a few ideas to get you started. With a little creativity, you can use your Nostalgia Retro Toaster to make endless delicious toasted treats!

A Cleaning guide

Here’s a step by step guide on how to clean your Nostalgia Retro Toaster:

Safety First:

  • Always unplug the toaster and let it cool completely before cleaning.

Exterior Cleaning:

  • Use a damp cloth to wipe down the exterior surfaces of the toaster. You can use a light soap solution for tougher stains, but avoid abrasive cleaners or scouring pads.
  • Never immerse the toaster in water or any other liquids.

Crumb Tray:

  • The crumb tray is usually located on the underside of the toaster.
  • Simply slide the tray out and discard the crumbs.
  • You can wash the crumb tray with warm, soapy water and a soft sponge. Dry it completely before putting it back in the toaster.

Interior Cleaning:

  • You can’t directly clean the inside of the toaster with water or soap because of the electrical components.
  • To remove loose crumbs from the inside, unplug the toaster and turn it upside down over a trash can. Gently shake the toaster to dislodge any crumbs.
  • You can also use a soft brush to help remove crumbs stuck around the heating elements.

Additional Tips:

  • Clean the crumb tray regularly to prevent crumbs from building up and burning inside the toaster.
  • Empty the crumb tray after each use for optimal performance.
  • Don’t push anything into the toaster slots to remove crumbs. This can damage the heating elements.

By following these simple cleaning tips, you can keep your Nostalgia Retro Toaster looking and functioning its best for years to come.


What to avoid when using the Nostalgia Retro bread toaster

Here are some things to avoid when using your Nostalgia Retro Toaster:

General Safety:

  • Never force bread into the slots: For safety, avoid forcing bread slices that don’t fit easily. This can damage the toaster and potentially start a fire.
  • Don’t leave the toaster unattended while in use: Monitor the bread closely, particularly at higher settings, to prevent burning.
  • Don’t use the toaster near flammable materials: Maintain a safe distance from flammable materials like curtains, dish towels, and anything else that could ignite.
  • Avoid using metal objects inside: For your safety, never insert metal objects like knives or forks into the toaster. This poses a serious risk of fire and electrical shock.

Appliance Care:

  • Don’t overload the toaster: Toast only as much bread or bagels as fit comfortably without crowding the slots.
  • Avoid toasting very wet or greasy foods: This can drip and cause sparking or fires.
  • Don’t cover the toaster vents: These vents allow heat to escape and prevent overheating.
  • Never use scouring pads or abrasive cleaners: Using these could cause scratches on the toaster’s surface.

Misusing Functions:

  • Don’t use the defrost function for regular bread: This setting is designed for thawing and toasting frozen items, but it might burn regular bread.
  • Don’t leave the lever pushed down for extended periods: This could cause the toaster to become too hot.

Remember: Following these simple guidelines ensures you can savor delicious toasted delights using your Nostalgia Retro Toaster.

In conclusion, the Nostalgia Retro Toaster offers delicious toasting versatility with its wide slots and browning controls. Remember safety first: unplug to clean, avoid flammables, and never use metal inside. Explore beyond bread and keep it clean for long-lasting enjoyment.

KETIAN LCD Touchscreen Digital bread toaster

Beyond Burnt Toast: Exploring the KETIAN LCD Touchscreen Toaster

Seeking a breakfast shake-up? Do mornings leave you burnt out from your toast-burning battles?  Wave goodbye to toast-induced stress! The KETIAN LCD Touchscreen Toaster is here, promising a whole new level of breakfast enjoyment!

Sleek Design with Smart Features:

Eye-catching looks are the first course! The KETIAN LCD Touchscreen Toaster isn’t just functional, it’s fashionable. Its modern aesthetic and black and white color palette will complement any kitchen style. But the beauty goes beyond skin deep. But the true innovation lies beneath the surface! The KETIAN boasts a suite of cutting-edge features, all conveniently controlled by a dazzling 7-inch LCD touchscreen.. Wave goodbye to outdated controls!. One tap takes control! Choose your perfect toast shade from a whopping 7 browning levels, ensure even results with pre-heating, or bring stale pastries back to life for a delicious redemption!

Beyond Basic Toasting:

This isn’t your average two-slice toaster. The KETIAN boasts the capacity to tackle different kinds of bread types, from thin bagels to thick Texas toast (five slices in total!). No more burnt fingertips! The high-lift lever allows you to effortlessly extract even the tiniest bread morsels, keeping your fingers safe from the heat

Safety First:

Talking about safety, the KETIAN prioritizes your peace of mind. Enjoy worry-free toasting! The cool-touch housing keeps your hands safe, while the automatic shut-off function prevents overheating, so you can focus on more important things than fire alarms. The built-in crumb tray is also easily detachable for convenient cleaning.

A Touch of Luxury for Everyday Use:

The KETIAN LCD Touchscreen Toaster isn’t just about functionality; it upgrades your breakfast routine to a whole new level. Can you imagine? Toast tailored to your taste buds, with just a touch of the screen. Breakfast has never been so satisfying! This toaster is ideal for busy mornings when you need a quick and delicious bite, or for leisurely weekend brunches where you can try out different bread types and toppings.

Is it Right for You?

Seeking a toaster that elevates your breakfast game? Look no further than the KETIAN LCD Touchscreen Toaster. It provides a perfect blend of style, functionality, and safety, making it a valuable addition to any kitchen.

With a little research and these considerations in mind, you can decide if the KETIAN LCD Touchscreen Toaster is the perfect match for your perfect slice of toast.


About the KETIAN LCD Touchscreen Digital bread toaster

The KETIAN LCD Touchscreen Toaster: A Detailed Look

The KETIAN LCD Touchscreen Toaster sounds like a feature-rich appliance designed to upgrade your toast-making experience. Here’s a breakdown of its key aspects:

Technical Specs:

  • Slices: 2 slice capacity
  • Color: Black and white
  • Control Panel: 7-inch LCD touchscreen
  • Browning Levels: 7 settings (light to dark)
  • Bread Capacity: Up to 5 slices (depending on thickness)
  • Features: Pre-heating function, high-lift lever, automatic shut-off, cool-touch housing, removable crumb tray

Potential Benefits:

  • Precision Browning: With 7 browning settings, you can personalize your toast to your exact preference, from a light golden hue to a satisfyingly dark crisp.
  • Versatility: Accommodates a variety of bread types, including bagels and thicker slices (up to 5 slices depending on thickness).
  • Convenience: The LCD touchscreen provides simple controls, and the pre-heating function ensures your toast comes out perfectly browned every single time.
  • Safety: Cool-touch housing prevents accidental burns, and automatic shut-off minimizes fire risk.
  • Easy Cleaning: Detachable crumb tray allows for effortless cleaning.
  • Style: Modern black and white design complements any kitchen décor.

Things to Consider:

  • Price: Check the price tag to see if it fits your budget.
  • Countertop Space: Make sure the toaster’s dimensions are compatible with your countertop space.
  • Features: Assess if specific features like pre-heating or high-lift lever are important to you.
  • Reviews: Check out user reviews to see how the toaster performs in everyday use and how well it holds up over time.

To sum up, the KETIAN LCD Touchscreen Toaster seems like a well-equipped option for those seeking a feature-rich and user-friendly toaster. However, considering the price and your specific needs is Vital before making a purchase decision.

Here are some additional questions to explore:

  • Does the toaster provide any warranty?
  • What are the dimensions of the toaster?
  • Can I easily find replacement parts for this toaster if needed? 

Specifications

Here are the specifications for the KETIAN LCD Touchscreen Toaster:

  • Capacity: 2 slices (possibly capable of handling up to 5 depending on how thick is the bread)
  • Color: Black and white
  • Control Panel: 7-inch LCD touchscreen
  • Browning Levels: 7 settings (light to dark)

Functions:

    • Pre-heating function
    • High-lift lever for safe toast retrieval
    • Automatic shut-off for safety
    • Cool-touch housing to prevent burns
    • Detachable crumb tray for easy cleaning

Additional Information Needed (not confirmed):

  • Dimensions: Height, width, and depth of the toaster are not available.
  • Wattage: Power consumption of the toaster is not available.
  • Warranty: It’s important to dig deeper into the warranty specifics before making a decision.
  • Replacement Parts: Availability of replacement parts needs to be investigated.

Tips:

  • Think about searching for the toaster model number online to find a product manual or detailed specifications webpage.
  • Retailer websites that sell the toaster might also have the missing specifications listed.

Key Features

Here are the features of the KETIAN LCD Touchscreen Toaster:

Core Toasting Features:

  • 2-Slice Capacity: Perfect for toasting bread for two people or preparing individual portions.
  • 7 Browning Levels: Allows precise control over toast shade, from lightly golden to deeply toasted.
  • Pre-heating Function: Guarantees even browning every time with pre-heating coils that warm up before you add your bread.
  • Automatic Shut-off: Offers automatic shut-off for worry-free toasting. The toaster turns itself off once your toast is done or when the timer goes off, ensuring safety and peace of mind.

Convenience Features:

  • 7-inch LCD Touchscreen: Provides a user-friendly interface for selecting browning levels, activating pre-heating, and potentially controlling other functions.
  • High-lift Lever: Safely Grabs even small bread pieces from the slots, preventing burnt fingers.

Safety Features:

  • Cool-touch Housing: Reduces the risk of accidental burns by keeping the exterior cool during operation.
  • Removable Crumb Tray: Makes cleaning a breeze and minimizes fire risks! The toaster’s design allows for easy crumb removal, preventing dangerous buildup.

Potential Additional Features (not confirmed):

  • Bagel Setting: Certain models boast a dedicated bagel setting that perfectly browns the cut side while maintaining a soft, chewy texture on the outside.
  • Single-Sided Toasting: Offers single-sided toasting, perfect for achieving a golden brown crust on thick slices or gently warming up pastries without overdoing it.

To confirm the presence of these additional features, you might need to check with the product manual, official website, or retailer descriptions.

How to use the KETIAN LCD Touchscreen Digital bread toaster

Here’s a Brief step-by-step guide on how to use the KETIAN LCD Touchscreen Toaster, based on the features mentioned:

  1. Prepare Your Bread:
  • select your bread slices and ensure they fit comfortably within the toaster slots.
  1. Power On and Select Browning Level:
  • Plug in the toaster and power it on.


  • Using the 7-inch LCD touchscreen, choose your desired browning level from the available options (typically 1-7, light to dark).
  1. Pre-heating (Optional):
  • Some models might have a dedicated pre-heat button on the touchscreen. For consistent browning, consider preheating the toaster first.
  1. Place Bread and Start Toasting:
  • Carefully lower the bread slices into the toaster slots. The high-lift lever might require a gentle press.
  1. Monitor and Retrieve Toast:
  • The toaster will automatically begin the toasting cycle. Keep an eye on your toast’s progress with the convenient touchscreen display (if your model has one).
  • The toaster takes care of the rest! Once your toast achieves your desired browning level, the automatic shut-off function kicks in. Use the high-lift lever to safely remove the hot toast.

Additional Tips:

  • Check with the user manual (if available) for specific instructions and any additional functionalities unique to this model.
  • Avoid stuffing the toaster with too much bread. This can lead to uneven browning and potentially jam the mechanism.
  • If toasting thicker bread slices, you might need to adjust the browning level or use the high-lift lever halfway through the cycle to check on the progress.
  • Let the toaster cool down completely before cleaning.
  • Always empty the crumb tray regularly, to prevent fire hazards and maintain optimal performance.

Remember, this is a general guideline. Always refer to the official instructions or the user manual for the most accurate and up-to-date information on using your specific KETIAN LCD Touchscreen Toaster model.

Tips and Recipes Suitable for the KETIAN LCD Touchscreen Digital bread toaster

Tips and Recipes for the KETIAN LCD Touchscreen Toaster

The KETIAN LCD Touchscreen Toaster sounds like a multifunctional appliance ideal for more than just basic toast. Here are some tips and recipe ideas to get the most out of your toaster:

Tips:

  • Beyond Bread: While bread is its primary function, try out toasting bagels, English muffins, or even thick slices of challah bread. The high-lift lever is your friend, especially for irregular-shaped breads or small pieces. It ensures easy retrieval without burnt fingers.
  • Reheating Pastries: Revive stale croissants, danishes, or puff pastries in a flash! The pre-heat function brings back their golden crispness. This can bring back their flakiness and warm them through for a delicious treat.
  • Frozen Waffles: Craving waffles? Look for a model with a dedicated waffle setting for perfectly cooked waffles every time. Otherwise, preheat the toaster and carefully brown your frozen waffles.
  • Melted Cheese: If your toaster has enough space, try putting a slice of cheese on top of bread before toasting. The pre-heat function can help the cheese melt evenly. (Monitor it to avoid burning!)
  • Garlic Bread: Brush bread slices with olive oil or melted butter, drizzle with garlic powder, and toast until golden brown. You can also add a sprinkle of cheese for a cheesy garlic bread variation.
  • Cleaning: Empty the crumb tray regularly to prevent build-up and potential fire hazards. Wipe the exterior with a damp cloth for a clean look.

Recipes for the KETIAN Toaster (using its core functionalities):

  1. Perfect Avocado Toast:
  • Toast two slices of whole-wheat bread to your desired level using the browning control.
  • Mash a ripe avocado and spread it on the toast.
  • Sprinkle with olive oil, season with salt and pepper flakes, and top with a squeeze of lemon juice.
  1. Caprese Toast:
  • Toast two slices of sourdough bread.
  • Rub a garlic clove on each toasted slice.
  • Top with sliced tomato, fresh mozzarella cheese, and a drizzle of balsamic reduction.
  • Season with salt and freshly ground black pepper.
  1. Easy Bruschetta:
  • Toast baguette slices until slightly crisp.
  • Rub each slice with a garlic clove.


  • Top with chopped tomatoes, fresh basil leaves, a drizzle of olive oil, and a sprinkle of balsamic vinegar.
  1. Sweet Cinnamon Toast:
  • Toast two slices of bread.
  • In a shallow bowl, mix sugar and cinnamon powder.
  • Slather your toast with softened butter, then gently dredge each slice in the cinnamon sugar mixture, ensuring a uniform coat.
  1. French Toast (using the pre-heat function):
  • Preheat the toaster using the pre-heat function (if available).
  • Prepare your egg batter (eggs, milk, vanilla extract, cinnamon) in a shallow dish.
  • Dredge bread slices into the egg batter, ensuring even coating.
  • Carefully place the batter-soaked bread slices in the pre-heated toaster slots.
  • Toast until golden brown on both sides, flipping halfway through if needed. (keep an eye on it closely to avoid burning)
  • Serve with your favorite toppings like maple syrup, fresh fruit, or whipped cream.

Remember, these are just a few ideas to get you started. With a little creativity, you can use your KETIAN LCD Touchscreen Toaster to prepare a variety of delicious and convenient meals and snacks.

A Cleaning Guide

Here’s a step by step guide on how to clean your KETIAN LCD Touchscreen Toaster:

Safety Precautions:

  • Ensure you unplug the toaster from the power outlet before cleaning.
  • Let the toaster cool down completely before cleaning to avoid burns.

Cleaning the Exterior:

  • Use a damp microfiber cloth to wipe down the exterior surfaces of the toaster.
  • You can add a light dish soap solution to the water for a tougher stain, but avoid using harsh chemicals or abrasive cleaners that could scratch the surface.
  • Dry the exterior with a clean, dry cloth to prevent water spots.

Cleaning the Crumb Tray:

  • For easy cleaning, find the crumb tray on the bottom or underneath your toaster. It typically slides out or has a release mechanism (consult the user manual for specific instructions if needed).
  • Empty the crumbs into a trash bin.
  • You can rinse the crumb tray with warm water and a light dish soap solution if needed. Let it dry completely before placing it back in the toaster.

Cleaning the Interior (Optional):

Important Note: Avoid submerging the toaster in water or allowing any liquids inside as this can damage the electrical components.

  • For stubborn crumbs, once the toaster is unplugged and completely cool, gently invert it over a trash bin and shake it to dislodge any loose particles.
  • You can use a clean, dry cloth or a soft brush to reach into the slots and remove any remaining crumbs.
  • Do not use sharp objects or metal utensils to clean the interior as they could scratch the heating elements.

Here are some additional tips:

  • Clean the crumb tray regularly, ideally after each use, to prevent build-up and potential fire hazards.
  • Clean the exterior of the toaster periodically to maintain its stylish look.
  • Check with the user manual that came with your specific KETIAN LCD Touchscreen Toaster model for any specific cleaning instructions or recommendations.

By following these cleaning tips, you can keep your KETIAN LCD Touchscreen Toaster looking and functioning its best for a long time.


What to avoid when using the KETIAN LCD Touchscreen Digital bread toaster

Here are some things to avoid while using your KETIAN LCD Touchscreen Toaster:

Safety Precautions:

  • Overcrowding:Resist the urge to cram too much bread or thick items into the slots. This can lead to uneven browning, jams, and potentially damage your toaster.
  • Water and Electricity: Never dip the toaster in water or clean it while it’s plugged in. This is a serious electrical hazard.
  • Metal Objects: Never use metal utensils like knives or forks to pry out stuck bread. This can damage the heating elements and could lead to an electrical shock.
  • Flammable Materials: Maintain a safe distance between the toaster and flammable materials like curtains or oven mitts when it’s in use.
  • Unattended Toasting: For safety reasons, never leave your toaster running unattended, particularly for long toasting times. Burnt toast can be a fire hazard.

General Use:

  • Forcing Stuck Bread: In case bread gets jammed, prioritize safety! Unplug the toaster immediately and wait for it to cool down completely before carefully removing the stuck bread. Don’t use too much force or a sharp object, as this can damage the toaster.
  • Abrasive Cleaners: For gentle cleaning of the toaster’s exterior, stay away from abrasive cleaners and harsh chemicals, as they can cause scratches.
  • Overheating: For optimal performance and longevity, avoid using the toaster continuously without cool-down periods. Overheating can shorten its lifespan.

Misuse:

  • Non-Food Items: The toaster is intended for toasting bread and similar food items. Avoid placing anything else like metal objects, plastic wrap, or aluminum foil inside the slots.
  • Dropping Food: Always try to avoid dropping crumbs or food particles inside the toaster as they can build up and burn, creating an unpleasant odor.

By following these tips, you can ensure safe and long-lasting use of your KETIAN LCD Touchscreen Toaster. If you have any doubts or encounter any issues, check with the user manual or contact the manufacturer for further guidance

In conclusion, the KETIAN LCD Touchscreen Toaster appears to be a feature-rich toaster with a user-friendly touchscreen interface. It provides precise browning control, multifunctionality for various breads, and convenient features like pre-heating. Safety features and easy cleaning make it a good choice for many users. Think about the price, countertop space, and desired features before buying. If you’re looking for a toaster with more than basic functions, this could be a good option for you.

The 10 Most Expensive Bread Makers on Amazon

Bread makers have revolutionized home baking, allowing you to enjoy fresh, warm, and homemade bread without the hassle. While many affordable models offer great value, there’s a growing demand for high-end bread makers that bring a touch of luxury and advanced technology into your kitchen. In this comprehensive guide, we’ll explore the 10 most expensive bread makers available on Amazon and delve into what makes each of them unique.


Westbend bread maker_

10. West Bend Hi-Rise Bread Maker

Price: $159.95

Selling Points:

  • Dual Kneading Blades: This bread maker utilizes two kneading blades to thoroughly mix and knead the dough, resulting in a superior texture and even rise.
  • Extended Kneading Time: The extended kneading time helps to develop the gluten structure in the dough, producing a more robust and flavorful loaf.
  • Customizable Settings: Allows you to adjust the knead, rise, and bake times, giving you greater control over the baking process.

Why It’s Unique: The West Bend Hi-Rise Bread Maker is designed for those who want consistent quality with the flexibility to customize their bread. The dual kneading blades and extended kneading time set it apart from many other models in its price range, ensuring better dough development and bread quality.


Hamilton beach 2988

9. Hamilton Beach Professional Bread Maker (Model 29888)

Price: $249.99

Selling Points:

  • 13 Programmed Settings: Offers a variety of settings, including gluten-free, whole grain, and quick bread, making it versatile for different types of bread.
  • Automatic Fruit and Nut Dispenser: Ensures even distribution of additional ingredients, perfect for recipes requiring mix-ins like nuts and dried fruits.
  • Non-stick Baking Pan: The non-stick pan makes for easy cleanup and ensures that the bread doesn’t stick, maintaining the shape and quality of the loaf.

Why It’s Unique: The Hamilton Beach Professional Bread Maker is known for its user-friendly features and versatility. The automatic ingredient dispenser and a wide range of programmed settings make it a convenient choice for diverse bread recipes.


SKG Bread

8. SKG Automatic Bread Machine

Price: $329.00

Selling Points:

  • Ceramic Pan: Unlike most bread makers that use metal pans, the SKG Automatic Bread Machine features a ceramic pan that is non-stick, easy to clean, and ensures even heat distribution.
  • Quiet Operation: It operates quietly, making it ideal for overnight baking or for use in households where noise is a concern.
  • 19 Automatic Programs: Offers a wide variety of bread types and baking styles, from whole wheat to French bread and even yoghurt making.

Why It’s Unique: The SKG Automatic Bread Machine stands out due to its ceramic pan and quiet operation. These features, along with the numerous automatic programs, make it a top choice for those who value both performance and peace of mind in the kitchen.


kbs pro stainless steel bread machine

7. KBS Pro Bread Machine

Price: $259.99

Selling Points:

  • Automatic Fruit and Nut Dispenser: The machine’s dispenser adds fruits, nuts, and other mix-ins at the optimal time, ensuring even distribution without manual intervention.
  • Stylish Stainless Steel Design: Its sleek design not only looks great in any kitchen but also offers durability and ease of cleaning.
  • Touch Panel Control: The intuitive touch panel is easy to clean and use, providing 17 customized automatic programs for different types of bread and baking styles.

Why It’s Unique: The KBS Pro Bread Machine combines style with functionality. Its automatic dispenser, sleek stainless steel build, and user-friendly touch panel make it a luxurious addition to any kitchen, offering both beauty and practicality.


Cuisinart CBK-200 Convection Bread Maker

6. Cuisinart CBK-200 Convection Bread Maker

Price: $399.95

Selling Points:

  • Convection Fan: Features a convection fan that circulates air for a superior crust colour and texture, providing a bakery-quality finish to your homemade bread.
  • 16 Pre-programmed Menu Options: Includes settings for low-carb, gluten-free, artisan dough, and more, catering to a wide variety of dietary preferences.
  • Unique Shape: The vertical design of the bread pan produces a distinctive, tall loaf shape, different from the traditional horizontal loaf most breadmakers produce.

Why It’s Unique: The Cuisinart CBK-200 stands out for its convection baking technology, which ensures even cooking and a perfect crust every time. Its wide range of pre-programmed settings and unique vertical loaf design add versatility and appeal to any home baker.


Panasonic SD-RD250 Automatic Bread Maker

5. Panasonic SD-RD250 Automatic Bread Maker

Price: $329.99

Selling Points:

  • Diamond Fluorine Coating: The bread pan and kneading blade are coated with diamond fluorine, which is significantly more durable than traditional non-stick coatings.
  • Automatic Ingredient Dispenser: Like some of the other models, it features an automatic dispenser for fruits and nuts, ensuring perfect ingredient distribution.
  • Temperature Control: The machine adjusts the baking temperature to accommodate different types of bread, providing optimal conditions for each loaf.

Why It’s Unique: The Panasonic SD-RD250 is known for its durability and precision. The diamond fluorine coating ensures longevity and easy maintenance, while the automatic ingredient dispenser and precise temperature control offer superior baking results.


Sana Smart Bread Maker

4. Sana Smart Bread Maker

Price: $499.00

  • Selling Points:
  • Multiple Kneading Blades: Comes with a unique double kneading blade system to ensure thorough dough mixing, producing a better crumb structure.
  • Programmable Settings: Allows users to create their own baking programs, providing flexibility for experimental bakers.
  • Stainless Steel Build: The robust, durable construction ensures longevity and a professional appearance, making it suitable for both home and semi-professional use.

Why It’s Unique: The Sana Smart Bread Maker is ideal for serious bakers who want total control over their bread-making process. Its double-kneading blades and programmable settings provide flexibility and precision, making it a versatile and durable choice.


Zojirushi BB-CEC20 Home Bakery Supreme

3. Zojirushi BB-CEC20 Home Bakery Supreme

Price: $289.99

  • Selling Points:
  • Dual Blade System: Features two blades for more thorough dough kneading, ensuring a better texture and more even rise.
  • Horizontal Baking Pan: It bakes a traditional, horizontal loaf many prefer for its conventional shape and even crumb.
  • Customizable Settings: Includes custom baking options for greater control, allowing you to tailor the baking process to your preferences.

Why It’s Unique: The Zojirushi BB-CEC20 Home Bakery Supreme is favoured for its dual blade system and horizontal loaf design, which are ideal for creating traditional bread shapes with a professional-quality texture.


Breville BBM800XL Custom Loaf Bread Maker

2. Breville BBM800XL Custom Loaf Bread Maker

Price: $299.95

Selling Points:

  • Customizable Loaf Size: This bread maker can bake four different loaf sizes, from 1 pound to 2.5 pounds, making it versatile for different baking needs.
  • Automatic Fruit and Nut Dispenser: It includes an automatic dispenser that releases ingredients at the right moment, ensuring evenly distributed extras like fruits and nuts.
  • Unique Kneading Paddle: The collapsible kneading paddle prevents the common issue of holes in the bottom of the loaf, providing a cleaner and more professional look.

Why It’s Unique: The Breville BBM800XL stands out for its customizable loaf size and unique kneading paddle, which offer convenience and quality. The automatic ingredient dispenser further enhances its appeal, making it a versatile and luxurious option for home bakers.


Zojirushi BB-PDC20BA Home Bakery Virtuoso Plus Breadmaker

1. Zojirushi BB-PDC20BA Home Bakery Virtuoso Plus Breadmaker

Price: $358.99

Selling Points:

  • Dual Kneading Blades: This model features two kneading blades to thoroughly mix ingredients, producing a superior dough texture and even rise.
  • Even Baking: It uses a heating element built into the lid, ensuring even baking and browning, which is critical for achieving a perfect crust.
  • Multiple Custom Settings: Offers a variety of settings, including gluten-free, salt-free, sugar-free, and vegan bread, catering to a wide range of dietary preferences.

Why It’s Unique: The Zojirushi BB-PDC20BA is the pinnacle of luxury bread makers, featuring dual kneading blades and an innovative heating element for perfect baking results. Its multiple custom settings and precise temperature control make it a top choice for any serious home baker.

Investing in a high-end bread maker can significantly enhance your baking experience, providing you with the convenience of automated processes, superior build quality, and innovative technologies. Amazon’s top 10 most expensive bread makers, such as the Zojirushi BB-PDC20BA and Breville BBM800XL, stand out for their unique features, making them worth the investment for anyone serious about homemade bread. Each model offers a blend of functionality and luxury, ensuring you can enjoy the freshest bread with minimal effort.

Check out our Products
FOLLOW US ON INSTAGRAM

bread maker

Bread Maker vs. Oven: Which is Better for Baking Bread?

Baking bread at home is a rewarding and delicious endeavour, offering a delightful escape from the mass-produced loaves found in supermarkets. However, a common dilemma for home bakers is choosing between a bread maker and a traditional oven. Both methods have their own unique advantages and drawbacks, making the decision not as straightforward as it might seem. In this comprehensive guide, we delve into the bread maker vs. oven debate, helping you determine which option is better suited for your baking aspirations.

Bread maker

Bread Maker: The Modern Convenience

Bread makers have revolutionized home baking, making it accessible and effortless for everyone. Here’s why they might be the perfect addition to your kitchen.

Pros:

  • Ease of Use: Imagine being able to bake bread with just a few simple steps: add your ingredients, select the desired settings, and press start. A bread maker simplifies the entire bread-making process, automating mixing, kneading, rising, and baking. This is ideal for beginners or those with busy schedules who still want to enjoy the pleasures of homemade bread without the hassle of traditional methods.


  • Consistency: One of the biggest advantages of a bread maker is its ability to produce consistent results. The machine’s precise control over temperature and timing ensures that each loaf is baked to perfection, minimizing the risk of human error. Whether you’re baking a basic white loaf or experimenting with complex recipes, you can count on reliable, delicious results every time.


  • Time-Saving: In our fast-paced world, time is precious. A bread maker can be a huge time-saver, allowing you to set up the machine in the morning and come home to freshly baked bread in the evening. This hands-off approach frees up valuable time for other activities while still delivering the delicious taste of homemade bread.


  • Versatility: Modern bread makers are incredibly versatile. They come in a variety of settings to accommodate different types of bread, including whole wheat, gluten-free, and even speciality breads like brioche and sourdough. Some models even allow you to make dough for pizza, rolls, or jam, broadening your culinary horizons.

Cons:

  • Limited Control: While bread makers are convenient, they can also limit your control over the bread-making process. Customizing the dough’s texture, crust colour, and shape can be challenging compared to baking in an oven. Bread makers follow set programs, which might not allow for the same level of personalization and adjustment that manual baking offers.


  • Size Constraints: Bread makers typically produce smaller loaves compared to traditional ovens. If you have a large family or need to bake multiple loaves, this could be a drawback. The capacity of most bread makers is designed for household use, which might not be sufficient for larger gatherings or when you need to prepare bread in bulk.


  • Texture and Crust: Some bread enthusiasts argue that bread made by a bread maker lacks the artisanal texture and crust that can be achieved with an oven. The crust produced by a bread maker tends to be softer and less caramelized, lacking the crunch and chewiness that many people appreciate in traditionally baked bread.

oven

Oven: The Traditional Approach

For many, the traditional method of baking bread in an oven holds a certain charm and satisfaction that a bread maker cannot match. Let’s explore why.

Pros:

  • Greater Control: Baking bread in an oven provides you with full control over every step of the process. You can manually adjust the dough’s consistency, shape the loaf to your preference, and experiment with different baking techniques. This hands-on approach allows for a more personalized baking experience, which is particularly appealing to experienced bakers.


  • Artisanal Quality: One of the standout advantages of using an oven is the ability to achieve superior crust and texture. Techniques like steam baking and using a baking stone can create a crispy, golden crust and a chewy, flavorful interior that is often difficult to replicate in a bread maker. These methods allow you to produce bread with an artisanal quality that is highly prized by bread enthusiasts.


  • Larger Batches: Ovens can accommodate larger batches of bread, making them ideal for families or those who enjoy baking multiple loaves at once. The spacious interior of an oven allows you to bake several loaves simultaneously, which is particularly useful when preparing for gatherings or events.


  • Versatility: While bread makers are designed specifically for bread, ovens offer unparalleled versatility. In addition to baking a wide range of bread types, ovens can be used to prepare a variety of other baked goods, such as pastries, cakes, and cookies. Moreover, ovens are suitable for cooking a diverse array of dishes, from savoury roasts and casseroles to pizzas and vegetables.

Cons:

  • Time-Consuming: The traditional method of baking bread in an oven requires more hands-on time and attention compared to using a bread maker. You’ll need to monitor the dough as it rises, knead it manually, and carefully watch the baking process to ensure optimal results. This time commitment can be a drawback for those with busy schedules or for beginners who may find the process overwhelming.


  • Skill Level: Baking bread in an oven requires a higher skill level and a solid understanding of baking principles. It may take more practice and experimentation to achieve consistent results. Factors such as dough hydration, fermentation times, and oven temperature must be carefully managed to produce high-quality bread.


  • Temperature Control: Maintaining the ideal temperature for baking bread can be challenging in some ovens, especially if they have hot spots or inconsistent heating. An oven with uneven heat distribution can result in loaves that are unevenly baked, with some parts overcooked and others undercooked. Achieving the perfect bake often involves getting to know your oven’s quirks and making necessary adjustments to ensure even and reliable results.

Both bread makers and ovens have their own unique advantages and can produce delicious homemade bread. Whether you choose the modern convenience of a bread maker or the traditional approach of an oven, the key is to enjoy the process and savour the delightful results. By understanding the pros and cons of each method, you can make an informed decision that best suits your baking needs and preferences.

Check out our Products
FOLLOW US ON INSTAGRAM

iFedio Prime Stainless Steel 2 Slice bread toaster

Toast Perfection: A Look at the 2-Slice Prime Stainless Steel Toaster

Are you tired of unevenly toasted bread? Do you wish to have perfectly browned slices every morning, every single time? Well, your breakfast prayers might just be answered with the 2-Slice Prime Stainless Steel Toaster! Combining cutting-edge functionality with a touch of retro charm, this high-performing toaster elevates any kitchen space.

Toasting Like a Pro

This toaster features extra-wide slots, making it ideal for handling thick breads, bagels, and even waffles. Offering seven customizable browning levels, this toaster lets you achieve your perfect toast, from a delicate golden touch to a deep, rich roast. Experience the joy of perfectly toasted bread, every time. No more pale middles or burnt edges with this innovative toaster!

Effortless Mornings

This toaster perfectly toasts bread and effortlessly simplifies your mornings. The thaw function revives frozen bread rapidly, and the bagel setting guarantees uniform browning on both sides. And when you need to end the toasting cycle early, the cancel button is there for your convenience.

Cleaning Up is a Snap

Let’s be honest, nobody enjoys a messy kitchen. Thankfully, the 2-Slice Prime Stainless Steel Toaster features a removable crumb tray for effortless cleanup. Simply remove the tray, discard the crumbs, and wipe down the exterior for a sparkling clean toaster.

More Than Just Toast

While this toaster excels at making breakfast convenient, it’s multifunctional enough to tackle different kinds of tasks. Need to revive some stale waffles or quickly brown your English muffin? This toaster is ready for the task..

A Touch of Retro Charm

Who says functionality can’t be sleek? The 2-Slice Prime Stainless Stainless steel toaster boasts a delightful vintage aesthetic that will complement any kitchen counter. The toaster’s sleek, stainless steel design adds a pop of modern refinement, making it a perfect match for any kitchen aesthetic.

Is this toaster the Prime choice for you?

Seeking a toaster that guarantees consistent results, offers user-friendly functionalities, and boasts effortless maintenance? Then the 2-Slice Prime Stainless Steel Toaster is a prime choice.With its wide slots, browning level settings, and defrost/bagel/cancel functions, it provides everything you need to toast bread, bagels, and more to perfection. Plus, the detachable crumb tray and sleek design make it a user-friendly and attractive addition to your kitchen.

Here’s a quick recap of the pros and cons to help you decide:

Pros:

  • Extra wide slots for thick breads, bagels, and waffles
  • Seven browning settings for perfect toast every time
  • Defrost, bagel, and cancel functions for added convenience
  • Detachable crumb tray for easy cleaning
  • Stylish retro design with a stainless steel finish

Cons:

  • Limited to 2 slices (may not be perfect for large families)
  • No digital display (may be a non-issue for some)

In general, the 2-Slice Prime Stainless Steel Toaster is a great choice for those looking for a multifunctional, user-friendly, and stylish toaster that delivers delicious results every time.


About the iFedio Prime Stainless Steel 2 Slice bread toaster

The 2-Slice Prime Stainless Steel Toaster showcases the features and benefits of the toaster, making it a compelling read for anyone looking for a new toaster. Here’s a breakdown of the key points you covered:

  • Problem: Inconsistent browning and mornings thrown into disarray.
  • Solution: The 2-slice stainless steel toaster boasts wide slots for thick breads and adjustable browning for perfect results.
  • Benefits:
    • Perfectly toasted bread every time
    • Easy to use with defrost, bagel, and cancel functions
    • Effortless cleaning with detachable crumb tray
    • Multifunctional for toasting bread, bagels, waffles, and more
    • Stylish retro design with a stainless steel finish
  • Target Audience: People looking for a functional, user-friendly, and stylish toaster.
  • Conclusion: The 2-Slice Prime Stainless Steel Toaster is a great choice for those who want delicious toast and a convenient kitchen appliance.

A well-written and informative post that tackles common toaster issues with clear language.


Specifications

Here are the specifications of the Toaster 2 Slice Best Rated Prime Stainless Steel 2 Slice Toasters Extra Wide Slot Toasters:

  • Extra-wide slots: Larger bread slices and bagels can fit in.
  • 7 Shade Settings: Allows for customizable browning control
  • Defrost/Bagel/Cancel: Features three convenient function buttons
  • Removable Crumb Tray: It ensures easy cleaning and maintenance
  • Stainless Steel: Long lasting and resistant to corrosion
  • 2-Slice: Can toast two slices of bread at the same time
  • Retro Design: Visually striking and compact
  • Wide Slot Toaster: perfect for toasting bread, waffles, and small items

Key Features

The 2-Slice Toaster with Extra Wide Slots comes equipped with an array of features designed to transform your toasting experience:

Accommodating Slices:

  • Extra-Wide Slots: These slots can handle bagels, thick-cut breads, and even English muffins with ease, giving you more multifunctionality in what you can toast.

Browning Control:

  • 7 Shade Settings: This allows you to achieve your ideal level of toast doneness, from lightly golden to a deep, crispy brown.

Special Toasting Functions:

  • Defrost: No need to thaw frozen bread beforehand. This function helps reheats and toasts frozen waffles, french toast, or bread slices.
  • Bagel: This setting gives even toasting to bagels, heating the inside while giving the outside a nice golden brown without burning.

Convenience Features:

  • Cancel Button: Take control of your toast! A cancel button lets you stop the toasting cycle whenever you achieve the desired level of doneness.
  • Detachable Crumb Tray: This makes cleaning up easy, preventing crumbs from burning and keeping your kitchen smelling fresh.
  • Automatic Shutoff: Ensures safety with automatic shut-off when toast reaches your preferred shade.
  • High-Lift Lever: Effortlessly remove even the smallest bread or bagel pieces with this convenient lever that lifts toast high for safe retrieval.
  • Cool-Touch Exterior: The toaster’s exterior remains cool to the touch, providing an extra layer of safety, particularly in kitchens where curious children might be present.

How to use the iFedio Prime Stainless Steel 2 Slice bread toaster

Here’s a step-by-step guide on how to use the Toaster 2 Slice Best Rated Prime Stainless Steel 2 Slice Toasters Extra Wide Slot Toasters:

Before You Begin:

1. To ensure safe use, locate a flat, heat-resistant surface for your toaster. Make sure the cord isn’t near flammable items and there’s sufficient space around the toaster for heat to escape.

2. Plug the toaster into a working power outlet.

Toasting Bread:

1. Choose your bread. Regular bread, thick-cut slices, or even bagels work in most wide-slot toasters.

2. Adjust the browning level. Many toasters offer a shade control (dial or buttons) to adjust browning from light to dark. This toaster provides 7 settings for precise customization to your preference.

3. Place the bread slices in the slots. For toasting bagels, use the bagel function (more on that below) for even toasting.

4. Lower the lever. The carriage will automatically lower the bread into the slots and begin toasting.

Special Functions:

  • Defrost: If using frozen bread, waffles, or pastries, click on the defrost button before lowering the lever. This setting will thaw and toast your frozen items.
  • Bagel: This button typically reduces the heat applied to the outside of the bagel while toasting the inside. Use this function for bagels to achieve a toasted inside with a golden brown, but not burnt, exterior.
  • Cancel: If your toast browns faster than expected, you can stop the cycle at any time by pressing the cancel button. It will pop up and your toast will be ready.

After Toasting:

1. The toaster automatically shuts down upon reaching the chosen shade or when the cancel button is pressed.

2. For safe removal of hot toast, utilize the high-lift lever (if present) to elevate the carriage and avoid burnt fingers.

3. Disconnect the toaster when not in use.

Cleaning:

1. Let the toaster cool down completely before cleaning.

2. For optimal performance, regularly empty the crumb tray (bottom of toaster) and discard crumbs. Clean with a damp cloth as needed.

3. Wipe the toaster exterior with a damp cloth only. Avoid abrasive cleaners and submerging in water.

By following these general steps, you should be able to use your 2-slice toaster safely and efficiently. If you have any questions or cannot locate specific buttons or features, check with the user manual that came with your toaster.

Tips and Recipes suitable for the iFedio Prime Stainless Steel 2 Slice bread toaster

Tips for Using Your 2-Slice Toaster:

  • Get the most out of your wide slots: These are great for toasting thick-cut bread, bagels, and even English muffins. You can also try toastings halved croissants or buns for sandwiches.
  • Pre-heat for even browning (optional):Want perfectly even toast every time? Simply lower the lever for a few seconds with no bread inside to preheat the coils for consistent browning. Then, place your bread and start the cycle for a more even browning process.
  • Control the browning with placement: For slight browning control (no single-sided function), try positioning the bread in the slots. Put the side you want more toasted closer to the heating element.
  • Reheat leftovers: Give leftover treats a second chance! This toaster can revive pizza slices, garlic bread, or pastries with a fast heating-up.
  • Experiment with toppings: Once your toast is done, add different kinds of toppings to create delicious snacks or light meals. Here are some ideas:
    • Sweet: Butter, jam, honey, fresh fruit, nut butters, Nutella
    • Savory: Avocado, cheese, smoked salmon, hummus, pesto

Recipes Suitable for a 2-Slice Toaster (using bread or similar):Simple and Savory:

  • Melty Cheese Toast: Toast bread, top with shredded cheese, and toast again until melted and bubbly. Try out with different cheeses or add herbs for variety.
  • Pizza Toast: Spread tomato sauce or pesto on toasted bread, top with shredded mozzarella cheese and your favorite pizza toppings (pepperoni, olives, peppers, etc.). Toast again until the cheese melts.
  • Garlic Bread: Toast bread slices. While hot, rub with a clove of garlic and sprinkle with olive oil. Optionally, sprinkle with parmesan cheese and toast briefly again.

Sweet Treats:

  • French Toast: Prepare a simple egg batter (eggs, milk, vanilla extract, cinnamon). Dip bread slices in the batter and toast until golden brown on both sides. Serve with syrup, fresh fruit, or whipped cream.
  • Cinnamon Toast: Toast bread slices. Spread with butter and sprinkle generously with cinnamon sugar. Heat again briefly to achieve a fragrant toast
  • Mini Grilled Cheese and Fruit: Use half slices filled with your favorite cheese and toast them alongside a handful of berries or sliced apple for a perfectly balanced sweet and savory snack.

Remember: These are just a few ideas to get you started. With a little creativity, you can use your 2-slice toaster to make different kind of delicious and satisfying snacks and meals.


A Cleaning Guide

Cleaning your Toaster 2 Slice Best Rated Prime Stainless Steel 2 Slice Toasters Extra Wide Slot Toasters regularly is important to maintain its performance and hygiene. Here’s a step-by-step guide on how to clean your toaster:

  1. Unplug the toaster: Make sure the toaster is not plugged to the power outlet to avoid any accidents.
  1. Remove crumb tray: Pull out the detachable crumb tray and empty it. Wash the tray with warm soapy water, rinse, and dry.
  1. Wipe exterior: Use a damp cloth to wipe down the exterior, paying attention to any areas with visible crumbs or splatters.
  1. Clean toast slots: Use a long, thin brush (like a bottle brush) or a small vacuum cleaner to remove crumbs from the toast slots.
  1. Wipe interior: Dab down the interior, including the walls and floor of the toaster using a damp cloth
  1. Clean controls: Use a soft, dry cloth to wipe down the control panel and buttons.
  1. Dry thoroughly: Use a dry cloth to wipe down the toaster and remove any excess moisture.
  1. Reassemble: Once everything is dry, replace crumb tray and plug in the toaster

Tips:

  • Clean the toaster every 1-2 weeks, or more often if you use it daily.
  • Do not use abrasive cleaners or scrubbers, as they can damage the stainless steel.
  • If you notice any stubborn stains or, mix baking soda and water to create a paste, and apply it to the area before cleaning.

By following these steps, you’ll be able to keep your toaster clean, in good working condition, and free from any built-up crumbs or bacteria.

What to avoid when using your Toaster

Here are some things to avoid when using your 2-slice toaster to ensure safety and optimal performance:

Electrical Safety:

  • Never use a toaster with a damaged cord or plug: Replace a faulty toaster immediately to avoid electrical hazards.
  • Don’t overload the electrical circuit: Avoid plugging your toaster into a circuit that’s already powering several other appliances.
  • Never dip the toaster in water or any other liquid. This can cause a short circuit and fire.

Fire Prevention:

  • Don’t leave the toaster unattended while in use. Always monitor it, especially if toasting for a long time or using the defrost function.
  • Avoid using the toaster near flammable materials. Keep curtains, towels, or other flammable objects away from the toaster.
  • Don’t force bread or thick items into the slots. This can damage the toaster and potentially cause a fire.
  • Clean the crumb tray regularly. Excess crumbs pose a fire hazard due to their potential ignition when exposed to the high temperatures of the heating coils.

Misuse and Damage:

  • Don’t put metal objects in the toaster. This can cause sparks and electrical shock. Use non metal objects like tongs to retrieve stuck bread, not a fork or knife.
  • Don’t use the toaster for anything other than its specific purpose. It’s not designed to cook other foods or reheat non-bread items.
  • Don’t cover the toaster vents. This can trap heat and lead to overheating.

General Use:

  • Don’t stuff the toaster with too much bread. This can prevent even browning and could potentially jam the mechanism.
  • Don’t put butter or oil on bread before toasting. This can create a fire hazard. You can only butter your toast after it pops up.
  • Don’t touch the hot metal parts of the toaster. Use the lever or tongs to handle hot bread.

By following these safety precautions, you can enjoy using your 2-slice toaster for a long time without any incidents. If you notice any strange smells or sparking while using the toaster, unplug from the power outlet immediately and suspend use.

In conclusion, the Toaster 2 Slice Best Rated Prime Stainless Steel 2 Slice Toasters Extra Wide Slot Toasters is a convenient and efficient appliance for toasting bread and more, with key features and necessary maintenance and safety precautions outlined.

bread maker

What Is A Bread Maker And How Does It Work?

Bread, with its comforting aroma and soul-satisfying taste, has been a staple in cultures around the world for centuries. There’s something undeniably magical about the process of transforming basic ingredients like flour, water, yeast, and salt into a warm loaf of bread. But for many, the idea of making bread from scratch can be intimidating. Enter the bread maker—your ticket to homemade bread without the hassle.

What is a bread maker?

Bread Maker

A bread maker is a versatile kitchen appliance designed to simplify the bread-making process. Also known as a bread machine, it automates the mixing, kneading, rising, and baking stages, allowing even novice bakers to create delicious loaves with minimal effort.

Step-by-step guide on how a Bread Maker works:

With your ingredients carefully measured and the bread maker primed, the magic unfolds in a captivating series of steps:

  1. Ingredients Preparation: Gather your essential elements, for example, water, yeast, salt, and any desired flavourings like herbs or seeds. Precise measurements are crucial for achieving the perfect texture and rise.
  2. Bread Maker Loading: Gently slide the bread pan into place, then layer the ingredients according to the recipe; generally, liquids are added first, then dry ingredients, and finally, the yeast is added last to avoid activation too soon.
  3. Selecting the Program: Modern bread makers boast a wealth of pre-programmed settings tailored to various bread types—basic, whole wheat, gluten-free, artisan, and more. Select the setting that aligns with your desired creation.
  4. The Kneading Choreography: With the touch of a button, the kneading paddles spring into a mesmerizing dance, rhythmically combining your ingredients and developing the gluten structure that will give your bread its signature texture and structure.
  5. The Rise to Greatness: Once the kneading phase concludes, the bread maker enters a state of tranquil incubation. The heating element creates a warm, humidity-controlled environment that coaxes the yeast into a lively fermentation, causing the dough to rise and expand to its full, lofty potential.
  6. The Baking Finale: As the rising process reaches its crescendo, the bread maker seamlessly transitions into the baking phase. The heating element applies gentle, even heat, transforming the risen dough into a golden, crusty masterpiece with a fluffy, tender interior.
  7. The Cooling Curtain: To preserve the integrity of your freshly baked loaf, some bread makers feature a built-in cooling cycle that prevents sogginess. Once the cooling phase is complete, carefully extract your creation from the bread pan and allow it to rest on a wire rack, cooling completely before indulging in that first, irresistible slice

Benefits of Using a Bread Maker

Embracing the use of a bread maker provides numerous benefits for both newbie and professional bakers. Some notable advantages are:

  1. Convenience: Simply press a few buttons to enjoy freshly cooked bread without excessive manual labour. Simply put the ingredients into the bread pan, choose your preferred settings, and let the machine do the rest. Whether you are making breakfast, lunch, or dinner, a bread maker has fresh, warm bread on hand at all times.
  2. Customization: Bread makers offer versatile recipe options, making them a popular choice. Whether you prefer the simplicity of a basic white loaf, the robust deliciousness of whole wheat, or the nutritional benefits of gluten-free bread, a bread maker allows you to create your own. You can try different flours, nuts and seeds, and even make specialty breads like sourdough or brioche. The choices are limitless, allowing you to customize your bread to your exact preferences and dietary requirements.
  3. Time-saving: Traditional breadmaking can be time-consuming, requiring hours of kneading, rising, and baking. A bread maker makes this process faster and easier. With pre-programmed settings for different varieties of bread, you may start the machine in the morning and return home to a freshly cooked loaf in the evening. This convenience is especially useful for busy people and families who wish to eat handmade bread without devoting an entire day to making it.
  4. Consistency: Getting consistent outcomes with homemade bread can be difficult, especially for those new to baking. A bread machine eliminates much of the guesswork by providing precise temperature control and preprogrammed settings that ensure consistency. The equipment precisely controls the mixing, kneading, rising, and baking operations, ensuring uniform quality with each batch. Whether you are making a simple white loaf or a complicated multigrain bread, your bread maker will provide consistent and tasty results every time.
  5. Health Benefits: Using a bread maker allows you to control the ingredients, avoiding preservatives and additives found in store-bought bread. You can use high-quality, organic ingredients and tweak the sugar, salt, and fat levels to suit your nutritional needs. This level of customization makes it easy to produce healthier bread options that meet your nutritional needs.
  6. Cost-effective: Baking bread at home with a bread machine can be less expensive than buying artisan bread from a store. While the gadget requires an initial investment, the essential bread ingredients—flour, water, yeast, and salt—are quite inexpensive. Making your own bread can result in significant savings over time, especially if you bake frequently.

With a bread maker in your kitchen arsenal, the art of homemade bread becomes accessible to everyone, regardless of baking experience. Whether you crave the simplicity of a classic white loaf or the hearty goodness of whole wheat, your bread maker empowers you to explore a world of flavours and textures with ease. It’s not merely a kitchen appliance, but a gateway to culinary creativity and satisfaction. By simplifying the bread-making process and inviting enthusiasts of all skill levels to experiment, it transforms baking into a delightful adventure. So dust off that bread maker, roll up your sleeves, and embark on a delicious journey of bread-making mastery today!


Check out our Products
FOLLOW US ON INSTAGRAM


Galanz Retro 2-Slice bread toaster

Say Goodbye to Uneven Toast: The Galanz Retro 2-Slice Toaster with a Touch of Vintage Charm

Fed up with toast that’s unevenly browned? Wish for mornings filled with consistently delicious, perfectly toasted bread? Well, look no further than the Galanz Retro 2-Slice Toaster! This little gem merges modern features with a cute retro style, making it the perfect countertop companion for any kitchen.

Toasting Perfection Every Time

The Galanz Retro Toaster boasts 6 browning levels, making sure you get your toast exactly the way you like it. Whether you prefer a light and airy golden brown or a deep, satisfying crunch, this toaster delivers. Plus, the even heating technology ensures consistent browning across the whole slice, no more burnt edges and Uneven browning!

Extra Wide Slots for All Your Bread Needs

The 1.5-inch extra wide slots are perfect for toasting bagels, thick bread slices, and even Texas toast. No more battling with oversized bread or getting frustrated with uneven toasting. This toaster can tackle it all!

Built for Convenience

The Galanz Retro Toaster comes packed with features that make your mornings convenient. The defrost function lets you toast frozen bread straight from the freezer, saving you valuable time. The cancel button allows you to stop the toasting cycle early if your bread starts browning too quickly. Keeping your kitchen spotless is a breeze with the removable crumb tray that allows for hassle-free cleaning.

A Touch of Retro Charm

Let’s not forget the eye candy! Featuring a gorgeous blue coat and a classic retro design, this toaster elevates your kitchen’s aesthetic with a hint of vintage charm. It’s not just a toaster; it’s a conversation starter! The included dust cover keeps your toaster clean and adds another layer of retro charm when not in use.

Here’s a quick brief of why you’ll love the Galanz Retro 2-Slice Toaster:

  • 6 browning levels for perfect toast customization
  • Extra wide slots (1.5 inches) for bagels, thick bread, and more
  • Defrost function for toasting frozen bread
  • Cancel button for stopping the toasting cycle
  • Removable crumb tray for easy cleaning
  • Dust cover for keeping your toaster clean and adding a retro touch
  • Classic blue aesthetic

So dump the unevenly toasted bread and upgrade your mornings with the Galanz Retro 2-Slice Toaster! It’s the perfect blend of functionality, convenience, and vintage charm.

About the Galanz Retro 2-Slice bread toaster

The Galanz Retro 2-Slice Toaster is a toaster that boasts a number of features that can make breakfast preparation convenient. With 1.5-inch extra wide slots, you can toast bagels, thick breads, and even English muffins. It also has six browning levels, so you can get your toast exactly how you like it, from lightly golden to dark and crispy.

Here are some of the features of the Galanz Retro 2-Slice Toaster:

  • 2-slice capacity
  • Extra wide 1.5″ slots for bagels and thick bread
  • Defrost function
  • 6 browning levels
  • Dust lid
  • Detachable crumb tray
  • Color: Blue

Most users consider this toaster to be a good value for the price. It is priced at around $30 and consistently receives positive reviews. Users like that it is easy to use and clean, and that it toasts bread evenly.

If you are looking for a basic toaster that can handle different kinds of breads, the Galanz Retro 2-Slice Toaster is a great option. It is pocket friendly, easy to use, and makes great toast.

Specifications

Here are the specifications of the Galanz Retro 2-Slice Toaster:

  • Dimensions (Overall): 7.56 inches height, 11.8 inches width, 7.08 inches depth
  • Weight: 2.9 pounds
  • Number of Slices: 2
  • Wattage Output: 825 Watts
  • Material: Plastic and Stainless Steel
  • Features: Removable Crumb Tray, Extra Wide Slots
  • Appliance Capabilities: Toasters
  • Care & Cleaning: Spot or Wipe Clean
  • Warranty: 1 Year Limited Warranty
  • Slot size: 1.5 inches wide
  • Browning levels: 6
  • Functions: Defrost, Bagel, Cancel
  • Color: Red

Key Features

Here are some of the features of the Galanz Retro 2-Slice Toaster:

  • 1.5″ Extra Wide Slots: It can accommodate even the thickest slices of bread and bagels
  • Customized Toasting Options: 6 browning levels are provided with the browning knob, cancel, bagel and defrost functions
  • Retro Design: Vintage charm meets modern convenience.
  • Easy Cleaning: Detachable crumb tray at the bottom of the toaster
  • Dust Cover: This also helps make the toaster clean and free of dust
  • High Lift Lever: Easily and safely remove each slice of toast
  • Defrost Function: Allows for toasting of frozen bread or other suitable recipes
  • It ca Allows for toasting of bagels

How to use the Galanz Retro 2-Slice bread toaster

Here’s a step-by-step guide on how to use the Galanz Retro 2-Slice Toaster:

1. Plug in the toaster and Prepare your bread: Connect the toaster to a nearby outlet and choose your bread slices, bagels, or other breakfast items you want to toast.

2. Adjust browning level: The Galanz Retro 2-Slice Toaster likely has a browning lever knob with settings from 1 (light) to 6 (dark). Select the level that suits your preference.

3. Using special functions: If you want to defrost frozen bread, press the defrost button (if available). Likewise, for bagels, use the bagel setting (if available) which toasts the cut side and warms the inside.

4. Place bread in slots: Carefully insert your bread slices or bagel halves into the toaster’s wide slots.

5. Start toasting: Click on the lever down to activate the toasting cycle. The lever will automatically lock in place.

6. Toaster beeps (optional): Some toasters emit a beep to signal when toast is finished. Be aware of the audio cue or watch for a light indicator, depending on your specific model.

7. Retrieve toast: The lever will pop back up when toasting is complete. Use a non metal utensil like tongs to carefully remove the hot toast.

8. Cleaning: Unplug the toaster from the outlet and let it cool completely before cleaning. Empty the crumb tray regularly to prevent crumbs from burning.

Additional Tips:

  • Don’t overload the slots.
  • Avoid using metal utensils to remove toast as they can scratch the heating elements.
  • Let the toaster cool down completely before storing it.

By following these steps, you’ll be able to enjoy perfectly toasted bread with the Galanz Retro 2-Slice Toaster!

Tips and Recipes suitable for the Galanz Retro 2-Slice bread toaster

Here are some tips and recipes suitable for the Galanz Retro 2-Slice Toaster:

Tips:

  • Use fresh bread for the best toasting results.
  • Fine-tune the browning level for perfectly toasted bread.
  • Use the Defrost function for frozen bread or bagels.
  • Use the Bagel function for toasting bagels or English muffins.
  • Experiment with toasting a variety of breads, like sourdough or ciabatta.

Recipes:

  • Classic Toast with Butter and Jam: Toast bread to your liking, spread butter and jam on it.
  • Avocado Toast: Toast bread, mash avocado, and spread on top. Add salt, pepper, and red pepper flakes to savor.
  • Grilled Cheese Sandwich: Toast bread, place cheese in between, and grill until crispy and melted.
  • Toast with Scrambled Eggs and Bacon: Toast bread, top with scrambled eggs and crispy bacon.
  • Cinnamon Sugar Toast: Toast bread, mix sugar and cinnamon, and drizzle on top.
  • Bagel with Cream Cheese and Smoked Salmon: Toast bagel, spread with cream cheese, and top with smoked salmon and capers.

Additional recipe ideas:

  • Toast bread with almond butter and banana slices
  • Toast  bread with hummus and cherry tomatoes
  • Toast bread with peanut butter and honey
  • Toast bread with tapenade and goat cheese
  • Toast bread with Nutella and strawberries

Remember to always try out with different ingredients and toppings to find your favorite combinations!

A Cleaning Guide

Cleaning your Galanz Retro 2-Slice Toaster is easy! Follow these steps:

  1. Unplug the toaster from the power outlet.
  1. Allow the toaster to cool down completely.
  1. Detach the crumb tray from the bottom of the toaster and empty it.
  1. Wipe the exterior with a damp cloth, avoiding any openings or vents.
  1. Use a soft-bristled brush or a small, dry paint brush to sweep away crumbs or remains from the toast slots.
  1. Wipe the toast slots with a damp cloth, making sure to remove any remaining crumbs or debris.
  1. Dry the toaster with a dry cloth to prevent water spots.
  1. Reassemble the toaster and plug it back in.

Additional tips:

  • Clean the toaster regularly to prevent crumb buildup.
  • Avoid using abrasive cleaners, scrubbers, or harsh chemicals, as they can damage the toaster’s finish or harm the non-stick coating.
  • If you need to remove stubborn stains or grime, mix equal parts water and white vinegar in the crumb tray and let it sit for about an hour before cleaning.
  • Always unplug the toaster when not in use to avoid standby power consumption and reduce the risk of electrical shocks or fires.

By following these steps, you’ll keep your Galanz Retro 2-Slice Toaster in great condition and ensure it continues to toast your bread to perfection!

What to avoid when Using the Galanz Retro 2-Slice bread toaster

Here are some things to avoid when using your Galanz Retro 2-Slice Toaster:

  1. Overloading: Don’t put too much bread or bagels in the toaster, as this can cause jamming or uneven toasting.
  1. Metal utensils: Never use metal utensils, like knives or forks, to remove toast or bagels while the toaster is plugged in as they can scratch or damage the toaster’s non-stick coating and creates a huge risk of electric shock. Use tongs or a heat-resistant utensil to remove toast.
  1. Abrasive cleaners: Avoid using harsh chemicals, abrasive cleaners, or scouring pads, as they can damage the toaster’s finish or harm the non-stick coating.
  1. Excessive force: Don’t force the toast or bagels into the slots, as this can damage the toaster’s mechanisms.
  1. Leaving it unattended: While toasters typically have automatic shutoff, it’s best not to leave the appliance unattended while in operation, especially if toasting something that might burn easily. So always make sure to monitor while it’s in use, as it can cause burns or start a fire if left unattended.
  1. Touching hot surfaces: Keep your fingers and other objects away from the hot toaster slots and heating elements to avoid burns or injuries.
  1. Using it near water: Do not  use the toaster near a sink or any water source, as it can cause electrical shocks or damage to the appliance.
  1. Ignoring maintenance: Always clean the toaster and remove crumb buildup regularly, to prevent damage and ensure optimal performance.
  1. Using it with a damaged cord: If the power cord is damaged, replace it before using the toaster to avoid electrical shocks or fires.
  1. Leaving it plugged in when not in use: Always unplug the toaster when not in use to avoid standby power consumption and reduce the risk of electrical shocks or fires.

For a safe and enjoyable toasting experience with your Galanz Retro 2-Slice Toaster, be sure to avoid these common mistakes!

In conclusion, the Galanz Retro 2-Slice Toaster is a great kitchen appliance that provides multi functionality and convenience. To get the most out of it, follow the tips and recipes provided, clean it regularly, and use it safely. With proper use and maintenance, it will provide perfectly toasted bread and last for a long time, making it a practical asset for your kitchen.

cheap waffle maker 

Where Can I buy a Cheap Waffle Maker online?

Are you looking for an affordable waffle maker? Check out our list of the 12 best online stores to find a great deal on a cheap waffle maker for your kitchen.


Waffle maker, cheap waffle maker

It’s hard to beat the delicious smell and taste of freshly made waffles on a weekend morning. However, purchasing a new waffle maker can be an investment.
In today’s digital age, finding affordable kitchen appliances online is easier than ever. If you’re on a budget, there’s a plethora of online stores offering budget-friendly waffle makers. To help you on your quest for the perfect waffle maker at the best price, here are 12 popular online stores to consider:

1. Amazon
The Everything Store has an enormous selection of waffle makers from top brands at various price points. Whether you’re looking for a basic model or a high-end, multifunctional waffle maker, Amazon has it all. With detailed customer reviews, ratings, and Q&A sections, it’s easy to find the right waffle maker to suit your needs and budget. Customers rave about the fast shipping, reliable service, and vast selection available on Amazon.

2. Walmart
You’ll find plenty of affordable options, like the Oster Belgian Waffle Maker for under $30. Walmart is known for its everyday low prices and wide range of products. The online store is user-friendly, and customers appreciate the free in-store pickup option, easy returns, and frequent sales. Walmart’s extensive inventory ensures that you can find a waffle maker that fits your kitchen and budget.

3. Target
In addition to their in-house brands, Target sells reasonably priced waffle makers from Cuisinart, Black & Decker, and more. Target is beloved for its stylish yet affordable product range and excellent customer service. Shoppers enjoy the convenience of browsing both online and in-store, with many opting for the drive-up service for quick pickups. Target’s RedCard holders also benefit from additional discounts and free shipping.

4. Konga
This major Nigerian online store offers waffle makers from Kenwood, Khind, and others at competitive prices. Konga is a go-to for many Nigerian shoppers due to its extensive range of products and secure payment options. Customers appreciate Konga’s frequent promotions, reliable delivery services, and the option to pay on delivery, which adds an extra layer of convenience and trust.

5. Jumia
Jumia, another massive Nigerian e-commerce company, has a wide selection of affordable yet dependable waffle makers. Shoppers hold Jumia in high respect due to its impressive delivery system and user-friendly website. Consumers adore the wide selection of products, affordable prices, and frequent flash discounts that make it simple to locate a fantastic offer. Customers’ evaluations and ratings on Jumia assist shoppers in making wise selections.

6. AliExpress
The popular Chinese online retailer is loaded with ultra-cheap waffle maker options if you don’t mind longer shipping times. AliExpress is famous for its unbeatable prices and massive selection of products. Shoppers enjoy direct-from-manufacturer deals, extensive product descriptions, and customer reviews. Although shipping times can be longer, the savings and variety often outweigh this inconvenience.

7. Wayfair
In addition to home furnishings, Wayfair has a nice selection of kitchen appliances, including affordable waffle makers. Wayfair’s user-friendly site, excellent customer service, and free shipping on most orders make it a favourite among online shoppers. Customers love the detailed product descriptions, high-quality images, and customer reviews that help them make well-informed purchases.

8. Overstock
This online liquidator frequently offers major discounts on name-brand waffle makers that are open-box or refurbished. Overstock is known for its significant markdowns on a variety of products. Customers appreciate the excellent deals, the option to find unique items, and the frequent promotions that make shopping enjoyable and affordable. Overstock’s customer service and return policy are also highly rated.

9. Newegg
Best known for computers, Newegg also sells inexpensive home appliances, including basic waffle makers. Newegg’s reputation for quality products and competitive pricing extends beyond electronics. Shoppers value the detailed product specifications, customer reviews, and the company’s excellent customer service. The frequent deals and promotions make it a worthwhile destination for budget-friendly appliances.

10. eBay
If you’re open to buying from individual sellers or exploring secondhand options, eBay can be a treasure trove for budget-friendly waffle makers. Be sure to read reviews and check seller ratings for a smooth shopping experience. eBay’s auction and Buy It Now options provide flexibility, and customers enjoy the thrill of finding great deals. The platform’s robust buyer protection ensures a safe shopping experience.

11. Banggood
Specializing in affordable gadgets and electronics, Banggood is another international option for purchasing budget-friendly waffle makers. Take advantage of their flash deals and coupons for additional savings. Customers appreciate the competitive prices, wide product range, and detailed descriptions. Banggood’s loyalty program and frequent sales add to the overall positive shopping experience.

12. Rakuten
Formerly Buy.com, this online megastore is stocked with heavily discounted waffle makers from third-party sellers. Rakuten is known for its cash-back rewards program, which adds extra value to every purchase. Customers enjoy the vast selection, competitive pricing, and the ability to earn points on every purchase. The site’s easy navigation and excellent customer service make it a top choice for many shoppers.

Before making a purchase, it’s crucial to consider factors such as the type of waffle you prefer (Belgian, Liege, etc.), features like non-stick coating and temperature control, and how frequently you plan to use your waffle maker.

Additionally, make sure to thoroughly read reviews, compare prices across different retailers, and actively seek out sales or coupon codes to maximize your savings. Soon enough, you’ll be indulging in delicious homemade waffles without burning a hole in your wallet!

Check out our Products
FOLLOW US ON INSTAGRAM

iSiLER 2 Slice bread toaster

Brighten Up Your Mornings with the iSiLER 2 Slice Toaster in Sunny Yellow

Want a toaster that does the job well and brings a bit of cheer to your kitchen? Look no further than the iSiLER 2 Slice Toaster! This cheerful kitchen appliance boasts a range of features that will make your mornings a little brighter, all wrapped up in a compact and vibrant design.

Toast to Perfection Every Time

The iSiLER toaster offers 7 levels of browning to perfectly match your preference. Whether you prefer your bread lightly kissed with golden brown or a deep, satisfying crunch, this toaster got you covered.

Double-Sided Heating for Even Results

No more unevenly toasted bread! The iSiLER toaster features double-sided heating elements that guarantees your bread will be evenly toasted, all the way through. This is especially important for thicker slices or bagels, which can often end up burnt on the outside and raw in the middle.

Bagel Function for the Perfect Breakfast Staple

Speaking of bagels, the iSiLER toaster has a dedicated bagel function that reheats the inside of the bagel while gently toasting the outside. This ensures you get a warm, chewy center and a perfectly toasted exterior, perfect for spreading your favorite cream cheese or toppings.

Compact Design for Small Kitchens

Despite limited counter space, the iSiLER toaster’s small footprint won’t be a problem. Its small design makes it a great choice for apartments, dorms, or small kitchens. With its bright yellow hue, the iSiLER toaster brings a touch of personality to any countertop.

Easy Cleaning with Removable Crumb Tray

Nobody likes a messy toaster! The iSiLER toaster features a detachable crumb tray that makes cleaning up easy. Simply remove the tray, throw away the crumbs, and wipe it clean for a fresh start.

Additional Features

The iSiLER toaster includes a defrost function for frozen bread and a cancel function for when you need to stop the toasting cycle early.

A Toasty Conclusion

The iSiLER 2 Slice Toaster is a great choice for anyone looking for a functional, pocket friendly, and cheerful toaster. Boasting 7 shade settings, double-sided heating, a bagel function, and a space-saving design, this toaster is a versatile workhorse that will quickly become indispensable in your kitchen. So abandon the unevenly toasted bread and start your day with a perfectly browned slice from the iSiLER toaster!

About the iSiLER 2 Slice bread toaster

Here are some key points about the iSiLER 2 Slice Toaster ¹ ²:

Product Information:

  • Brand: iSiLER
  • Color: Yellow, Green, Grey, Black, Pink
  • Material: Polypropylene
  • Product Dimensions: 24.13 x 13.46 x 17.78 cm; 1 kg (9.5″D x 5.3″W x 7″H)
  • Power/Wattage: 750 watts
  • Voltage: 120 Volts
  • Auto shut-off: Yes
  • Number of slices: 2
  • Special Features: Automatic Shut-Off

Product Description:

  • 2 Slice Extra-wide Slots & 750 W Power: Each slot measures 5.4 × 1.3”, thick slices of many types of bread, bagel, muffins, waffles and more can fit in.
  • Even Browning With 7 Shade Settings & Double Sides Baking: The 7 selectable browning levels for 2-side baking allow ideal crispness for every type of bread and guarantees even browning with accurate control.
  • 3 Led Function Buttons: The defrost and reheat mode avoid over-browning or burning. The cancel button allows a shutdown without a struggle.
  • Easy Operation & Cleaning: Simply slide out the crumb tray for easy cleaning. The 3.6 foot extra-long cord provides greater reach with a convenient cord storage at the bottom of the unit.
  • Safety & Certification: Fast-heated 430 stainless steel bread slots and a PP body provide optimal, UL certified safety.


Specifications

Here are the specifications of the iSiLER 2 Slice Toaster ¹:

  • Brand: iSiLER
  • Color: Black
  • Material: Polypropylene
  • Product Dimensions: 9.5″D x 5.3″W x 7″H
  • Specific Uses For Product: Bagel, Bread
  • Wattage: 750 watts
  • Number of Slices: 2
  • Special Feature: Automatic Shut-Off
  • Style: Classic
  • Item Weight: 2.2 Pounds
  • Number of settings: 7
  • Number of Programs: 3
  • Voltage: 120V, 60Hz
  • Power Cord Length: 3.6 ft
  • Extra-wide slots: 5.4× 1.3 in


Key Features

Here are the features of the iSiLER 2 Slice Toaster:

  1. Extra-Wide Slots: 5.4″ x 1.3″ slots can accommodate thick slices of bread, bagels, muffins, and more.
  1. 7 Shade Settings: select from 7 browning levels for perfect crispness and control.
  1. Double-Side Baking: Toast both sides of the bread consistently.
  1. Defrost Function: This function is used to defrost frozen bread or bagels with ease.
  1. Cancel Function: It is used to stop the toasting process at any time.
  1. LED Indicating Buttons: User friendly buttons with LED indicators.
  1. Detachable Crumb Tray: Ensures easy cleaning and maintenance.
  1. Cord Wrap Storage: Convenient cord storage at the bottom of the unit.
  1. Fast Heating: Quickly toasts bread to your desired preference.
  1. Automatic Shut-Off: Turns off the toaster when the toasting cycle is complete.
  1. Compact Design: Space-saving design fits perfectly on your countertop.
  1. Easy Operation: Simple and intuitive operation.

These features make the iSiLER 2 Slice Toaster a convenient and versatile addition to your kitchen!

How to Use the iSiLER 2 Slice bread toaster

Here’s a step-by-step guide on how to use the iSiLER 2 Slice Toaster:

  1. Plug in the toaster: Connect the toaster to a nearby outlet.
  1. Place bread in the slots: Put 2 slices of bread into the extra-wide slots (5.4″ x 1.3″) which can accommodate the recipe suitable for the toaster.
  1. Adjust the shade setting: Select one of the 7 browning levels using the shade control button. Consult the user manual (if available) for recommended settings based on your bread type and desired level of toastiness. 
  1. Select your function (optional): 
  • Press the Defrost function if your bread is frozen.
  • Bagel function warms the inside of the bagel while toasting the outside for a perfect texture.
  • Cancel button depending on your needs. If your bread starts toasting too quickly, you can use the cancel button to stop the cycle early.
  1. Start toasting: Press the Start button to activate the toasting cycle.
  1. Wait: The toaster will automatically shut off when the cycle is complete.
  1. Remove toast: Take out your toasted bread and enjoy!
  1. Clean up: pull out the crumb tray and empty it for easy cleaning.

Some additional tips:

  • Use the Defrost function for frozen bread or bagels.
  • Use the Bagel function for toasting bagels or English muffins.
  • Press Cancel to stop the toasting cycle at any time.
  • Adjust the shade control to your desired level of browning.
  • Always unplug the toaster when you are not making use of it.

By following these steps, you’ll be able to enjoy perfectly toasted bread with the iSiLER 2 Slice Toaster!

Tips and Recipes Suitable for the iSiLER 2 Slice bread toaster

Here are some tips and recipes suitable for the iSiLER 2 Slice Toaster:

Tips:

  • Use fresh bread for the best toasting results.
  • Adjust the browning level to your desired preference.
  • Use the Defrost function for frozen bread or bagels.
  • Use the Bagel function for toasting bagels or English muffins.
  • Put the iSiLER toaster to the test with different breads like sourdough or ciabatta. 

Recipes:

  • Classic Toast with Butter and Jam: Toast bread to your desired preference, spread with butter and jam.
  • Avocado Toast: Toast bread, mash avocado, and spread on top. Add salt, pepper, and red pepper flakes to savor.
  • Grilled Cheese Sandwich: Toast bread, place cheese in between, and grill until crispy and melted.
  • Toast with Scrambled Eggs and Bacon: When toasting your bread, top with scrambled eggs and crispy bacon.
  • Cinnamon Sugar Toast: Toast bread, mix sugar and cinnamon, and drizzle on top.
  • Bagel with Cream Cheese and Smoked Salmon: Toast bagel, spread with cream cheese, and top with smoked salmon and capers.

Some additional recipe ideas:

  • Toast with almond butter and banana slices
  • Toast with hummus and cherry tomatoes
  • Toast with peanut butter and honey
  • Toast with tapenade and goat cheese
  • Toast with Nutella and strawberries

Remember to always try out with different ingredients and toppings to find your favorite combinations!


A Cleaning Guide

For easy Cleaning of your iSiLER 2 Slice Toaster, here’s a step-by-step guide to help  you through:

  1. Unplug the toaster: Make sure the toaster is no longer plugged to the power outlet to avoid any accidents or electrical shocks.
  1. Cool down: Let the toaster cool down completely before cleaning to avoid burns or injuries.
  1. Remove crumb tray: Pull out the crumb tray from the bottom of the toaster and discard any crumbs or remnants. Wash the tray with warm soapy water, dry thoroughly, and replace it.
  1. Wipe exterior: Use a damp cloth to wipe down the exterior of the toaster, Checking for any crumbs or splatters you might have missed
  1. Clean toast slots: Use a long, thin brush (like a bottle brush) or a small, soft-bristled brush to gently sweep away crumbs from the toast slots.
  1. Wipe toast slots: Use a damp cloth to wipe down the toast slots, removing any remaining crumbs or debris.
  1. Clean control panel: Use a soft, dry cloth to wipe down the control panel, avoiding any buttons or LED indicators.
  1. Dry thoroughly: For areas you cleaned with water, use a dry cloth to remove any remaining moisture.
  1. Reassemble: Once everything is dry, reattach the toaster and plug it back in.

Some additional tips:

  • Always clean the toaster regularly to prevent crumb buildup.
  • For a long-lasting toaster, use soft cloths and light soap or detergent. Skip the abrasive cleaners, scrubbers, and harsh chemicals, as they can be too tough on the finish and non-stick coating.
  • For stubborn stains or grime, mix equal parts water and white vinegar in the crumb tray and let it settle for about an hour before cleaning.

By adhering to these guidelines, you can ensure the longevity and optimal performance of your iSiLER 2 Slice Toaster, guaranteeing consistently perfect toast.


What to avoid when using the iSiLER 2 Slice bread toaster

Here are some things to avoid when using the iSiLER 2 Slice Toaster:

  1. Avoid overloading: Don’t put too much bread or bagels in the toaster, to avoid jamming or uneven toasting.
  1. Don’t touch heating elements: Keep your fingers and other objects away from the hot toaster slots and heating elements to avoid burns, injuries or elecrical shock.
  1. No metal utensils: Never use metal utensils, like knives or forks, to remove toast or bagels, as they can scratch or damage the toaster’s non-stick coating.
  1. Avoid extreme temperatures: Keep your toaster away from hot surfaces like ovens or stovetops to prevent overheating and potential damage.
  1. Unplug when not in use: Always unplug the toaster when not in use to avoid standby power consumption and reduce the risk of electrical shocks or cause fire hazard.
  1. No flammable materials nearby: Keep flammable materials, like towels or curtains, away from the toaster to avoid fire hazards.
  1. Clean regularly: Failing to clean the toaster regularly can lead to crumb buildup and affect its performance.
  1. Avoid abrasive cleaners: Keep your iSiLER toaster looking its best and functioning flawlessly by avoiding harsh chemicals, abrasive cleaners, and scouring pads. These can damage the finish and scratch the non-stick coating.
  1. No sharp objects: Don’t use sharp objects, like knives or scissors, to remove toast or bagels, as they can scratch or damage the toaster.
  1. Follow instructions: Always consult the user manual’s instructions and guidelines for safe and effective use.

The adherence to these aforementioned recommendations will contribute to the secure and pleasurable operation of your iSiLER toaster.

In conclusion, the iSiLER 2 Slice Toaster is a great kitchen appliance that offers multifunctionality and convenience. To get the most out of it, follow the tips and recipes provided, always clean it regularly, and use it safely. With proper use and maintenance, it will provide perfectly toasted bread and last for years to come.

Bread toaster

What is the Most Purchased Bread Toaster on Amazon

What is the Best and Most Purchased Bread Toaster on Amazon?

As the perfume of freshly brewed coffee permeates the kitchen, the prospect of a flawlessly toasted slice of bread may make or break your morning routine. A dependable bread toaster is an essential kitchen device, capable of transforming a plain slice into a crispy, golden-brown delight. With so many possibilities on Amazon, it can be difficult to select the right toaster. Fear not, toast fans; we have scoured the virtual shelves to offer you the top 15 bread toaster brands that promise to up your toasting game.

1. Cuisinart bread toaster:

Cuisinart bread toaster
Renowned for their sleek designs and top-notch performance, Cuisinart toasters are a favourite among home cooks. Their wide slots accommodate thick slices with ease, while innovative features like defrost and reheat settings ensure your toast is always at the perfect temperature.

2. Breville bread toaster:

Breville bread toaster

Breville toasters are known for their cutting-edge technology and innovative features. Think LCD displays, custom browning controls, and even “lift and look” features to check on your toast without interrupting the cycle. Breville takes toasting to a whole new level.

3. KRUPS bread toaster:

KRUPS bread toaster
KRUPS toasters are a blend of modern design and advanced technology. From their keep-warm function to their precise browning control, these toasters cater to all your toasting preferences, ensuring your bread is toasted to perfection.

4. Hamilton Beach bread toaster:

Hamilton Beach
Affordable yet reliable, Hamilton Beach toasters are a popular choice for budget-conscious consumers. With their user-friendly controls and versatile features, these toasters deliver consistent results, making them a dependable addition to any kitchen.

5. BLACK+DECKER bread toaster:

BLACK+DECKER

BLACK+DECKER toasters are the workhorses of the kitchen. Durable and long-lasting, these toasters offer a wide range of options, from basic models to feature-rich variants, ensuring there’s something for every toasting need and preference.

6. Oster bread toaster:

Oster bread toaster
Oster toasters are a testament to simplicity and functionality. With their sleek designs and easy-to-use controls, these toasters make toasting a breeze, delivering perfectly crisp slices every time.

7. Smeg bread toaster:

Smeg bread toaster

Smeg toasters are a perfect blend of retro styling and modern technology. These classic appliances bring a vintage charm to your kitchen and feature advanced functions such as automatic centring and adjustable browning control.

8. KitchenAid bread toaster:

KitchenAid bread toaster
KitchenAid toasters are a testament to the brand’s commitment to quality and performance. With their sturdy construction and intuitive controls, these toasters ensure consistent results while adding a touch of elegance to your kitchen countertop.

9. Dualit bread toaster:

Dualit bread toaster
Dualit toasters are the epitome of British craftsmanship and design. These iconic appliances not only boast a classic aesthetic but also offer advanced features like adjustable browning settings and a manual ejector, ensuring your toast is always cooked to perfection.

10. Frigidaire bread toaster:

Frigidaire bread toaster
Frigidaire toasters are a reliable choice for those seeking a no-frills toasting experience. With their straightforward controls and durable construction, these toasters deliver consistent results, making them a practical addition to any kitchen.

11. Russell Hobbs bread toaster:

Russell Hobbs bread toaster
Russell Hobbs toasters are a perfect blend of style and functionality. With their sleek designs and innovative features like lift-and-look functionality and automatic centring, these toasters ensure your bread is toasted evenly every time.

12. Elite Gourmet bread toaster:

Elite Gourmet bread toaster
Elite Gourmet toasters are a budget-friendly option that doesn’t compromise on performance. With compact designs and user-friendly controls, these toasters are perfect for small kitchens or busy households.

13. Dash bread toaster:

Dash bread toaster
Dash toasters are a trendy and versatile choice for modern kitchens. With their compact and stylish designs, these toasters look great on your countertop and offer convenient features like defrost and reheat settings.

14. Keenstone bread toaster:

Keenstone bread toaster
Keenstone toasters are a reliable and affordable option for those seeking a basic toasting experience. With their user-friendly controls and durable construction, these toasters ensure consistent results, making them a practical choice for everyday use.

15. Magimix bread toaster:

Magimix bread toaster
Magimix toasters are a sophisticated choice for discerning toast enthusiasts. With their sleek designs and advanced features like precise browning control and automatic shut-off, these toasters offer a premium toasting experience.


Whether you prefer artisanal sourdough or classic white bread, having the perfect toaster can significantly improve your morning routine. Check out the top 15 toaster brands on Amazon, read reviews, and find the toaster that will take your toast game to the next level. With the right appliance, every morning can be a delightful journey into the world of perfectly toasted slices.


For more updates: Click on this link to check out our product,
Check out our social media platforms


Nostalgia Inspirex Touch Screen Display Smart Toaster

About the Nostalgia Inspirex Touch Screen Display Smart Toaster

Enhance Your Mornings with the Inspirex Touchscreen Smart Toaster: Toast Perfection at Your Fingertips

Are you tired of battling the toaster for that ideal slice of golden brown toast? Would you love a streamlined and modern appliance that perfectly complements your kitchen’s design? Then look no further than the Inspirex Touchscreen Smart Toaster! This toaster seamlessly blends advanced technology with a classic aesthetic, creating a versatile appliance for any kitchen.

Toasting Made Easy with a Touch

Gone are the days of mishandling buttons and dials. The Inspirex toaster boasts a large and intuitive touchscreen interface, allowing you to choose your desired settings with a simple touch. Choose from 8 bread types, including white, wheat, bagel, and even frozen waffles. With pre-set toasting cycles for various bread types, this toaster delivers your desired level of crispness, every time.

No More Toasting Guesswork

Forget about burnt toast or underdone slices forever! The Inspirex toaster features 7 browning levels, giving you complete control over your toast’s color. With the remaining toasting time visible on the digital display, you can confidently tackle other things in your kitchen.

Effortless Functionality Meets Modern Design

The Inspirex toaster offers both cutting-edge technology and stunning aesthetics. The sleek stainless steel finish adds a touch of modern elegance to any kitchen counter. For your safety and convenience, the toaster features an automatic lowering and raising mechanism. The removable crumb tray also ensures easy cleaning.

Unlock Even More:

  • Reheat Function: Is your toast a little chilly? Simply use the reheat function for a quick and easy crisp.
  • Defrost Setting: No need to wait for frozen bread to unfreeze! The defrost setting conveniently takes care of that for you.
  • Automatic Shutoff: This toaster’s automatic shutoff function guarantees safe operation, so you can relax and enjoy perfectly toasted bread.

Is the Inspirex Touchscreen Smart Toaster Right for You?

This toaster is an ideal choice for anyone who:

  • Wants perfectly toasted bread, at all time
  • Values the ease of use offered by a touchscreen interface.
  • Appreciates a contemporary design with high performance.
  • Enjoys different kind of bread types, including bagels and frozen waffles

While the occasional batch might toast unevenly, the general value and ease of use make this toaster a captivating option for many.

So do away with the burnt toast and embrace mornings made easy with the Inspirex Touchscreen Smart Toaster!


Specification

Here are the specifications of Inspirex Touch Screen Display Smart Toaster ¹ ² ³:

Number of Slices:

  • 2-slice toaster

Touch Control:

  • Expansive and user-friendly touchscreen display with well-defined icons.

Toast Programs:

  • 60+ programs
  • Select from 8 bread types
  • 7 browning level options
  • Defrost, add time, and reheat functions

Automatic Lowering:

  • This system will lower your bread into the toaster
  • Push CANCEL to automatically stop and pop up your toast

Heating Coils:

  • Fast-heating nichrome wire heating coils
  • Even, consistent toasting

Countdown Display:

  • Integrated countdown timer on the touch display
  • Adapts to your preferences

Modern Style:

  • streamlined, stylish, and modern design
  • Stylish glass touch screen plate

Easy Clean:

  • Detachable crumb tray included for easy cleanup

Key Features

Here are the features of Inspirex Touch Screen Display Smart Toaster:

  1. Touch Screen Display: Spacious and user-friendly touchscreen display with self-explanatory icons.
  1. 8 Bread Types: Select from 8 pre-programmed bread types, including white, whole wheat, bagel, English muffin, and more.
  1. 7 Browning Modes: Choose from 7 browning levels, from lightly toasted to deeply browned.
  1. Automatic Lowering and Raising: This system lowers bread into the toaster, and pops it back up when toasting is complete.
  1. Digital Countdown: Visual countdown display on the touchscreen control panel shows the toasting time.
  1. Modern Style: Streamlined, stylish, and modern design with a sleek glass touch screen plate.
  1. Easy Clean: Detachable crumb tray included to ensure easy cleanup.
  1. Fast Heating: Fast-heating nichrome wire heating coils for quick and even toasting.
  1. Defrost Function: Defrost function for toasting frozen bread.
  1. Add Time Function: This is for extra toasting time.
  1. Reheat Function: This Function is for warming up previously toasted bread.
  1. Stainless Steel: Durable stainless steel construction for long lifespan.

These features make the Inspirex Touch Screen Display Smart Toaster a convenient, multifunctional, and user-friendly appliance for your kitchen.

How to Use the Nostalgia Inspirex Touch Screen Display Smart Toaster

Here’s a step-by-step guide on how to use the Inspirex Touch Screen Display Smart Toaster:

  1. Plug in the toaster: Plug the toaster to a power outlet.
  1. Turn it on: Touch the touchscreen display to turn on the toaster.
  1. Select bread type: Easily choose among 8 pre-programmed toasting options via the touchscreen.
  1. Select browning level: Choose from 7 browning levels by touching the desired level.
  1. Place bread: Put your bread slices into the toaster slots.
  1. Start toasting: Touch the “Start” icon to activate the toasting cycle.
  1. Automatic lowering: The toaster will automatically lower the bread into the toasting chamber.
  1. Toasting progress: Watch your toast journey unfold with a clear countdown timer and progress bar on the display.
  1. Toast is ready: When the toasting cycle is complete, the toaster will automatically pop up the toast and beep to alert you.
  1. Remove toast: Take out your toasted bread and enjoy!


Additional functions:

  • Defrost: Touch the “Defrost” icon to toast frozen bread.
  • Add time: Touch the “Add time” icon to add extra toasting time.
  • Reheat: Touch the “Reheat” icon to warm up previously toasted bread.
  • Cancel: Touch the “Cancel” icon to stop the toasting cycle at any time.

Remember to clean the toaster frequently and check with the user manual for any specific maintenance instructions.

Tips and Recipes Suitable for Nostalgia Inspirex Touch Screen Display Smart Toaster

Here are some tips and recipes suitable for the Inspirex Touch Screen Display Smart Toaster:

Tips:

  • Use fresh bread for a perfect toasting result.
  • Try out with different bread types and browning levels to find your perfect combination.
  • Use the defrost function for frozen bread or pastries.
  • Get creative with your breakfast! Toast bagels or English muffins for a satisfying and crispy treat.
  • Use the reheat function to warm up previously toasted bread or to reheat leftovers.

Recipes:

Classic Toast with Butter and Jam: Toast bread to your desired preference, spread with butter and jam, and enjoy.

  • Avocado Toast: Toast wheat bread, mash avocado, and spread on top. Add salt, pepper, and a squeeze of lemon.
  • Grilled Cheese Sandwich: Toast bread, place cheese in between, and grill until crispy and melted.
  • Cinnamon Sugar Toast: Toast bread, mix cinnamon and sugar, and drizzle on top.
  • Toast with Scrambled Eggs and Bacon: Toast bread, scramble eggs, and top with crispy bacon.
  • French Toast: Toast bread, dip in egg mixture, and cook in a pan until golden brown.
  • Bruschetta: Toast bread, top with diced tomatoes, garlic, basil, and mozzarella cheese.
  • Toast with Almond Butter and Banana: Toast bread, spread with almond butter, and top with sliced banana.


Some additional recipe ideas:

  • Toast with hummus and vegetables
  • Toast with peanut butter and jelly
  • Toast with cream cheese and smoked salmon
  • Toast with tapenade and goat cheese
  • Toast with Nutella and strawberries

These are just a few ideas to get you started. The Inspirex Touch Screen Display Smart Toaster is multifunctional and can be used to make a world of toasty flavors to explore!

A Cleaning Guide

To maintain the toaster performance and hygiene, cleaning it is very essential. Here’s a step-by-step guide on how to clean it:

  1. Unplug the toaster: Before cleaning, make sure the toaster is not plugged into the power outlet.
  1. Cool down: Let the toaster cool down completely to avoid any burns or injuries.
  1. Remove crumb tray: Remove the crumb tray from the bottom of the toaster and empty it. Wash the tray with warm soapy water, dry thoroughly, and replace it.
  1. Wipe exterior: Use a damp cloth to wipe down the exterior of the toaster, paying attention to any areas with visible crumbs or splatters.
  1. Clean touch screen: Gently dab the touch screen display with a soft, dry cloth to remove any fingerprints or smudges.
  1. Clean toasting chamber: Use a long, thin brush (like a bottle brush) or a small, soft-bristled brush to clean out any accumulated crumbs or particles from the toasting compartment.
  1. Wipe heating elements: Use a dry cloth to wipe down the heating elements ( nichrome wire coils) to remove any crumbs or debris.
  1. Clean toast lift: Wipe the toast lift (the mechanism that raises and lowers the toast) with a dry cloth to remove any crumbs or debris.
  1. Reassemble: Once all parts are clean and dry, reconstruct the toaster.
  1. Plug in and test: Plug in the toaster to the power outlet and test it to ensure it’s working properly.

Additional tips:

  • Clean the toaster regularly to prevent crumb buildup.
  • Protect your toaster’s beautiful finish and touchscreen display by using gentle cleaning techniques. Avoid harsh chemicals and abrasive materials.
  • If you notice any stubborn grimes or burnt-on food, mix baking soda and water to create a paste, apply it to the area, and let it settle for 30 minutes before wiping clean.

By following these steps, you’ll keep your Inspirex Touch Screen Display Smart Toaster in great condition and ensure it continues to perform optimally.

What to Avoid when Using this Smart Toaster

Here are some things to avoid when using the Inspirex Touch Screen Display Smart Toaster:

  1. Avoid overloading: To ensure even toasting and prevent jamming, use only the recommended amount of bread per slot.
  1. Don’t touch heating elements: Never touch the heating elements (nichrome wire coils) or insert utensils into the toaster to avoid injury or electric shock.
  1. No metal utensils: Never use metal utensils or objects to remove toast or clean the toaster, as they can damage the toaster or cause electrical shock.
  1. Avoid water splashes: Keep water away from the toaster’s electrical components and touch screen display to avoid damage or electrical shock.
  1. Don’t toast non-bread items: This toaster is designed for toasting bread and other approved items. Avoid using it for anything else to ensure safety and proper operation.
  1. Avoid extreme temperatures: Don’t place the toaster near extreme heat sources (e.g., ovens, stovetops) or in areas with high humidity.
  1. Unplug when not in use: Maximize energy efficiency by unplugging your toaster when not in use. This helps conserve power and reduce standby consumption.
  1. Avoid abrasive cleaning: Avoid using abrasive cleaners, scrubbers, or harsh chemicals, as they can damage the toaster’s finish or harm the touch screen display.
  1. Don’t tamper with internal components: To prevent electrical shock, never attempt to fix or alter the toaster’s internal components yourself.
  1. Follow user manual guidelines: Always check with the user manual for specific guidelines and precautions when using the Inspirex Touch Screen Display Smart Toaster.

By avoiding these common mistakes, you’ll ensure safe and effective use of your smart toaster.

In conclusion, the Inspirex Touch Screen Display Smart Toaster is an advanced kitchen appliance that provides a range of features and benefits. To get the most out of it, follow the tips and recipes provided, clean and maintain it regularly, and avoid common mistakes. By doing so, you’ll be able to enjoy a wide variety of delicious toast creations and elevate your breakfast experience.

waffle maker

15 Meals You Can Make with a Waffle Maker

Your reliable waffle maker is not just a breakfast sidekick – it’s a versatile powerhouse waiting to be unleashed! Despite its name, this kitchen gadget can whip up a wide array of delectable dishes, from savoury snacks to decadent desserts.

Get ready to expand your culinary horizons and embark on a delicious adventure with these 15 mouthwatering meals you can make with a waffle maker!


  • Waffle Iron Grilled Cheese Sandwiches 

waffle maker

Who doesn’t love a crispy, gooey grilled cheese sandwich? With a waffle maker, you can achieve the perfect combination of crunchy exterior and melty interior in no time.

  • Waffle Iron Hash Browns

waffle maker

Elevate your breakfast game with crispy, golden hash browns made in a waffle maker. Top them with your favourite fixings for a delightful morning treat.

  • Waffle Iron Quesadillas

waffle maker

Forget the pan – your waffle maker can whip up perfectly crisp and delicious quesadillas in minutes. Fill them with your favourite fillings for a tasty Mexican-inspired snack or meal.

  • Waffle Iron Brownies

waffle maker

Satisfy your chocolate cravings with gooey, fudgy brownies that come out of the waffle maker with a unique, ridged texture. Serve them warm with a scoop of ice cream for a decadent dessert.

  • Waffle Iron Frittatas

waffle maker
Upgrade your breakfast game with fluffy, protein-packed frittatas cooked to perfection in a waffle maker. Add your favourite veggies, meats, and cheese for a satisfying start to your day.

  • Waffle Iron Pizza Pockets

waffle maker
Satisfy your pizza cravings with these easy-to-make pizza pockets. Stuff them with your preferred toppings and let the waffle maker work its magic for a fun and tasty snack or meal.

  • Waffle Iron Cinnamon Rolls

waffle maker
Skip the oven and whip up warm, gooey cinnamon rolls in your waffle maker. Drizzle them with a sweet glaze for a delightful treat that’s sure to impress.

  • Waffle Iron Falafel

waffle maker
Get your falafel fix without the hassle of deep-frying. Simply pop the batter into your waffle maker for crispy, flavorful falafel patties that are perfect for sandwiches or salads.

Waffle Iron Stuffed Peppers

waffle maker

Forget the oven – your waffle maker can cook up perfectly tender and flavorful stuffed peppers in no time. Fill them with your favourite grain, meat, and veggie combinations.


  • Waffle Iron Baked Apples

waffle maker
Enjoy the cosy flavours of fall with warm, cinnamon-spiced baked apples made in your waffle maker. Top them with a scoop of ice cream or a drizzle of caramel for a delightful dessert.

  • Waffle Iron Churro Bites

churro_bites_cooked waffle maker
Satisfy your sweet tooth with these irresistible churro bites made in a waffle maker. Dust them with cinnamon sugar for a delightful treat that’s sure to please.

  • Waffle Iron Fajita Veggies

waffle maker
Skip the skillet and let your waffle maker take care of perfectly cooked fajita veggies. Top them with your favourite protein and fixings for a quick and tasty meal.

  • Waffle Iron Latkes

latkes_cooked_in_a waffle maker
Celebrate Hanukkah or enjoy a delicious snack with crispy, golden latkes made in your waffle maker. Serve them with applesauce or sour cream for a tasty treat.

  • Waffle Iron Meatballs

meatballs_cooked_in_a_waffle maker
Skip the oven and let your waffle maker cook up perfectly juicy and flavorful meatballs. Serve them with your favourite sauce for a quick and easy meal.

  • Waffle Iron Breakfast Sandwiches

breakfast_sandwiches_cooked_in_a_waffle maker

So now you can start your day right with a delicious breakfast sandwich made in your waffle maker. Layer eggs, cheese, and your favourite breakfast meats for a portable and satisfying meal.

With this collection of 15 mouthwatering meals, your waffle maker is about to become your new favourite kitchen gadget. From savoury snacks to decadent desserts, the possibilities are endless. So fire up your waffle maker and get ready to embark on a culinary adventure that will tantalize your taste buds and impress your friends and family. Happy cooking!

Check out our Products
FOLLOW US ON INSTAGRAM

Haden 75039 Dorset 4 Slice Bread toaster

About Haden 75039 Dorset 4 Slice Bread toaster

Haden Dorset 4-Slice Toaster: A Stylish and Functional Breakfast Companion

Are you looking for a toaster that can handle the breakfast needs of your whole family? Then the Haden Dorset 4-Slice Wide Slot Stainless Steel Bread and Bagel Toaster might be an ideal choice for you. This toaster’s streamlined design and usability ensure yummy toasted snacks every morning.

Toasting Powerhouse

The most impressive feature of this toaster is its ability to fit in four slices of bread at once. This is perfect for large families or those who love to make breakfast for a crowd. The extra-wide slots are ideal for thick-cut bread, bagels, and even English muffins.

Even Browning for Everyone

The Haden Dorset toaster boasts an adjustable browning dial with six shade options. This allows you to achieve the perfect level of toastiness, from a light golden brown to a deep, crispy dark.

Functional Features

This toaster isn’t just about looks. It comes packed with features to make your mornings easier. The defrost function ensures even browning for frozen bread, while the reheat function is ideal for warming up already toasted bread. There’s also a cancel button to stop the toasting cycle anytime, and a detachable crumb tray for easy cleaning.

Stylish Design

The Haden Dorset toaster boasts a sleek stainless steel design with black and copper accents. This toaster’s enduring style makes it a perfect fit for any kitchen, modern or traditional.

Here’s a quick recap of the Haden Dorset 4-Slice Toaster’s highlights:

  • Spacious 4-slice capacity
  • Extra-wide slots for thick bread and bagels
  • Variable browning control for ideal toast customization
  • Defrost, reheat, and cancel functions for added convenience
  • Detachable crumb tray for easy cleaning
  • Stylish stainless steel design with black and copper accents

Generally, the Haden Dorset 4-Slice Toaster is a great option for those looking for a functional and stylish way to toast bread, bagels, and more. Boasting ample room for bread, precise shade selection, and user-friendly functions, this toaster will undoubtedly become a workhorse in your kitchen.

Specifications

Here are the specifications of the Haden Dorset 75039 Stainless Steel 1500W Retro Toaster 4 Slice ¹:

Brand: HADEN

Model Number: 75039

Color: Beige

Power/Wattage: 1500 watts

Voltage: 120 Volts

Material: Stainless Steel

Number of slices: 2

Special Features: Variable Browning Control, Cancel Function

Item Weight: 3.56 kg

Product Dimensions: 19.1D x 33W x 29.2H Centimeters

Specific uses for product: Bread

Wattage: 1500 watts

Number of slices: 2

Special feature: Variable Browning Control, Cancel Function

Display type: LED

Voltage: 120 Volts

Overall Dimensions: 12.5″ W x 8.5″ D x 7.5″ H

Features: Four Slice Toaster with Extra Wide Slots for Bagels Painted Stainless Steel with Haden Badge, Painted Stainless Steel Housing with Haden Badge, Self-Centering Function, and Detachable Crumb Tray

Specifications: 1500W, 120V~60Hz, Cord Length: 32″, Standard 2-Prong US Plug, ETL Tested and Approved

Toasting Features Self Centering Function (keeps bread in the perfect toasting position), Removable Crumb Tray, Adjustable Browning Control, Cancel, Defrost, and Reheat Settings.

Extras: 1-Year Warranty, Matching Electric Kettle Sold Separately, 4-Slice Toaster Also Available

Key Features

Here are the features of the Haden Dorset 75039 Stainless Steel 4 Slice Wide Slot Stainless Steel Bread and Bagel Toaster with Detachable Crumb Tray and Variable Browning Control, Black/Copper:

Extra-Wide Slots: ideal for toasting thick slices of bread, bagels, or English muffins.

Variable Browning Control: Adjust the level of browning to your liking, from lightly toasted to deeply toasted.

Removable Crumb Tray: Easy to clean and remove crumbs, making maintenance a breeze.

Self-Centering Function: Automatically centers bread for even toasting.

Cancel Function: Stop toasting at any time using the cancel button.

Defrost Function: This Feature helps to defrost frozen bread or bagels with ease.

Reheat Function: This helps in warming up previously toasted bread or bagels to restore crispness.

Stainless Steel Housing: Long lasting and easy to clean, with a stylish black and copper finish.

LED Indicators: This displays the toasting progress and settings clearly.

Cool-Touch Exterior: Stays cool to the touch, doesn’t get hot during use

Cord Storage:This toaster boasts a space-saving built-in cord wrap for a tidy kitchen.

ETL Tested and Approved: Meets safety standards for peace of mind.

These features make the Haden Dorset 75039 a convenient, multifunctional, and stylish addition to any kitchen!

How to Use Haden 75039 Dorset 4 Slice Bread  toaster

Here’s a step-by-step guide on how to use the Haden Dorset 75039 Stainless Steel 4 Slice Wide Slot Stainless Steel Bread and Bagel Toaster with Detachable Crumb Tray and Variable Browning Control, Black/Copper:

  1. Plug in the toaster: Insert the plug into a nearby outlet and ensure the toaster is placed on a stable, heat-resistant surface.
  1. Place bread or bagels: Put 2-4 slices of bread or bagels into the extra-wide slots, depending on your desired preference.
  1. Adjust browning control: Use the variable browning control dial to choose your desired level of toasting, from lightly toasted to deeply toasted.
  1. Select toasting options: Select from the cancel, defrost, or reheat functions as needed.
  1. Start toasting: Press the toasting lever or button to activate the toasting process.
  1. Wait for toasting to complete: The toaster will automatically pop up the toast when it’s done.
  1. Remove toast: Take out the toasted bread or bagels and enjoy!
  1. Clean the crumb tray: Frequently remove and empty the crumb tray to keep the toaster clean and crumb-free.
  1. Store the toaster: When not in use, store the toaster in a cool, dry place, and wrap the cord around the cord storage feature.

Some additional tips:

– Always unplug the toaster when not in use.

– Use the cancel button to stop toasting at any time.

– Defrost frozen bread or bagels before toasting.

– Reheat previously toasted bread or bagels to restore crispiness.

– Clean the toaster regularly to maintain its performance and long lasting experience.

By following these steps and tips, you’ll be able to enjoy perfectly toasted bread and bagels with your Haden Dorset 75039 toaster!


Tips and Recipes Suitable for Haden 75039 Dorset 4 Slice Bread  toaster

Here are some tips and recipes suitable for the Haden Dorset 75039 Stainless Steel 4 Slice Wide Slot Stainless Steel Bread and Bagel Toaster with Detachable Crumb Tray and Variable Browning Control, Black/Copper:

Tips:

– Use the defrost function to toast frozen waffles or pancakes for a crispy breakfast treat.

– Warm up leftover bread or bagels to restore freshness and crispiness.

– Try out with different browning levels to find your ideal toast.

– Use the wide slots to toast baguette slices or English muffins for a delicious breakfast or snack.

– Clean the crumb tray regularly to avoid crumb buildup and maintain even toasting.

Recipes:

Avocado Toast: Toast whole grain bread, mash avocado, and spread on top. Add salt, pepper, and a squeeze of lemon juice.

Cinnamon French Toast: Toast bread, mix eggs, milk, cinnamon, and sugar, and dip bread for a sweet breakfast treat.

Bagel with Lox and Cream Cheese: Toast a bagel, spread cream cheese, and top with smoked salmon (lox) and capers.

Grilled Cheese Sandwich: Toast bread, butter, and fill with cheese for a classic comfort food.

Breakfast BLT: Toast bread, cook bacon, and compile with lettuce, tomato, and mayonnaise for a twist on the classic BLT.

Toasted Baguette with Bruschetta: Toast baguette slices, topped with diced tomatoes, garlic, basil, and mozzarella cheese, and sprinkle with olive oil.

–  Mini Pizzas: Use the toaster to make individual-sized pizzas on English muffins. Top with tomato sauce, cheese, and your favorite pizza toppings. Toast on a low setting until the cheese is melted and bubbly.

These are just a few ideas to get you started. The Haden Dorset 75039 toaster is multifunctional and can be used for many other delicious recipes, so don’t be afraid to test and find your new favorite toast mixture!


A Cleaning Guide

Cleaning your Haden Dorset 75039 Stainless Steel 4 Slice Wide Slot Stainless Steel Bread and Bagel Toaster with Detachable Crumb Tray and Variable Browning Control, Black/Copper is easy and important to maintain its performance and longevity. Here’s a step-by-step guide on how to clean your toaster:

  1. Unplug the toaster: Ensure the toaster is unplugged from the power outlet before cleaning.
  1. Remove crumb tray: Pull out the crumb tray from the bottom of the toaster and throw away the crumbs. Wash the tray with warm soapy water, dry thoroughly, and replace it.
  1. Wipe exterior: Use a damp cloth to dab the exterior, monitoring any areas with visible crumbs or splatters. Avoid using abrasive materials or harsh chemicals that might damage the stainless steel or paint.
  1. Clean toast slots: Use a long, thin brush (like a bottle brush) or a toast slot cleaning tool to remove crumbs and debris from the toast slots. You can also use a small, dry paintbrush to sweep out crumbs.
  1. Wipe toast lifters: Use a damp cloth to wipe the toast lifters and the area around them.
  1. Clean controls and dials: Gently wipe the controls, dials, and buttons with a damp cloth to remove any fingerprints or splatters.
  1. Dry the toaster: Use a dry cloth to wipe down the toaster, paying extra attention to the toast slots and crumb tray to prevent water spots.
  1. Inspect and clean the cord: Check the power cord for any damage or fraying. If damaged, replace the cord as soon as possible. Wrap the cord around the cord storage feature when not in use.
  1. Store the toaster: Once clean and dry, store the toaster in a cool, dry place to prevent moisture buildup.

Additional tips:

– Clean the toaster regularly to prevent crumb buildup and maintain even toasting.

– Avoid using abrasive materials, harsh chemicals, or scouring pads, as they can damage the toaster’s finish or harm the non-stick coating.

– If you notice stubborn stains or burnt-on food, mix baking soda and water to create a paste, apply it to the area, and let it settle for 30 minutes before wiping clean.

– For tough stains or mineral deposits, dampen a cloth with white vinegar and wipe the area clean.

By following these steps and tips, you’ll keep your Haden Dorset 75039 toaster clean, in great condition, and ready for your next toasting adventure!


What to avoid when using the Haden 75039 Dorset 4 Slice Bread  toaster

When using the Haden Dorset 75039 Stainless Steel 4 Slice Wide Slot Stainless Steel Bread and Bagel Toaster with Removable Crumb Tray and Variable Browning Control, Black/Copper, there are some things to avoid to ensure safe and effective use:

  1. Avoid overheating: Don’t leave the toaster unattended for long periods or toast for too long, as this can cause overheating and potentially lead to a fire.
  1. Don’t insert metal objects: Never put metal objects, such as knives or forks, into the toast slots, as they can cause electrical shock or damage the toaster.
  1. Keep away from water: Avoid exposing the toaster to water or excessive moisture, as this can lead to electrical shock or damage to the internal components.
  1. Don’t toast flammable materials: Never toast flammable materials, such as plastic or paper, as they can catch fire and cause damage or injury.
  1. Avoid overloading: Don’t stuff the toaster with too much bread or bagels, as this can cause jamming and damage to the toaster.
  1. Keep children away: Keep children away from the toaster, to avoid unforeseen accidents. 
  1. Don’t use abrasive cleaners: Avoid harsh cleaners and abrasive tools, as they can dull or damage the stainless steel or painted surface.
  1. Don’t toast expired or moldy bread: Avoid toasting expired or moldy bread, as it can produce harmful spores which aren’t healthy.
  1. Keep the toaster clean: Regularly clean the toaster to prevent crumb buildup and maintain even toasting.
  1. Follow the user manual: Always Consult the user manual instructions and guidelines for safe and effective use.

By avoiding these common mistakes, you’ll ensure a safe and enjoyable toasting experience with your Haden Dorset 75039 toaster!

In conclusion, The Haden Dorset 4-Slice Toaster is a stylish and functional toaster that handles breakfast needs for families or those who love selecting. It boasts wide slots, browning control, and defrost/reheat functions, but some users mention uneven browning. Generally, it’s a good choice for the price, even if you can handle the occasional inconsistent browning.

bread maker

What is the difference between a bread maker and a bread toaster?

The Difference Between a Bread Maker and a Bread Toaster: A Comprehensive Guide

When it comes to kitchen appliances, few are as cherished as the bread maker and the bread toaster. These two devices have transformed the way we prepare and enjoy our daily bread, but they serve very different purposes and functions. Understanding these differences can help you make an informed decision about which appliance suits your needs best. In this blog post, we’ll delve into the specifics of bread makers and bread toasters, highlighting their unique features, benefits, and limitations.

What is a Bread Maker?

bread maker

A bread maker, also known as a bread machine, is an appliance designed to automate the process of making bread. From mixing ingredients to kneading dough and baking the loaf, a bread maker handles it all. This convenience allows users to enjoy freshly baked bread with minimal effort.

Key Features of a Bread Maker:

1. Automatic Process: A bread maker automates the entire bread-making process, including mixing, kneading, rising, and baking.

2. Customization: Users can add ingredients like nuts, seeds, and fruits, and select different settings for various types of bread (whole wheat, gluten-free, etc.).

3. Timing Options: Many bread makers come with a timer feature, allowing you to set the machine to bake bread at a specific time, so you can wake up to the smell of fresh bread.

4. Versatility: Besides bread, many models can make pizza dough, jam, and even cakes.


What is a Bread Toaster?

bread toaster

A bread toaster is a simpler appliance designed to toast slices of bread. It works by exposing the bread to radiant heat, turning the soft bread into a crispy, golden-brown slice. Toasters are a staple in many households, providing a quick and easy way to prepare breakfast or snacks.

Key Features of a Bread Toaster:

1. Speed: A toaster can toast bread in a matter of minutes, making it a convenient choice for quick meals.

2. Simplicity: Toasters are straightforward to use, with most models offering settings to control the level of toasting.

3. Compact Design: Toasters are typically small and can easily fit on kitchen countertops without taking up much space.

4. Variety: Toasters come in various sizes and styles, from two-slice to four-slice models, and some can also accommodate bagels and pastries.

Bread Maker vs. Bread Toaster: Key Differences


While both appliances deal with bread, they serve very different purposes and offer distinct advantages and limitations. Below is a detailed comparison to help you understand these differences better:


 Feature  Bread Maker  Bread Toaster
Primary Function  Makes bread from scratch (mixing, kneading, baking)  Toast pre-sliced bread slices
 Process   Automated (mix, knead, rise, bake)  Manual (insert slice, select setting, toast)
 Usage Time   Several hours (2-4 hours)   A few minutes (1-3 minutes)
 Customization
 High (add ingredients, choose bread type)  Low (adjust toasting level only)
Versatility  Can make various types of bread, dough, jam, cakes  Limited to toasting bread, bagels, pastries
Size and Storage  Larger, require more counter space  Compact, easy to store
Maintenance  More complex, parts to clean  Easy to clean, fewer parts
Cost  Generally more expensive  Depending on the type of bread used
Health Aspect  Control over ingredients for healthier bread options  Depending on the type of bread used

Detailed Comparison

1. Primary Function: The most significant difference lies in their primary function. A bread maker is designed to create a loaf of bread from raw ingredients, handling every step from mixing to baking. In contrast, a toaster is designed to toast slices of bread, reheating and browning them to a desired level of crispiness.

2. Process: Bread makers automate the entire process, which includes mixing ingredients, kneading dough, allowing it to rise, and baking. This comprehensive process can take several hours. Toasters, on the other hand, are manual in the sense that you must insert the bread slices, select the toasting level, and then wait for a few minutes until the bread is toasted.

3. Usage Time: Using a bread maker requires planning due to the long baking time (typically 2-4 hours). Toasters are much quicker, providing toasted bread in just a few minutes, making them ideal for busy mornings.

4. Customization: Bread makers offer high levels of customization. You can experiment with different types of flour, add-ins like nuts and seeds, and adjust settings for various types of bread. Toasters offer limited customization, mainly in terms of adjusting the toasting level to achieve the desired browning.

5. Versatility: Bread makers are versatile appliances capable of making different types of bread, dough for pizza or rolls, and even non-bread items like jam and cakes. Toasters, while limited in their primary function, can toast a variety of bread products, including bagels and pastries.

6. Size and Storage: Breadmakers are larger appliances that require more counter space and storage. Toasters are typically compact, fitting easily on countertops or in cabinets.

7. Maintenance: Bread makers have several parts that need regular cleaning, including the mixing paddle and bread pan. Toasters are easier to maintain, often requiring only periodic cleaning of the crumb tray.

8. Cost: Bread makers are generally more expensive due to their complexity and multifunctional capabilities. Toasters are more affordable, making them accessible to a wider range of consumers.

9. Health Aspect: With a bread maker, you have complete control over the ingredients, allowing you to make healthier bread options free from preservatives and additives. The health aspect of a toaster depends on the type of bread you choose to toast.

10. Time Convenience: For immediate consumption, toasters are highly convenient, offering a quick and easy way to prepare toasted bread. Bread makers, while producing fresh bread, require a longer time commitment and planning.


Both bread makers and bread toasters have their unique places in the kitchen, catering to different needs and preferences. A bread maker is ideal for those who love the process and taste of homemade bread and want control over their ingredients. On the other hand, a bread toaster is perfect for those who need a quick, easy solution for their breakfast or snacks.

Understanding these differences can help you decide which appliance is right for you, based on your lifestyle, cooking habits, and culinary preferences. Whether you choose a bread maker, a toaster, or both, each will undoubtedly enhance your kitchen experience and bring joy to your daily bread consumption.

Check out our Products
FOLLOW US ON INSTAGRAM

bread toaster

Which Amazon bread toaster is the best?

Which Amazon Bread Toaster is the Best? A Comprehensive Guide

In the realm of kitchen appliances, the humble bread toaster holds a special place. From golden brown toast to perfectly heated bagels, a good toaster can make breakfast preparation a breeze. If you’re looking to upgrade your current toaster or purchase one for the first time, Amazon offers a plethora of options to suit every need and budget. But with so many choices, how do you decide which toaster is the best? In this comprehensive guide, we’ll list the 15 best bread toasters on Amazon based on reviews and customer satisfaction to help you make an informed decision.

Criteria for Choosing the Best Bread Toaster

Before diving into the list, it’s important to understand the criteria used to evaluate these toasters:

1. Customer Reviews: The number of positive reviews and overall ratings are crucial indicators of a product’s reliability and performance.

2. Functionality: Features like multiple toasting settings, defrost and reheat options, and extra-wide slots.

3. Design: Aesthetic appeal and whether the design complements various kitchen styles.

4. Durability: Build quality and materials used in construction.

5. Price: Value for money, balancing cost with features and performance.


The 15 Best Bread Toasters on Amazon

1. Breville BTA820XL Die-Cast 2-Slice Smart Toaster

– Rating: 4.7/5

– Key Features: “Lift and Look” functionality, LED progress indicator, and “A Bit More” button for additional browning.


2. Cuisinart CPT-180 Metal Classic 4-Slice Toaster

– Rating: 4.5/5

– Key Features: Dual control panels, 6-setting browning dials, and reheat, defrost, and bagel buttons.


3. Oster Long Slot 4-Slice Toaster

– Rating: 4.6/5

– Key Features: Extra-long slots, 7 shade settings, and removable crumb tray.


4. KitchenAid KMT4115CU 4-Slice Toaster

– Rating: 4.5/5

– Key Features: Manual high-lift lever, adjustable shade control, and bagel function.


5. BLACK+DECKER 2-Slice Extra-Wide Slot Toaster

BLACK+DECKER 2-Slice Extra-Wide Slot Toaster– Rating: 4.4/5

– Key Features: Extra-wide slots, 7 toast shades, and easy-to-use controls.


6. Hamilton Beach 2 Slice Extra Wide Slot Toaster

– Rating: 4.4/5

– Key Features: Bagel and defrost settings, auto shutoff, and slide-out crumb tray.


7. Cuisinart CPT-122 2-Slice Compact Plastic Toaster

– Rating: 4.3/5

– Key Features: Compact design, 7-setting shade dial, and slide-out crumb tray.


8. Breville BTA840XL Die-Cast 4-Slice Smart Toaster

– Rating: 4.6/5

– Key Features: LED progress indicator, “Lift and Look,” and “A Bit More” settings.


9. Krups KH732D50 2-slice Stainless Steel Toaster

– Rating: 4.4/5

– Key Features: High lift lever, 6 browning levels, and defrost/reheat/cancel settings.


10. Dualit 4 Slice Classic Toaster

– Rating: 4.5/5

– Key Features: Hand-built in the UK, extra-wide slots, and mechanical timer.


11. Oster 2-slice Toaster, Metallic Grey

– Rating: 4.3/5

– Key Features: Advanced toast technology, extra-wide slots, and 7 toast shades.


12. Dash Clear View Extra Wide Slot Toaster

– Rating: 4.4/5

– Key Features: See-through window, extra-wide slots, and 7 browning levels.


13. Bella Linea Collection 2-Slice Toaster

– Rating: 4.2/5

– Key Features: Extra-wide slots, automatic centring guides, and high-lift lever.


14. Smeg 2-Slice Toaster

– Rating: 4.5/5

– Key Features: Retro design, 6 browning levels, and removable crumb tray.


15. AmazonBasics 2-Slice Extra-Wide Slot Toaster

– Rating: 4.2/5

– Key Features: Extra-wide slots, 6 shade settings, and affordable price.


Detailed Analysis of Top Picks

Breville BTA820XL Die-Cast 2-Slice Smart Toaster

The Breville BTA820XL stands out for its smart features and sleek design. The “Lift and Look” function allows you to check your toast without interrupting the cycle, while the “A Bit More” button adds extra toasting time without starting a new cycle. Customers rave about its consistency and ease of use, making it a top choice for those willing to invest in quality.


Cuisinart CPT-180 Metal Classic 4-Slice Toaster

Cuisinart’s CPT-180 is a robust and reliable toaster, perfect for families. It features dual control panels, allowing you to toast different items simultaneously. The 6-setting browning dials and additional reheat, defrost, and bagel buttons provide versatility. Reviewers appreciate its durability and consistent performance.


Oster Long Slot 4-Slice Toaster

For those who prefer a toaster that can handle larger slices or artisan bread, the Oster Long Slot Toaster is ideal. It comes with 7 shade settings and a removable crumb tray for easy cleaning. Users highlight its ability to evenly toast a variety of bread types.


KitchenAid KMT4115CU 4-Slice Toaster

KitchenAid is known for its high-quality kitchen appliances, and the KMT4115CU is no exception. With its manual high-lift lever and adjustable shade control, it offers precise toasting. The bagel function ensures perfect toasting for your morning bagels. Customers love its combination of style and functionality.


Conclusion

Choosing the best bread toaster on Amazon depends on your specific needs and preferences. Whether you prioritize advanced features, design, or budget, there’s a toaster for you. The Breville BTA820XL and Cuisinart CPT-180 are excellent choices for those seeking premium options, while the Oster Long Slot and KitchenAid KMT4115CU offer great value for families and toast enthusiasts.


Investing in a high-quality toaster can significantly enhance your breakfast experience. Consider the features most important to you and read customer reviews to ensure you select a toaster that will meet your needs and provide reliable performance for years to come. Happy toasting!

Click on this link to check out our product
Check out our social media platforms

Peach Street 2 Slice Toaster

About the Peach Street 2 Slice Toaster

A Toasty Tech Review

Looking for a simple yet effective toaster to step up your morning routine? The Peach Street 2 Slice Toaster might be an ideal fit for your kitchen counter. With its numerous features and budget-friendly price, this toaster is an ideal selection for anyone desiring flawlessly browned toast without incurring excessive expenses.

Sleek Design with Modern Features

First impression? The Peach Street 2 Slice Toaster is an attractive appliance. The brushed stainless steel finish gives it a clean, modern aesthetic that will complement any kitchen style. But it’s not just about looks. This toaster delivers a tech-savvy experience with a digital timer display. No more guessing when your toast will be ready – you can simply monitor the timer tick down for perfectly timed mornings.

Toasting Perfection at Your Fingertips

This toaster isn’t just a pretty face. It offers 6 precise browning controls, enabling you to craft toast that suits your taste, from softly golden to satisfyingly crispy. Craving a warm bagel? No problem! The bagel setting ensures even toasting without burning the inside. If you also need to defrost bread that’s been lingering in the freezer? The defrost function takes care of that as well.

Convenience is Key

The wide slots can contain different kinds of breads, from thin slices to thick Texas toast. And when your toast is ready, the auto-pop function ensures it lands safely on your plate, no more burnt fingers fumbling for hot bread! Cleaning up is easy with the detachable crumb tray, which catches any stray crumbs for easy disposal.

The Verdict: Toasty Triumph or Burnt Breakfast Blues?

Generally, the Peach Street 2 Slice Toaster provides a captivating combination of style, functionality, and affordability. While it might not have the bells and whistles of some high-end toasters, it delivers on the essentials: perfectly toasted bread, bagels, and even frozen waffles.

Here’s a quick breakdown:

  • Pros: Stylish design, digital countdown, 6 browning levels, defrost and bagel functions, wide slots, auto-pop, detachable crumb tray, affordable price.


  • Cons: May not have all the features of high-end toasters.

If you’re looking for a reliable, user-friendly and budget friendly toaster that gets the job done, then the Peach Street 2 Slice Toaster is a great option. It’s a morning masterpiece for rushed hours and a wonderful kitchen companion!


Specifications

Peach Street 2 Slice Toaster Specifications:

  • Capacity: 2 Slices


  • Material: Brushed Stainless Steel


  • Dimensions: 9.5 inches (D) x 6 inches (W) x 7 inches (H)


  • Wattage: 825 watts (according to some sources, though some listings may be slightly different)


  • Power:
    – Voltage: 120V
    – Wattage: 850W
  • Certifications: ETL and FDA certified


  • Warranty: 2-year warranty


Key Features

Here are the key features of the Peach Street 2 Slice Toaster Compact Bread Toaster:

1. Digital Countdown Timer: Shows you exactly how much time is left until your toast is ready.


2. Extra-Wide Slots: Toast larger slices of bread or even bagels with ease (1.5 inches / 3.8 cm wide).


3. Auto-Pop: The toast pops up automatically when it’s done.


4. 6 Browning Levels: Customize the level of toasting to your liking, either light and golden to a satisfyingly dark crisp.


5. Defrost Function: Toast frozen bread with ease.


6. Bagel Function: Toast bagels with ease, with a specialized setting for perfect toasting.


7. Cancel Function: Stop the toasting process whenever you need.


8. Removable Crumb Tray: Ensure easy cleanup and maintenance.


9. Stainless Steel Construction: Durable and easy to clean.


10. Compact Design: Ideal for small kitchens or countertops.

These key features make the Peach Street 2 Slice Toaster a convenient and multifunctional addition to your kitchen!


How to use the Peach Street 2 Slice Toaster

Here’s a step-by-step guide on how to use the Peach Street 2 Slice Toaster Compact Bread Toaster:

1. Plug in the toaster: Connect the toaster to an outlet closer to the toaster.


2. Place bread: Insert 2 slices of bread into the extra-wide slots. You can also toast bagels, English muffins, or frozen bread.


3. Select browning level: Select from 6 browning levels using the dial on the right side of the toaster.


4. Defrost or bagel function: Click on the “Defrost” button for frozen bread or the “Bagel” button for toasting bagels.


5. Start toasting: Press the “Start” button to activate the toasting cycle.


6. Wait for toast: The digital countdown timer will show the remaining time. When the toast is ready, it will automatically pop up.


7. Cancel toasting: Press the “Cancel” button to stop the toasting process at any time.


8. Remove toast: Use tongs or forks to take out the toast to avoid burning your fingers and enjoy!


9. Clean up: Remove crumbs from the crumb tray and wipe the toaster with a damp cloth.

Some additional tips:

  • Use the “Defrost” function for frozen bread to get the best results.


  • Use the “Bagel” function for toasting bagels to get a crispy outside and a soft inside.


  • Adjust the browning level to your liking.


  • Clean the toaster regularly to prevent crumb buildup.


  • To avoid burnt toast crumbs building up, empty the removable crumb tray regularly.

You’ll be able to enjoy perfectly toasted bread, bagels, or English muffins with the Peach Street 2 Slice Toaster just by following these steps.


Tips and Recipes Suitable for Peach Street 2 Slice Toaster

Here are some tips and recipes suitable for the Peach Street 2 Slice Toaster Compact Bread Toaster:

Tips:

  • Use fresh bread for the best toasting results.


  • Try out with different browning levels to get your ideal toast.


  • Clean the toaster frequently to prevent crumb buildup.


  • Use the defrost function for frozen bread to get the best results.


  • Try toasting bagels or English muffins for a crispy outside and soft inside.

Recipes:

  • Classic Toast with Butter and Jam: Toast bread to your liking, spread with butter and jam, and enjoy!


  • Avocado Toast: Toast whole grain bread, mash avocado, and spread on top. Add salt, pepper, and a squeeze of lemon juice.


  • Cinnamon Sugar Toast: Toast bread, mix sugar and cinnamon, and drizzle on top.


  • Bagel with Cream Cheese and Smoked Salmon: Toast a bagel, spread with cream cheese, and top with smoked salmon and capers.


  • Toast with Almond Butter and Banana Slices: Toast bread, spread with almond butter, and garnish with a banana slice.


  • English Muffin with Scrambled Eggs and Bacon: Toast an English muffin, top with scrambled eggs and crispy bacon.

Some additional recipe ideas:

  • Toast with hummus and veggies


  • Toast with peanut butter and banana slices


  • Toast with Nutella and strawberries


  • Toast with cheese and ham


  • Toast with tapenade and cherry tomatoes

These are just a few ideas to get you started. The Peach Street 2 Slice Toaster is multifunctional and can be used to make a variety of delectable toast dishes


A Cleaning Guide

Cleaning the Peach Street 2 Slice Toaster Compact Bread Toaster is easy and important to maintain its performance and hygiene. Here’s a step-by-step guide on how to clean it:

1. Unplug the toaster: Make sure the toaster is unplugged from the power outlet to avoid any accidents or electrical shocks.


2. Cool down: Let the toaster cool down completely before cleaning to avoid burns or injuries.


3. Remove crumb tray: Detach the crumb tray from the bottom of the toaster and empty it. Wash the tray with warm soapy water and dry thoroughly before replacing it.


4. Wipe exterior: Use a damp cloth to wipe down the exterior of the toaster, paying attention to any areas with visible crumbs or splatters.


5. Clean toast slots: Use a long, thin brush (like a bottle brush) or a toothbrush to clean out any crumbs or remains from the toast slots.


6. Clean controls and buttons: Use a soft, dry cloth to wipe down the controls and buttons on the toaster.


7. Clean cord storage: If your toaster has a cord storage compartment, use a soft brush or cloth to clean out any dust or debris.


8. Dry thoroughly: Use a dry cloth to wipe down the toaster and remove any glut moisture.


9. Reassemble: Once everything is dry, reconstruct the toaster and plug it back in.

Additional tips:

  • Clean the toaster frequently to prevent crumb buildup.


  • Use a gentle cleaning product like a combination of equal parts water and white vinegar if you need to remove stubborn stains.


  • Avoid using abrasive cleaners, scrubbers, or harsh chemicals, as they can damage the toaster’s finish or harm its electrical components.


  • If you have a stubborn grime or crumb buildup, let the toaster soak for a few minutes before cleaning.

By following these steps, you’ll be able to keep your Peach Street 2 Slice Toaster clean, in good working condition for a long time and ready for its next use!


What to avoid while Using the Peach Street 2 Slice Toaster

Here are some things to avoid while using your Peach Street 2 Slice Toaster to ensure safety, effective operation and prevent damage:
1. Avoid overheating: Don’t leave the toaster on for long periods or toast multiple slices in quick succession, as this can cause overheating.


2. Don’t insert metal objects: Never insert metal objects, such as knives or forks, into the toast slots, as they can cause electrical shock or damage the toaster, Use non metal objects.


3. Keep away from water: Avoid exposing the toaster to water or moisture, as this can cause electrical shock or damage the internal electrical components.


4. Don’t toast non-bread items: Only toast bread, bagels, or English muffins. Avoid toasting other items, such as cookies, pastries, or frozen foods, as they can cause damage or create a fire hazard.


5. Don’t leave unattended: Always monitor the toaster while it’s in use, especially when toasting bagels or English muffins, which can pop up any moment.


6. Avoid using abrasive cleaners: Never use abrasive cleaners, scrubbers, or harsh chemicals to clean the toaster, risking harm to the surface or electronics.


7. Keep children away: Keep away from children while using the toaster, as they may accidentally insert objects or touch hot surfaces.


8. Don’t toast bread with flammable materials: Avoid toasting bread with flammable materials, such as plastic or paper, as they can cause a fire hazard.


9. Follow instructions: Always follow the manufacturer’s instructions and guidelines for using the toaster.

By avoiding these potential hazards, you’ll be able to make use of your Peach Street 2 Slice Toaster safely and effectively.

In conclusion, the Peach Street 2 Slice Toaster is a budget-friendly toaster that gets the job done. It toasts bread, bagels, and waffles with ease thanks to its wide slots, several settings, and auto-pop function. It’s a great choice for those looking for a simple and affordable toaster for perfectly browned mornings.

Rae Dunn Retro Rounded Bread Toaster

About the Rae Dunn Retro Rounded Bread Toaster

Do you love the look of vintage appliances but crave modern functionality? Then the Rae Dunn Retro Rounded Bread Toaster in black might be your perfect match! This stylish toaster combines the best of both worlds, offering a touch of nostalgic charm alongside features that make weekday mornings a breeze.

Retro Looks Meets Modern Performance

This toaster boasts a sleek, rounded design with a black stainless steel finish that will look stunning on any countertop. But it’s not all about good looks! Here’s why this toaster will quickly become your new kitchen essential:

  • Wide Slots: Accommodate a variety of breads, bagels, and even thick Texas toast slices. No more struggling to fit your favorite breakfast carb in the toaster!


  • 6 Browning Levels: From a light golden hue to a perfectly crisp dark roast, you can achieve your ideal level of toastiness every time.


  • Bagel Function: Want a perfectly toasted bagel with a warm, chewy center? The bagel setting gently browns the outside while delicately warming the inside.


  • Defrost Function: No need to wait for frozen bread to thaw! The defrost setting quickly and evenly brings your bread to room temperature, ready for toasting.


  • Cancel Option: Did you accidentally put the toast on too dark? No problem! The cancel button allows you to stop the toasting cycle at any time.


  • Removable Crumb Tray: Makes cleaning up a breeze – simply remove the tray, empty it, and pop it back in.

More Than Just a Toaster, It’s a Statement Piece

The Rae Dunn toaster isn’t just about functionality; it’s also a stylish addition to your kitchen décor. The black finish with the signature Rae Dunn font adds a touch of understated elegance that complements any kitchen style. Whether you’re a Rae Dunn enthusiast or simply love the retro aesthetic, this toaster is sure to become a conversation starter.

So ditch your old, boring toaster and upgrade your mornings with the Rae Dunn Retro Rounded Toaster in black. It’s the perfect blend of style, functionality, and convenience, making every breakfast a delightful experience!


Specifications

Based on the information we used for the previous blog post, here are the specifications for the Rae Dunn Retro Rounded Bread Toaster:

  • Material: Stainless Steel
  • Color: Black
  • Capacity: 2 Slices
  • Slot Width: Wide (can accommodate bagels and thick bread slices)
  • Browning Levels: 6
  • Functions:
  • Toast
  • Bagel (toasts the outside while warming the inside)
  • Defrost (thaws frozen bread before toasting)
  • Cancel (stops the toasting cycle)
    Other Features:
  • Removable crumb tray for easy cleaning
  • Wattage: Not specified (but typically around 800-1000 watts for a 2-slice toaster)

Additional points to consider (depending on what information you can find):

  • Dimensions (length, width, height)
  • Weight
  • Warranty information

I would recommend searching online or checking the product manual for the toaster to find the exact wattage and dimensions.


Key Features

Here are the features of the Rae Dunn Retro Rounded Bread Toaster in more detail:

Core Toasting Features:

  • Wide Slots: These can accommodate a wider variety of breads, bagels, and even thicker Texas toast slices. No more struggling to fit your favorite breakfast items!


  • 6 Browning Levels: This allows you to achieve your ideal level of toastiness, from a light golden hue to a perfectly crisp dark roast. You can customize your toast to your exact preference every time.

Special Functions:

  • Bagel Function: This setting ensures perfectly toasted bagels. It gently browns the outside while delicately warming the inside, giving you a crispy exterior and a warm, chewy center.


  • Defrost Function: No need to wait for frozen bread to thaw on the counter! This function quickly and evenly brings your bread to room temperature, so it’s ready for toasting without any cold spots.


  • Cancel Option: Did you accidentally put the toast on too dark? No problem! This button allows you to stop the toasting cycle at any time, preventing burnt toast.

Convenience Features:

Removable Crumb Tray: This makes cleaning up a breeze. Simply remove the tray, empty it into the trash, and pop it back in for a clean toaster.

Additional Features to Consider (depending on available information):

  • Automatic Shutoff: This safety feature automatically shuts the toaster off after a certain amount of inactivity, preventing potential fire hazards.


  • Indicator Lights: Lights on the toaster might indicate the selected browning level, function (defrost, bagel), or when the toast is finished.


  • Cord Storage: This allows for neat and tidy storage of the power cord when not in use.

By incorporating these features, the Rae Dunn Retro Rounded Bread Toaster aims to combine style with functionality, making it a convenient and versatile addition to your kitchen.


How to Use the Rae Dunn Retro Rounded Bread Toaster

Here’s a breakdown on how to use the Rae Dunn Retro Rounded Bread Toaster:

1. Prepare Your Bread:

  • Decide on the bread you want to toast. The wide slots can handle various thicknesses, including bagels and Texas toast.


  • If your bread is frozen, utilize the defrost function (explained in step 3).

2. Select Your Toasting Preferences:

  • Lower the lever to activate the toasting slots.


  • Choose your desired browning level from the 6 settings. Refer to the toaster’s manual or markings on the control panel for guidance on what level achieves your preferred toast color (light golden to dark roast).

3. Using Special Functions (Optional):

  • Bagel Function: If toasting a bagel, press the bagel button instead of selecting a browning level. This setting will toast the outside while warming the inside for the perfect bagel experience.


  • Defrost Function: For frozen bread, press the defrost button. This will thaw the bread before toasting it to your desired level.

4. Starting the Toasting Cycle:

  • Once you’ve selected your browning level (or chosen a special function), the toasting cycle will begin automatically.

5. Monitoring and Stopping the Toasting Cycle (Optional):

  • The toaster may have indicator lights that show the progress of the toasting cycle.


  • If you prefer to stop the toasting early, press the cancel button to prevent burning.

6. Removing Your Toast:

  • The toast will automatically pop up when the cycle is complete. Use tongs or a utensil to remove the hot toast to avoid burns.

7. Cleaning Up:

  • After each use, unplug the toaster and let it cool completely before cleaning.\


  • Empty the removable crumb tray into the trash. You can wipe down the exterior with a damp cloth if needed.

Safety Tips:

  • Never put anything metal inside the toaster to clean it, as this can create a fire hazard.
  • Avoid using the toaster near flammable materials like curtains.
  • Keep the toaster out of reach of children when in use.

By following these steps, you can easily use the Rae Dunn Retro Rounded Bread Toaster and enjoy perfectly toasted bread, bagels, and more for your breakfast mornings.


Tips and Recipes Suitable for the Rae Dunn Retro Rounded Bread Toaster

Tips and Recipes for the Rae Dunn Retro Rounded Bread Toaster

The Rae Dunn Retro Rounded Bread Toaster, with its wide slots and multiple functions, opens up a world of possibilities for your breakfast creations. Here are some tips and recipes to get the most out of your toaster:

Tips:

  • Master the browning levels: Experiment with the different browning levels to find your perfect toast shade. Remember that different breads will toast at varying speeds, so start with a lower setting and adjust as needed.


  • Use the defrost function strategically: This is not just for frozen bread! If your bread feels a bit stale, the defrost function can give it a gentle refresh before toasting.


  • Take advantage of the bagel function: This setting is ideal for bagels and ensures a crispy exterior without sacrificing a warm, chewy center.


  • Think beyond toast: While toasting bread is its primary function, the Rae Dunn toaster can also handle bagels, English muffins, and thick slices for sandwiches. Get creative with your breakfast options!


  • Keep it clean: Empty the crumb tray regularly to prevent crumbs from burning and affecting the taste of your toast.


  • Safety first: Unplug the toaster when not in use and allow it to cool completely before cleaning.

Recipes:

Classic Toasts:

  • Avocado Toast: Toast whole-wheat bread to your desired level of crispiness. Mash avocado and spread it on the toast. Top with your favorite toppings like lemon juice, chili flakes, salt, and an egg.


  • Breakfast Bruschetta: Toast baguette slices. Rub with garlic cloves and drizzle with olive oil. Top with chopped tomatoes, fresh basil, and a balsamic glaze.

Using the Bagel Function:

  • Cream Cheese and Smoked Salmon Bagel: Toast a bagel using the bagel function. Spread with cream cheese and top with smoked salmon, red onion slices, and capers.


  • Everything Bagel with Herb Cream Cheese: Toast an everything bagel using the bagel function. Spread with herb cream cheese and top with additional everything bagel seasoning.

Utilizing the Defrost Function:

  • French Toast: Defrost slices of bread using the defrost function. Prepare your egg batter and soak the defrosted bread slices. Cook the french toast on a skillet until golden brown on both sides. Serve with maple syrup and fresh fruit.


  • Cinnamon Toast: Defrost bread slices using the defrost function. Spread with butter and sprinkle with cinnamon sugar. Toast using a lower browning level to achieve warm, melty cinnamon sugar without burning the bread.

These are just a few ideas to get you started. With the Rae Dunn Retro Rounded Bread Toaster’s versatility, the possibilities for delicious toasted creations are endless!


A Cleaning Guide

Here’s how to clean your Rae Dunn Retro Rounded Bread Toaster for safe and efficient maintenance:

Safety Precautions:

  • Unplug the toaster: Always unplug the toaster before cleaning to avoid any electrical hazards.


  • Let it cool completely: Wait for the toaster to cool down completely before handling it. The exterior can get quite hot during operation.

Cleaning the Exterior:

  • Use a damp cloth: For most cleaning, a damp microfiber cloth is sufficient. Wipe down the exterior surfaces to remove any crumbs or smudges.


  • Mild soap (optional): If there are stubborn marks, you can dampen the cloth with a light dish soap solution. Wring out the cloth thoroughly so it’s just damp, not soaking wet.


  • Avoid harsh chemicals: Don’t use abrasive cleaners, scouring pads, or harsh chemicals on the toaster’s exterior. These can damage the finish.

Cleaning the Crumb Tray:

  • Remove the crumb tray: Locate the removable crumb tray on the underside of the toaster. It typically slides out or pulls out easily.


  • Empty the tray: Discard the crumbs into the trash.


  • Wash the tray (optional): If the tray is heavily soiled, you can wash it with warm, soapy water. Dry the tray completely before placing it back in the toaster.

General Cleaning Tips:

  • Clean regularly: Empty the crumb tray after each use to prevent crumbs from accumulating and burning. Wipe down the exterior occasionally to maintain a clean appearance.


  • Don’t immerse the toaster: Never submerge the toaster in water or any other liquids. This can damage the electrical components.


  • No metal objects inside: Avoid putting anything metal inside the toaster for cleaning, as this can create a fire hazard.

By following these simple cleaning steps, you can keep your Rae Dunn Retro Rounded Bread Toaster looking good and functioning properly for years to come.


What to Avoid when Using the Rae Dunn Retro Rounded Bread Toaster

Here are some things to avoid when using the Rae Dunn Retro Rounded Bread Toaster to ensure safety and optimal performance:

Misusing the Slots:

  • Overstuffing: Don’t try to cram too much bread or thick items into the slots. This can force the bread and potentially damage the heating elements.


  • Foreign objects: Never insert anything metal (like knives, forks, or utensils) into the slots. This is a fire hazard and can damage the toaster.

Forgetting Safety:

  • Leaving unattended: Don’t leave the toaster unattended while it’s in operation. Keep an eye on it, especially if toasting for young children.


  • Flammable materials: Keep the toaster away from flammable materials like curtains, oven mitts, or dish towels while it’s running.


  • Wet or damp bread: Avoid toasting wet or damp bread. This can cause the bread to stick or even create sparks.

Improper Cleaning Techniques:

  • Submerging in water: Never submerge the toaster in water or any other liquids. This can damage the electrical components and cause a fire hazard.


  • Abrasive cleaners: Avoid using harsh chemicals, scouring pads, or abrasive cleaners on the toaster’s exterior. These can damage the finish.


  • Metal objects inside: Never put anything metal inside the toaster for cleaning. This can create a shock hazard.

Pushing the Toaster’s Limits:

  • Exceeding capacity: Don’t overload the toaster by trying to toast more than the recommended number of slices. This can strain the electrical components and potentially cause a fire.


  • Forcing stuck bread: If bread gets stuck, unplug the toaster and let it cool completely before attempting to remove it. Don’t use a knife or fork to pry it out, as this could damage the toaster or cause an electrical shock.


  • Continuous use: Allow the toaster to cool down between uses, especially after toasting multiple batches. Running it continuously can overheat the appliance.

By following these tips, you can avoid common mistakes and ensure safe and efficient use of your Rae Dunn Retro Rounded Bread Toaster.

In conclusion, the Rae Dunn Retro Rounded Bread Toaster brings both style and function to your kitchen. It boasts a sleek design with wide slots for various breads and bagels. Achieve perfect toast every time with 6 browning levels, while special bagel and defrost functions ensure convenience. A cancel option and removable crumb tray add to its user-friendliness. With proper use and care, this toaster will be a delightful addition to your mornings for years to come.

Keenstone Stainless Steel Toaster

About the Keenstone Stainless Steel Toaster

Beyond Basic: The Chic and Functional 2-Slice Retro Toaster

Are you tired of your boring old toaster that only provides a single shade of “kinda burnt”? Do you crave perfectly browned toast, with settings to fit even the pickiest eaters in your household? Step aside, boring breakfast routine! This toaster is here to add some serious flavor (or crispness) to your mornings.(or rather, on your countertop).

Let’s dive into the world of the 2 Slice Stainless Steel Retro Toaster with 6 Bread Shade Settings. Don’t be fooled by its good looks (though the retro design is a plus)! This toaster packs a punch with features that will transform your toast-making experience.

Here’s what makes this toaster stand out:

Say goodbye to shade limitations: With 6 bread shade settings, you can achieve toast perfection, from a light golden brown to a satisfyingly brittle dark roast. No more toast-based bickering! This toaster offers even browning for a harmonious breakfast experience.

Bagel lovers rejoice! This toaster has a dedicated bagel setting that perfectly browns the outside while keeping the inside soft and chewy. Even browning for your bagels! No more disappointment, just deliciousness.

Got frozen bread? No problem! The defrost function lets you toast bread straight from the freezer, Streamlining your morning routine.

Wide enough for more than just bread: The extra-wide slots can fit thick bagels, Texas toast, and even English muffins. Multifunctionality is key!

Cleaning up is a breeze: The detachable crumb tray makes cleaning up after your toasty adventures easy. No more crumbs littering your countertop!

Safety first: With a cancel function, you can stop the toasting cycle anytime, preventing any potential burning setbacks.

But wait, there’s more! An appliance that’s as beautiful as it is functional? Yes, please! This toaster boasts a stunning design that complements any kitchen aesthetic.

So, whether you’re a lover of toast, a busy bee in the mornings, or someone who appreciates both style and function, this 2-Slice Retro Toaster is an ideal choice. It’s the perfect way to elevate your daily breakfast routine and enjoy perfectly toasted goodness at all time.


Specifications

2-Slice Stainless Steel Retro Toaster Specifications:

General:

  • Type: 2-Slice Toaster
  • Design: Retro
  • Material: Stainless Steel (likely body)
  • Color: White

Capacity:

  • Slices: 2
  • Slot Width: Extra Wide (fits bagels, Texas toast, English muffins)

Features:

  • 6 Bread Shade Settings: Light to Dark Roast
  • Bagel Function
  • Defrost Function
  • Cancel Function
  • Detachable Crumb Tray

Additional Information:

  • May have cool-touch housing for safety (based on similar models)
  • No information on wattage or voltage (check user manual for details)

Please note: It’s always best to check with the product manual or manufacturer’s website for complete and accurate specifications.


Key Features

Here are the features of the 2-Slice Stainless Steel Retro Toaster:

Toasting Features:

  • 6 Bread Shade Settings: This allows you to achieve different levels of toast doneness, from light and golden to dark and crispy.


  • Bagel Function: This setting ensures even toasting for bagels, browning the outside while keeping the inside soft and chewy.


  • Defrost Function: Toast frozen bread straight from the freezer without needing to warm it up first, saving you time in the mornings.


  • Cancel Function: Stop the toasting cycle at any point to prevent over-toasting or burning.

Other Features:

  • Extra-Wide Slots: These can fit a wider variety of breads and breakfast items, including bagels, Texas toast, and English muffins.


  • Detachable Crumb Tray: Makes cleaning up after use easy and helps prevent crumb buildup that could lead to fire hazards.

Potential Additional Features (not confirmed but common in similar toasters):

  • Cool-Touch Housing: The exterior of the toaster may stay cool to the touch for added safety, especially around curious hands.

Remember, It’s always best to check with the user manual or manufacturer’s website for a complete list of features.


How to Use the Keenstone Stainless Steel Toaster

How to Use Your 2-Slice Stainless Steel Retro Toaster:

While a user manual would provide the most specific instructions, here’s a step by step guide on how to use your 2-Slice Stainless Steel Retro Toaster based on the provided information:

1. Prepare Your Bread:

  • Select your bread or desired breakfast item (bagel, English muffin, etc.)


  • If using frozen bread, ensure the toaster has a defrost function. Otherwise, warm up the bread beforehand.

2. Adjust Settings:

  • Select your desired toast shade using the bread shade setting dial (likely 1-6 settings for light to dark).


  • If toasting a bagel, turn on the bagel function (usually a dedicated button).

3. Toasting:

  • Put your bread or breakfast item in the slots.


  • Lower the lever (if applicable) or press the start button (depending on the model) to begin toasting.

4. Monitor and Cancel (Optional):

  • When the cycle is complete, the toast will pop up and the toaster will shut off automatically. You can listen for a popping sound or monitor for an indicator light (depending on the model).


  • You can use the cancel button (if available) to stop the toasting cycle early and prevent your toast from burning.

5. Retrieval and Enjoyment:

  • Use tongs or another heat-resistant utensil to safely remove the hot toast from the slots.


  • To avoid burns be careful, as the exterior surfaces will be hot.


  • Enjoy your perfectly toasted breakfast!

Additional Tips:

  • Check with the user manual for specific instructions on your toaster model if available.


  • Only toast one or two slices at a time, as recommended by the manufacturer (check with the manual for capacity).


  • Avoid putting oversized items in the slots that could get stuck or cause a fire hazard.


  • When not in use and before cleaning, always unplug the toaster.


  • Let the toaster cool down completely before cleaning.


  • Empty the crumb tray regularly to avoid causing a fire hazard.

Remember, these are general guidelines. Always prioritize safety and follow the specific instructions provided with your toaster model.


Tips and Recipes Suitable for Keenstone Stainless Steel Toaster

Tips and Recipes for Your 2-Slice Stainless Steel Retro Toaster

This toaster provides different kinds of functions to upgrade your breakfast routine beyond just plain toast. Here are some tips and recipe ideas to get you started:

General Tips:

  • Try out with the bread shade settings: Find your ideal toast color, from a light golden brown for a soft center to a dark and crispy finish.


  • Use the defrost function wisely: This is a lifesaver for mornings when you forget to take bread out of the freezer. However,thicker items like bread and pastries may not heat uniformly, so it’s best to use thinner slices or defrost them beforehand.


  • The bagel function is your friend: Get perfectly toasted bagels with a soft, chewy inside every time. Don’t forget to slice your bagel in half before toasting!


  • Think beyond bread! The wide slots can fit different kinds of breakfast items. Try toasting English muffins for a tasty base for breakfast sandwiches, or get creative with thicker slices of challah or French bread.


  • Get fancy with toppings: Once you have your perfectly toasted base, Dive into a delicious topping adventure! Here are some ideas:
    Sweet: Butter and jam, ricotta cheese and honey, sliced banana with Nutella, peanut butter and sliced banana. Savory: Sliced avocado with a drizzle of everything bagel seasoning, ricotta cheese with fresh herbs and a sprinkle of olive oil, mashed beans with cheese, smoked salmon with cream cheese and capers.

Recipes for Your Retro Toaster:

1. Toasted Open-Faced Breakfast Sandwich:

  • Toast an English muffin using the bagel function for a soft and chewy center.


  • Top with a fried egg, a slice of cheese, and a sprinkle of hot sauce.

2. Melty Grilled Cheese:

  • Use two slices of Texas toast (cut in half if needed) to create a pocket.


  • Fill with your favorite cheese mixture (cheddar, mozzarella, provolone) and any additional fillings like sliced ham or tomato.


  • Butter the outside of the bread and toast using a low setting on the toaster until the cheese is melted and the bread is golden brown.

3. Bruschetta with Toasted Bread:

  • Slice a baguette on a diagonal and toast using a lower setting to prevent burning.


  • Rub each slice with a garlic clove while still warm.


  • Top with diced tomatoes, fresh basil, a sprinkle of olive oil, salt and pepper.

4. Cinnamon Sugar Toast:

  • Toast two slices of bread to your desired level of doneness.


  • In a shallow dish, gather your cinnamon sugar by mixing white sugar with ground cinnamon.


  • While the toast is still warm, spread with butter and then dip it into the cinnamon sugar mixture to coat.

These are just a few ideas to get you started. With a little creativity, you can use your 2-Slice Stainless Steel Retro Toaster to create endless delicious breakfast choices!


A Cleaning Guide

Here’s a step by step guide on how to clean your 2-Slice Stainless Steel Retro Toaster:

Safety First:

  • Unplug the toaster and let it cool completely before cleaning. This is essential to prevent burns and electrical shock.

Exterior Cleaning:

  • Wipe down the exterior with a damp cloth. Use a light dish soap solution if necessary for stubborn stains.


  • Do not submerge the toaster in water or any other liquids. This can damage the electrical components.


  • Dry the exterior thoroughly with a clean, dry cloth before plugging it back in.

Crumb Tray Cleaning:

  • Empty the crumb tray frequently to prevent fires. This should be done after each use.


  • Most crumb trays are detachable. Simply pull it out and throw away the crumbs into the trash.


  • If the crumb tray is washable (refer to the user manual), you can wash it with warm soapy water and dry it completely before placing it back in the toaster.

Interior Cleaning (Optional):

  • The interior of the toaster doesn’t require frequent cleaning. However, you can occasionally remove loose crumbs by:

Unplugging the toaster and letting it cool down completely.

Turning the toaster upside down and gently shaking it over a trash can to remove any crumbs.

You can also use a soft brush to carefully brush away any remaining crumbs.

  • Never use harsh chemicals, abrasive cleaners, or scouring pads on the interior. These can damage the toaster’s heating elements.

Additional Tips:

  • Refer to the user manual for specific cleaning instructions for your toaster model.


  • Avoid leaving crumbs or debris inside the toaster, as this can lead to smoke or burning during future use.


  • Keep your toaster sparkling clean, but remember: never use metal objects inside. It’s a fire hazard!

By following these simple cleaning tips, you can keep your 2-Slice Stainless Steel Retro Toaster looking and functioning its best for years to come.


What to Avoid when Using the Keenstone Stainless Steel Toaster

Here are some things to avoid when using your 2-Slice Stainless Steel Retro Toaster to ensure safety and optimal performance:

Overloading the Toaster:

  • Don’t try to force too much bread or other items into the slots. This can cause uneven toasting, jamming, or damage to the toaster’s heating elements.


  • Only toast the recommended number of slices at a time. Check the user manual for your specific model’s capacity.

Using Oversized Items:

  • Avoid toasting items that are too large for the slots. This can be a fire hazard, as oversized items could obstruct the toasting mechanism and prevent proper heat dispersion.


  • Stick to bread slices, bagels cut in half, English muffins, or other breakfast items that fit comfortably inside the slots.

Forgetting to Remove Bread:

  • Always monitor the toaster while it’s in operation. This is a fire hazard, especially if bread gets stuck or starts to burn.


  • Listen for the toaster’s automatic shut-off sound or watch for the indicator light to signal the end of the cycle.


  • Use tongs to remove hot toast from the slots to avoid burns.

Misusing the Defrost Function:

  • The defrost setting is best for bread that’s slightly frozen.


  • Thick slices and frozen pastries may defrost unevenly with defrost. To ensure even browning, thaw them first.

Water and Electricity:

  • Never submerge the toaster in water or any other liquids. This can damage the electrical components and cause a serious electrical shock hazard.


  • Always unplug the toaster before cleaning or when not in use.

Forgetting the Crumb Tray:

  • Don’t forget to empty the crumb tray frequently, ideally after each use. This prevents crumb buildup, which can be a fire hazard.

By following these tips, you can enjoy delicious toast and ensure the safe and long-lasting use of your 2-Slice Stainless Steel Retro Toaster.

In conclusion, the 2-Slice Stainless Steel Retro Toaster goes beyond basic with its different kinds of functions and stylish design. Providing 6 shade settings, a bagel function, defrost option, and wide slots, it toasts bread, bagels, and more to your exact preference. This toaster is both multifunctional and convenient, making it a great choice for anyone who wants to upgrade their breakfast routine. Remember to use it safely for years of perfectly toasted enjoyment!

Bread Toasters Vs. Sandwich Maker – The comparison

Bread Toasters vs. Sandwich Makers: The Ultimate Comparison

When it comes to quick and convenient kitchen appliances, bread toasters and sandwich makers stand out as essentials for many households. They both offer fast and easy solutions for breakfast and snacks, but they serve slightly different purposes. In this comprehensive comparison, we’ll dive into their functions, designs, and uses to help you decide which one suits your needs best.


bread toaster       bread toaster

-Functions:

Bread Toasters

The primary function of a bread toaster is to toast bread slices to your desired level of crispiness. Toasters typically have multiple slots (usually two or four) where you insert bread slices vertically. Once you push the lever down, the toaster heats the bread until it reaches the selected level of toasting, at which point it pops up, ready to eat.

Key Features:

1. Variable Browning Control: Most toasters allow you to adjust the toasting level from light to dark.

2. Reheat and Defrost Options: Modern toasters often come with these settings to reheat previously toasted bread or defrost frozen slices.

3. Bagel Function: Some toasters have a bagel setting that toasts the cut side of a bagel while gently warming the outer side.

Sandwich Makers

A sandwich maker, on the other hand, is designed to grill or toast sandwiches, usually creating a sealed, crispy edge around the bread. Sandwich makers often feature two hot plates that press together to cook the sandwich evenly from both sides. These appliances can accommodate various fillings, from simple cheese to more complex combinations involving meats and vegetables.

Key Features:

1. Interchangeable Plates: Many models offer different plates for grilling, toasting, or making waffles.

2. Non-Stick Surface: Ensures easy removal of sandwiches and simplifies cleaning.

3. Indicator Lights: Sign when the sandwich maker is preheated and when the sandwich is ready.


-Design

Bread Toasters

Toasters are typically compact and vertical, designed to save counter space. They come in various styles and finishes, from sleek stainless steel to retro-inspired designs. Toasters have simple controls, usually consisting of a browning dial and a lever to lower the bread.

Design Elements:

1. Slot Width: Adjustable slots can accommodate different bread thicknesses, including bagels and thick artisan bread.

2. Crumb Tray: A removable tray at the bottom collects crumbs, making cleaning easier.

3. Compact Footprint: Toasters are designed to occupy minimal counter space, making them ideal for small kitchens.


Sandwich Makers

Sandwich makers are generally larger and horizontal, as they need space to accommodate and press the sandwiches. They often have a clamshell design, where the top plate closes over the bottom one, and some models can stand upright for storage.

Design Elements:

1. Heating Plates: Come in different shapes and sizes, often with a non-stick coating to prevent food from sticking.

2. Locking Mechanism: Ensures the plates are securely pressed together while cooking.

3. Handle and Exterior: Insulated to stay cool to the touch, enhancing safety.


 –Uses

Bread Toasters

Toasters are primarily used for toasting bread, but their utility extends beyond just making toast.

Common Uses:

1. Toast: The obvious primary use, perfect for breakfast or a quick snack.

2. Bagels and English Muffins: Specialized settings allow for toasting bagels and English muffins.

3. Pastries: Certain models can toast pastries like Pop-Tarts and toaster strudels.

4. Reheating Bread: The reheat function can warm up previously toasted bread without overheating it.


Sandwich Makers

Sandwich makers are versatile kitchen appliances with a range of uses beyond just making sandwiches.

Common Uses:

1. Grilled Sandwiches: The primary use, is ideal for making grilled cheese or panini-style sandwiches.

2. Quesadillas: Perfect for cooking quesadillas with crispy edges.

3. Grilled Meats and Vegetables: Some models with interchangeable plates can grill small portions of meat and vegetables.

4. Waffles and Pancakes: With the right plates, sandwich makers can double as waffle makers or cook other batter-based items.


Pros and Cons

Bread Toasters

Pros:

1. Speed: Toasters are quick and efficient, delivering toast in minutes.

2. Ease of Use: Simple controls make them user-friendly.

3. Compact Size: Fits easily on most countertops and can be stored in cabinets.

4. Affordability: Generally less expensive than sandwich makers.


Cons:

1. Limited Use: Primarily designed for toasting bread and similar items.

2. Single Functionality: Cannot handle complex tasks like making sandwiches with fillings.


Sandwich Makers

Pros:

1. Versatility: Can be used for a variety of dishes beyond sandwiches.

2. Even Cooking: Cook both sides of the sandwich or other items evenly.

3. Sealing Edges: Creates sealed edges on sandwiches, preventing fillings from spilling out.

4. Interchangeable Plates: Increases functionality for different types of cooking.


Cons:

1. Size: A larger footprint takes up more counter space.

2. Cleaning: Can be more challenging to clean, especially if the plates are not removable.

3. Longer Cooking Time: Generally takes longer than a toaster to cook food.

Making the Choice

Choosing between a bread toaster and a sandwich maker depends on your specific needs and preferences.


Consider a Bread Toaster if:

1. You Need Quick Breakfasts: Toasters are ideal for quick, no-fuss breakfasts.

2. Space is Limited: Their compact design makes them perfect for small kitchens.

3. You Prefer Simple Operation: Toasters are straightforward and easy to use.


Consider a Sandwich Maker if:

1. You Love Grilled Sandwiches: Perfect for creating a variety of grilled and pressed sandwiches.

2. You Want Versatility: Useful for more than just sandwiches, including grilling and making waffles.

3. You Have Counter Space: Can accommodate the larger footprint of a sandwich maker.


 Conclusion

Both bread toasters and sandwich makers are valuable kitchen appliances, each offering unique benefits. The bread toaster excels in simplicity and speed, perfect for those who want a quick slice of toast or a warmed bagel. On the other hand, the sandwich maker shines in versatility, capable of handling a range of dishes from grilled sandwiches to quesadillas and even waffles.


In making your decision, consider your daily needs, kitchen space, and the types of foods you enjoy. Whether you prioritize quick breakfasts or versatile cooking options, there’s a perfect appliance out there for you. Happy toasting and sandwich-making!

Click on this link to check out our product
Check out our social media platforms

Retro Bagel Toaster

About Retro Bagel Toaster

Love Your Toast? This Retro Toaster by Yabano Might Be Your Perfect Match

Interested in a toaster that’s both aesthetically pleasing and packed with useful features? Then the Yabano 2 Slice Retro Bagel Toaster might be an ideal addition to your kitchen counter. This toaster provides a winning combination of features for toast lovers who appreciate a touch of retro charm.

Retro Looks for the Modern Kitchen

If you’re tired of large, stainless steel appliances, the Yabano toaster boasts a sleek, silver finish with a vintage aesthetic that injects a pop of character into your kitchen. It’s sure to stand out without looking out of place.

Toast to Perfection with 7 Shade Settings

Whether you like your toast lightly kissed with golden brown or a deep, dark roast, the Yabano toaster got you covered. With 7 shade settings, you can make exactly the level of crispiness you desire for any type of bread.

Extra-Wide Slots for Bagels and More

Get creative! This toaster handles more than just plain bread slices. The Yabano toaster features extra-wide slots that can easily fit bagels, thick Texas toast, or even English muffins.

Defrost, Bagel, and Cancel Functions for Convenience

This toaster is more than just your average appliance. It boasts a defrost function, letting you toast bread straight from the freezer for mornings on the go.The bagel setting ensures even toasting, gently browning the outside while keeping the inside warm and chewy. And if you need to stop the toasting cycle for any reason, the cancel function is accessible.

Easy Cleaning with Removable Crumb Tray

Nobody likes a messy toaster! The Yabano toaster features a detachable crumb tray for easy cleaning. Simply pull it out, throw away the crumbs, and pop it back in.

A Great Value for Toast Enthusiasts

The Yabano 2 Slice Retro Bagel Toaster is a perfect blend of style, functionality, and convenience, all at a budget-friendly price. If you crave perfectly toasted bread, look no further! This user-friendly toaster with a sleek design makes achieving that toasty perfection a breeze.

Is this toaster right for you?

If you are looking for a basic toaster, you should consider your needs and preferences. This might offer more features than you need. But if you love different kinds of breads, appreciate a touch of retro style, and want the convenience of defrost, bagel, and cancel functions, then the Yabano 2 Slice Retro Bagel Toaster could be your ideal match.


Key Features

The Yabano 2 Slice Retro Bagel Toaster boasts a range of features that cater to both style and functionality:

1. Retro Design: This toaster provides a sleek silver finish with a retro aesthetic, adding a touch of personality to your kitchen.

2. 7 Shade Settings: You can achieve perfect toast every time by choosing from 7 browning levels, from lightly golden to a deep, dark roast.

3. Extra-Wide Slots: This toaster’s capabilities extend far beyond basic bread toasting.These wider slots can fit bagels, thick breads, and even English muffins.

4. Multi-Functions:

  • Defrost: Straight from frozen to perfectly toasted! This function makes mornings a breeze.
  • Bagel Setting: Ensures even toasting for bagels, gently browning the outside while keeping the inside warm and chewy.
  • Cancel Function: Puts you in control of the toasting cycle with the option to stop it at any point..

5. Easy Cleaning: The detachable crumb tray makes cleaning the toaster easy. Simply take it out, throw away the crumbs, and put it back in.

6. Stainless Steel Body: Provides a sleek and long lasting design that complements any kitchen.

7. Possible Additional Features (Based on Availability):

  • Non-Slip Feet: These provide stability for the toaster on your countertop.
  • Warming Rack: This allows you to warm buns, croissants, or keep toast warm after toasting.


Specifications

Specific details about the Yabano 2 Slice Retro Bagel Toaster might be scarce, but here’s what we can piece together based on available information.

  • Capacity: 2 Slices
  • Shade Settings: 7 Levels
  • Slot Width: Approximately 1.4 inches
  • Power: Likely around 900 watts (based on similar toasters)
  • Material: Stainless Steel body
  • Dimensions: Roughly 9.85″ deep x 10.6″ wide x 6.7″ high (based on available information)

Features:

  • Defrost function
  • Bagel function
  • Cancel function
  • Detachable crumb tray

Possible Additional Specs (Based on Availability):

  • Non-slip feet for stability
  • Warming rack for buns, croissants, or keeping toast warm

Missing Specs:

  • Weight
  • Warranty information


How to Use the Retro Bagel Toaster

While a physical manual might be optimal, here’s a general guide on how to use the Yabano 2 Slice Retro Bagel Toaster based on common toaster functions:

1. Plug in the toaster: Make sure the toaster is on a stable surface and plugged into a working outlet.

2. Prepare your bread: Put your bread slices or bagel halves into the slots.

3. Select your shade setting: Choose the desired toast level (1-7) using the shade control knob. Lower numbers are lighter toast, while higher numbers result in darker browning.

4. Start toasting: Depending on your model, you might have a lever or a button to start toasting.

5. Bagel function (optional): If you’re toasting a bagel, press the bagel button (if available) for even toasting. This setting might apply heat to both sides of the bagel for a crispier exterior and warm center.

6. Defrost function (optional): If your bread is frozen, click on the defrost button (if available) to warm up and toast it in one cycle.

7. Cancel function (optional): If you need to stop the toasting cycle for any reason, press the cancel button (if available).

8. Wait for the toast to pop up: Once the toasting cycle is finished, the toaster will automatically shut off and the toast will pop up. The exterior will be hot, so handle it with care.

9. Remove your toast: For safe handling of hot toast, use a utensil like tongs to remove it from the slots.

10. Cleaning: Allow the toaster to cool completely before cleaning. Unplug it and empty the detachable crumb tray. You can dab the exterior with a damp cloth if needed.

Tips:

  • Don’t overload the slots.


  • Don’t put butter or oil on bread before toasting.


  • Always monitor the food while toasting.


  • Check with the user manual (if available) for specific instructions and any additional features your toaster might have.


Tips and Recipes Suitable for your Retro Bagel Toaster

Tips for Using Your Yabano 2 Slice Retro Bagel Toaster
Here are some tips to get the most out of your Yabano toaster:

  • Get to know your shade settings: Try out with the different shade settings to find your ideal toast preference. Remember, lower numbers result in lighter toast, while higher numbers toast darker.


  • Start low, go high: If you’re unsure about the perfect browning level for your bread, it’s always safer to start with a lower setting and toast for a shorter time. You can always toast for extended periods if needed.


  • Use the defrost function strategically: This function is ideal for quickly toasting bread straight from the freezer. However, do not use it for very cold bread or frozen waffles, as they might not cook evenly throughout.


  • Bagel love: The bagel setting is a great way to achieve perfectly toasted bagels. It toasts the cut sides while warming the inside, ensuring a crispy exterior and a chewy center.


  • Clean regularly: To ensure your toaster functions safely, it’s helpful to empty the crumb tray after each use. This prevents crumbs from burning. To maintain a bright and shiny appearance, you can wipe the exterior with a damp cloth.

Recipes Suitable for Your Yabano Toaster

Your Yabano toaster isn’t just for toast! Here are some recipe ideas that can be made using your toaster:

  • Melty Grilled Cheese: Put two slices of bread with your favorite cheese filling in between the slots. Toast until the cheese is melted and gooey, and the bread is golden brown. You can add sliced ham or other fillings for a heartier sandwich.


  • Warmed Pita Bread: Cut pita bread in half horizontally to create pockets. Place them in the toaster for a few seconds to warm them a bit. These are perfect for scooping up hummus, baba ghanoush, or your favorite dips.


  • Crispy Quesadillas: Level a tortilla with cheese and your favorite fillings like beans, peppers, or cooked chicken. Fold the tortilla in half and toast until the cheese is melted and the tortilla is brittle.


  • French Toast Sticks: Cut bread into thick sticks, dip them in a mixture of eggs, milk, and cinnamon, and then toast until golden brown. Sprinkle it with maple syrup for a delicious breakfast treat.


  • Revive Day-Old Croissants: Pop those croissants in the toaster for a quick refresh. They’ll be slightly brittle on the outside and warm and flaky on the inside.

With a little creativity, your Yabano toaster can be a multifunctinal tool in your kitchen for more than just perfectly toasted bread.


A Cleaning Guide

Here’s how to keep your Yabano 2 Slice Retro Bagel Toaster sparkling clean:

Safety First:

  • Unplug the toaster before cleaning and allow it to cool down completely to avoid any risk of burns.

Crumb Tray:

1. This is the easiest part to clean! Simply detach the crumb tray (check with your manual if needed on how to locate the release mechanism).

2. Empty the crumbs into a trash can.

3. You can wash the crumb tray with warm, soapy water if needed. Rinse it thoroughly and dry completely before placing it back in the toaster.

Exterior Cleaning:

1. Wipe down the exterior of the toaster with a damp cloth. You can add a light dish soap to the water for tougher stains.

2. Avoid using abrasive cleaners, scouring pads, or steel wool, as these can scratch the stainless steel finish.

3. Use a separate damp cloth to clean the control knobs and buttons.

4. Dry the entire toaster with a clean, dry cloth before plugging it back in.

Interior Cleaning (Optional):

1. For crumbs stuck inside the toaster slots, you can use a long, thin utensil like a chopstick or a narrow brush to gently remove them.

2 Never insert anything metallic into the toasting slots while the toaster is plugged in.

3. You can also unplug the toaster and turn it upside down over a trash can to empty out any remaining crumbs from the toaster.

General Tips:

  • Regularly empty the crumb tray after each use to prevent a fire hazard from built-up crumbs.


  • Wipe down the exterior regularly to maintain a clean and shiny toaster.


  • Check with the user manual for specific cleaning instructions for your Yabano toaster model, as there might be slight differences.

By following these simple cleaning steps, you can ensure your Yabano toaster looks great and operates properly for years to come.


What to avoid when Using the Retro Bagel Toaster

Here are some things to avoid when using your Yabano 2 Slice Retro Bagel Toaster to ensure safety and optimal performance:

Fire Hazards:

  • Overcrowding the slots: Don’t force too much bread or thick items into the slots. This can obstruct airflow and cause overheating, which can lead to a fire hazard.


  • Forcing stuck bread: Never use a knife, fork, or any metal utensil to remove stuck bread while the toaster is plugged in. This creates a risk of electric shock. Let the toaster cool completely and then gently remove the bread with a non metal utensil made of wood or heat-resistant plastic.


  • Putting in wet or greasy foods: Do not toast wet bread, buttered bread, or greasy foods like cheese directly on the bread. The moisture or dripping grease can cause sparks and lead to a fire hazard.


  • Leaving unattended: Always monitor your toast while it’s toasting. Don’t leave the toaster unattended, especially if you have children or pets around.

Misuse and Damage:

  • Using with a damaged cord or plug: Never use the toaster if the cord or plug is damaged. This poses a serious electrical hazard. For optimal safety, replace damaged cord immediately.


  • Forcing the levers: Don’t force the toaster carriage lever or any buttons down. If they’re not working smoothly, check with the manual or unplug the toaster and contact customer service.


  • Cleaning with harsh chemicals: Don;t use abrasive cleaners, scouring pads, or steel wool on the toaster’s exterior. These can scratch the stainless steel finish.

General Toasting Tips:

  • Matching bread size to slots: Use bread slices or bagel halves that fit comfortably within the slots. Very small pieces of bread can be a choking hazard and might burn easily.


  • Not overloading the circuit: If you’re using other appliances on the same electrical circuit, avoid using the toaster at the same time. This could overload the circuit causing the breaker to trip.

By following these precautions, you can enjoy perfectly toasted bagels and bread with your Yabano toaster for a long time.

In conclusion, the Yabano 2 Slice Retro Bagel Toaster is a toaster that mixes style with function. It toasts different kinds of breads with its wide slots, defrost and bagel settings, and 7 browning levels. Easy to clean and with a retro design, this toaster is perfect for anyone who wants more than just a basic appliance for their daily toast.

BLACK+DECKER 2-Slice Toaster

Start Your Day Right with the BLACK+DECKER 2-Slice Toaster (T2569B)

Looking for a simple and reliable toaster that can tackle all your breakfast needs? Look no further than the BLACK+DECKER 2-Slice Toaster (T2569B). This toaster Showcases timesaving features for a smooth start to your day, from perfectly browned toast to convenient cleaning.

Accommodating Every Slice

The T2569B shines with its extra-wide slots. Whether you’re craving a thick-cut bagel or a slice of artisan bread, this toaster can tackle it. No more having trouble storing oddly shaped loaves.

Toast Exactly How You Like It

With six shade settings, you’re in complete control of your toast’s browning level. From a light golden hue to a satisfyingly dark crisp, this toaster lets you achieve your perfect breakfast texture.

Simplify Your Mornings

This toaster Provides a suite of intuitive functionalities to simplify your morning routine. The simplified bagel operation adjusts the toasting cycle to perfectly brown the inside while keeping the outside chewy. Likewise, the frozen setting ensures even toasting for waffles or frozen bread. And if you need to stop the toasting cycle at any time, the cancel button is at your disposal.

Clean Up Made Easy

The T2569B comes with a pull-out crumb tray, allowing for easy cleaning and preventing crumbs from burning or piling up on your counter.

Sleek Design with Powerful Performance

This toaster features a stylish design that enhances any kitchen aesthetic.The 850 watts of power ensures your toast is browned quickly and evenly.

Is the BLACK+DECKER 2-Slice Toaster (T2569B) Right for You?

Seeking a straightforward toaster that gets the job done? Look no further! The BLACK+DECKER 2-Slice Toaster (T2569B) is a great choice. With its wide slots, shade settings, and convenient features, this toaster delivers perfectly browned toast every time.


Key Features

BLACK+DECKER 2-Slice Toaster (T2569B) Features:

  • Extra-Wide Slots: It fits thick slices of bread, bagels, and more.
  • 6 Shade Settings: Control the level of browning for your perfect toast.
  • Bagel Function: Toasts bagels evenly, browning the inside while keeping the outside chewy.
  • Frozen Setting: It guarantees even toasting for waffles or frozen bread.
  • Cancel Button: it stops the toasting cycle at any time.
  • Pull-Out Crumb Tray: This feature allows for easy cleaning and prevents mess.
  • Sleek Design: Matches a variety of kitchen aesthetics.
  • 850 Watts of Power: Toasts quickly and evenly.


How to Use the BLACK+DECKER 2-Slice Toaster

Using the BLACK+DECKER 2-Slice Toaster (T2569B) is easy to understand:

1. Plug in the toaster: Make sure the toaster is on a stable surface and plugged into a working outlet.

2. Prepare your bread: Place your bread slices, bagels, or other toasty favorites into the extra-wide slots.

3. Select your browning level: Turn the browning knob to select your desired shade preference, from 1 (light) to 6 (dark).

 4.Special Functions (Optional):

  • Bagel Function: Press the bagel button for toasting bagels. This setting adjusts the cycle to brown the inside while keeping the outside chewy.


  • Frozen Setting: Press the frozen button for toasting frozen waffles or bread. This makes sure of even browning throughout.

5. Start Toasting: Press the lever down to lower the bread into the slots and begin the toasting cycle.

6. Canceling Toasting (Optional): If your bread is toasting too quickly, simply press the cancel button to stop the cycle.

7. Lifting Toast: Once the toasting cycle is complete, the toast will pop up automatically. Use the high-lift lever to safely get your toast without burning your fingers.

8. Cleaning: Unplug the toaster and allow it to cool down completely. Then, pull out the crumb tray and throw out any crumbs. You can wipe down the exterior with a damp cloth if needed.

Tips:

  • For even browning, center your bread slices in the slots.


  • The first time you use the toaster, for best results, begin with a lower shade. Feel free to adjust it to your preference after your first use.


  • Don’t use metal utensils to remove bread. They can damage the heating elements.

With these simple steps, you’ll be enjoying perfectly browned toast in no time with your BLACK+DECKER 2-Slice Toaster (T2569B)!


Tips and Recipes Suitable for the BLACK+DECKER 2-Slice Toaster

Tips and Recipes for your BLACK+DECKER 2-Slice Toaster (T2569B)

Here are some tips and recipes to get the most out of your BLACK+DECKER 2-Slice Toaster (T2569B):

Tips:

  • Even Browning: For even browning on thicker bread, try this: toast one side to your desired level, then flip the bread and toast the other side.


  • Reheating: The BLACK+DECKER toaster can also be used to reheat toast remains, waffles, or other breakfast items. Use a lower shade setting to avoid burning.


  • Garlic Toast: For a quick and tasteful snack, try making garlic toast. Toast bread slices until golden brown. Then, rub a clove of garlic on the hot toast and drizzle with olive oil. Season with salt and pepper for a delicious delight.


  • Fruity Toasts: Change your toast into a sweet and refreshing breakfast by adding fresh fruit toppings. Try sliced strawberries, bananas, or blueberries with a sprinkle of honey or maple syrup.


  • Pizza Toast: Craving pizza? Get creative! Toast bread slices until golden brown. Spread with tomato sauce or pizza sauce, top with shredded cheese and your preferred pizza toppings like pepperoni, sausage, or vegetables. Broil on low until the cheese is melted and bubbly.

Recipes Suitable for the Toaster:

  • Avocado Toast: Toast two slices of whole-wheat bread. Mash half an avocado and spread it on the toast. Top with a drizzle of lemon juice, salt, and pepper. For an extra protein boost, consider adding a poached egg or sprinkling some crumbled feta cheese on top (optional)


  • French Toast Sticks: Cut bread slices into thick sticks or squares. Prepare an egg mixture with milk, cinnamon, and a touch of sugar. Dip the bread sticks into the egg mixture and toast until golden brown on both sides. Serve with maple syrup and fresh fruit.


  • Caprese Toast: Toast two slices of sourdough bread. Sprinkle with olive oil and top with sliced fresh mozzarella tomatoes, and basil leaves. Season with salt and pepper.

These are just a few ideas to get you started. With its wide slots and even toasting capabilities, the BLACK+DECKER 2-Slice Toaster (T2569B) is a multifunctional appliance that can be used for different kinds of breakfast and snack recipes. So get creative and enjoy delicious toasted treats!


A Cleaning Guide

Keeping your BLACK+DECKER 2-Slice Toaster (T2569B) clean is easy and ensures optimal performance:

1. Unplug and Cool Down: Before cleaning, always unplug the toaster and allow it to cool down completely. Be careful! A hot toaster can cause burns.

2. Empty Crumb Tray: The key to a clean toaster is managing crumbs. The T2569B features a detachable crumb tray. Simply slide it out and throw away the crumbs. You can wipe the tray with a damp cloth if needed.

3. Wipe Exterior: Once the toaster is cool, use a damp cloth to wipe down the exterior surfaces. Avoid using harsh chemicals or abrasive cleaners, which could cause scuffs or marks.

4. Inner Heating Elements (Optional): For a more thorough cleaning, you can carefully remove any lingering crumbs from inside of the toaster. Unplug the toaster and wait for it to cool completely. Turn the toaster upside down and gently shake it over a trash can to remove any crumbs. You can also use a long, thin brush to reach inside the slots and remove any stubborn crumbs.

Here are some additional tips for cleaning your toaster:

  • Never dip the toaster in water.
  • Use non metal utensils to clean the inside of the toaster, to avoid damage to the heating elements.
  • Clean the toaster regularly to prevent crumbs from piling and burning.

By following these simple cleaning steps, you can keep your BLACK+DECKER 2-Slice Toaster (T2569B) looking and operating like new for years to come.


What to Avoid when Using the BLACK+DECKER 2-Slice Toaster

Here are some things to avoid when using your BLACK+DECKER 2-Slice Toaster (T2569B) to ensure safety and perfect performance:

  • Oversized Bread: While the toaster has wide slots, don’t force in bread slices or pastries that are too large. This can damage the toaster and become a fire hazard.


  • Metal Objects: Don’t insert metal utensils like forks or knives into the toaster to retrieve stuck bread. This can cause electric shock and damage the heating elements. Use tongs or a heat-resistant utensil to remove stuck items after you have unplugged the toaster and let it cool completely.


  • Foil or Wrappers: Do not put aluminum foil, plastic wrap, or any other kind of wrapper into the toaster. These materials can melt, catch fire, or release harmful fumes.


  • Wet or Buttered Bread: Avoid toasting wet bread or bread with butter on it. The moisture can cause sparking or electrical issues, and butter can melt and create a fire hazard. Toast your bread plain and add butter or other spreads after toasting.


  • Forcing the Lever: If the bread gets stuck and the lever won’t release, don’t force it. Unplug the toaster and let it cool down completely. Then, you can gently try to remove the bread with tongs. Never pull on the cord to unplug the toaster.


  • Leaving Unattended: It’s important to monitor the toaster while it’s in operation. Don’t leave it unattended, especially around children or pets.


  • Overheating: Avoid toasting bread for a long period of time. Keep an eye on it to prevent burning and potential fire hazards.

By following these safety precautions, you can enjoy delicious toast with your BLACK+DECKER toaster for a long time.

In conclusion, Skip the burnt toast struggles! The BLACK+DECKER 2-Slice Toaster (T2569B) handles various breads with its wide slots, providing perfect browning every time. Get ready for mornings filled with perfectly toasted treats! This toaster features user-friendly controls, easy cleaning, and a range of shade settings to create your ideal breakfast every time.

15 Most expensive Air Fryer on Amazon

15 Most Expensive Air Fryers on Amazon: Why They’re Worth the Investment

While there are many budget-friendly options available, the high-end models come with advanced features, superior build quality, and exceptional performance that justify their higher price tags. Here’s a detailed look at the 15 most expensive air fryers on Amazon, exploring what makes each one unique and worth the investment.


1. Philips Premium Airfryer XXL (HD9650/96)

Air fryer

Price: Approximately $349.99

Why It’s Expensive:

Philips is a pioneer in the air fryer market, and the Premium Airfryer XXL is their flagship model.


Unique Features:

– Fat Removal Technology: Claims to remove excess fat from food, making meals healthier.

– Large Capacity: Can handle up to 3 pounds of food, suitable for large families.

– Digital Interface: Easy-to-use digital controls with presets for popular dishes.

– Rapid Air Technology: Ensures food is cooked evenly and quickly.

– Durable Build: High-quality materials ensure long-lasting performance.


2. Breville Smart Oven Air Fryer Pro

Price: Approximately $399.95

Why It’s Expensive:

Breville is known for its premium kitchen appliances, and the Smart Oven Air Fryer Pro is no exception.


Unique Features:

– Element IQ System: Distributes heat intelligently for precise cooking.

– Versatility: Functions as an air fryer, toaster oven, and convection oven.

– Super Convection: Reduces cooking time by up to 30%.

– Large Capacity: Can roast a 14-pound turkey or fit nine slices of toast.

– High-Quality Construction: Stainless steel build ensures durability and sleek aesthetics.


3. Ninja Foodi 10-in-1 XL Pro Air Fry Oven

Price: Approximately $329.99

Why It’s Expensive:

Ninja is a trusted brand in the kitchen appliance market, and their Foodi line is renowned for its versatility.

Unique Features:

– 10-in-1 Functionality: Air fry, air roast, bake, whole roast, broil, toast, bagel, dehydrate, reheat, and pizza.

– Extra-Large Capacity: Fits a 5-pound chicken and a sheet pan of vegetables.

– Digital Display: Easy-to-read controls and presets.

– Dual Heat Technology: Faster and more even cooking.

– Stainless Steel Design: Premium build quality.


4. Instant Vortex Plus 10-Quart Air Fryer

Price: Approximately $159.95

Why It’s Expensive:

Instant, known for the Instant Pot, brings its reputation for multifunctionality to the air fryer market.

Unique Features:

– 10-Quart Capacity: Ideal for family-sized meals.

– 7-in-1 Functionality: Air fry, broil, bake, roast, dehydrate, reheat, and rotisserie.

– EvenCrisp Technology: Ensures food is crispy on the outside and tender on the inside.

– Touchscreen Controls: Intuitive and easy to use.

– Stainless Steel Finish: Durable and stylish.


5. Cuisinart TOA-65 Digital Convection Toaster Oven Air Fryer

Price: Approximately $299.95

Why It’s Expensive:

Cuisinart is synonymous with quality kitchen appliances, and this model is a testament to that.

Unique Features:

– Multifunctional: Air fry, bake, broil, toast, warm, and more.

– Digital Display: Offers precision with customizable settings.

– High-Performance: Powerful motor and fan ensure fast and even cooking.

– Adjustable Thermostat: Wide temperature range for various cooking methods.

– Large Capacity: Fits a 12-inch pizza or six slices of bread.


6. GoWISE USA Deluxe 15.5-Quart Air Fryer Oven

Price: Approximately $199.99

Why It’s Expensive:

GoWISE USA is known for its innovative and affordable air fryers, and the Deluxe model offers advanced features.

Unique Features:

– 15.5-Quart Capacity: One of the largest available, ideal for large families or gatherings.

– 10 Preset Functions: Air fry, bake, roast, rotisserie, dehydrate, and more.

– Rotisserie Function: Comes with rotisserie accessories for perfectly roasted meats.

– Digital Touchscreen: User-friendly interface.

– Stainless Steel Interior: Durable and easy to clean.


7. Chefman TurboFry Touch 8-Quart Air Fryer

Price: Approximately $139.99

Why It’s Expensive:

Chefman is known for combining functionality and affordability, and the TurboFry Touch is a feature-packed model.

Unique Features:

– 8-Quart Capacity: Large enough for family meals.

– Digital Touchscreen: Easy to navigate with preset options.

– Rapid Air Technology: Faster cooking times.

– Dishwasher-Safe Parts: Easy to clean.

– Sleek Design: Modern and stylish look.


8. Cosori Pro II Air Fryer Oven Combo

Price: Approximately $149.99

Why It’s Expensive:

Cosori is celebrated for its user-friendly designs and reliable performance.

Unique Features:

– 12 Cooking Functions: Air fry, roast, broil, bake, dehydrate, and more.

– Smart Control: Wi-Fi enabled for remote control through an app.

– Even Heating Technology: Ensures uniform cooking.

– Large Capacity: Fits a whole chicken or 13-inch pizza.

– Digital Display: Intuitive and customizable.


9. Kalorik MAXX Digital Air Fryer Oven

Price: Approximately $199.99

Why It’s Expensive:

Kalorik offers a balance of innovative technology and robust build quality.

Unique Features:

– 26-Quart Capacity: Among the largest, ideal for big families.

– 21 Preset Functions: Versatile cooking options.

– Turbo MAXX Technology: Cooks food up to 30% faster.

– Dual Heating Elements: Provides even heat distribution.

– Stainless Steel Finish: Durable and attractive.


10. NuWave Brio 15.5-Quart Digital Air Fryer

Price: Approximately $179.99

Why It’s Expensive:

NuWave is known for its advanced cooking technology and versatile appliances.

Unique Features:

– 15.5-Quart Capacity: Perfect for large meals.

– Integrated Temperature Probe: Ensures precise cooking.

– Multi-Level Cooking: Multiple racks for simultaneous cooking.

– Rotisserie Function: Includes rotisserie kit.

– Digital Controls: User-friendly and precise.


11. Emeril Lagasse Power AirFryer 360

Price: Approximately $199.99

Why It’s Expensive:

Endorsed by celebrity chef Emeril Lagasse, this air fryer promises professional-grade performance.

Unique Features:

– 12 Cooking Functions: Air fry, bake, rotisserie, dehydrate, and more.

– 360° Quick Cook Technology: Ensures even cooking.

– LCD Digital Display: Easy to use and adjust.

– Stainless Steel Construction: Robust and durable.

– Large Capacity: Can cook a full meal for a family.


12. Yedi Total Package 18-in-1 Air Fryer Oven

Price: Approximately $149.95

Why It’s Expensive:

Yedi offers a comprehensive package with numerous accessories and features.

Unique Features:

– 18-in-1 Functions: Covers a wide range of cooking methods.

– 14.7-Quart Capacity: Suitable for large meals.

– Rotisserie and Dehydrator: Additional cooking options.

– Digital Touchscreen: Intuitive controls.

– Accessory Kit: Includes multiple cooking tools.


13. PowerXL Air Fryer Grill

Price: Approximately $169.99

Why It’s Expensive:

PowerXL combines air frying with grilling capabilities in this versatile appliance.

Unique Features:

– 8-in-1 Cooking Functions: Air fry, grill, bake, roast, and more.

– Crisper Tray: Ensures even cooking and crispiness.

– Grill Plate: Adds grilling functionality.

– Rapid Air Technology: Faster cooking times.

– Digital Controls: Easy to use and adjust.


14. T-fal ActiFry Genius XL 2-in-1 Air Fryer

Price: Approximately $199.99

Why It’s Expensive:

T-fal’s ActiFry Genius XL is known for its unique stirring paddle and dual cooking zones.

Unique Features:

– Automatic Stirring: Ensures even cooking without manual shaking.

– Dual Cooking Zones: Allows cooking two dishes simultaneously.

– Digital Interface: Easy-to-use controls with presets.

– Ceramic Coating: Durable and easy to clean.

– Large Capacity: Ideal for family-sized meals.


15. CruxGG 6-in-1 Digital Touchscreen Countertop Air Fryer

Price: Approximately $129.99

Why It’s Expensive:

CruxGG is known for its stylish design and reliable performance.

Unique Features:

15. CruxGG 6-in-1 Digital Touchscreen Countertop Air Fryer


Price: Approximately $129.99

Why It’s Expensive:

CruxGG is known for its stylish design and reliable performance.

Unique Features:

– 6-in-1 Functionality: Air fry, broil, bake, roast, reheat, and dehydrate.

– Digital Touchscreen: Modern and easy-to-use interface.

– Rapid Heat Technology: Ensures fast and even cooking.

– Compact Design: Fits easily on countertops while offering a decent capacity.

– Sturdy Construction: High-quality materials and a sleek design.

In-Depth Analysis of Why These Air Fryers Are Expensive

While it’s clear that these air fryers are priced higher than many standard models, their advanced features, superior build quality, and enhanced cooking capabilities justify their cost. Here’s a more detailed breakdown of what makes these air fryers expensive and unique.

Advanced Cooking Technology

1. Heating Elements and Cooking Efficiency

Higher-end air fryers, such as the Breville Smart Oven Air Fryer Pro and the Kalorik MAXX Digital Air Fryer Oven, use advanced heating technologies like Element IQ and Turbo MAXX. These technologies ensure precise heat distribution and faster cooking times, which result in perfectly cooked food every time.

2. Versatility and Multifunctionality

Many of these air fryers, including the Ninja Foodi 10-in-1 XL Pro Air Fry Oven and the Emeril Lagasse Power AirFryer 360, offer multiple cooking functions beyond just air frying. This versatility means you can use them to bake, roast, dehydrate, broil, and even perform rotisserie cooking. This multifunctionality reduces the need for multiple kitchen appliances, justifying the higher price.

3. Capacity and Family-Friendly Design

The larger capacity of models like the Philips Premium Airfryer XXL and the GoWISE USA Deluxe 15.5-Quart Air Fryer Oven makes them suitable for preparing meals for larger families or gatherings. A bigger cooking area means you can cook more food at once, saving time and effort.

4. Smart Features and Connectivity

Air fryers such as the Cosori Pro II Air Fryer Oven Combo come with smart features, including Wi-Fi connectivity and app control. These features allow for remote monitoring and control, providing convenience and enhancing the user experience.

Premium Build Quality

1. Durable Materials

High-end air fryers often feature stainless steel construction, as seen in the Breville Smart Oven Air Fryer Pro and the Instant Vortex Plus 10-Quart Air Fryer. Stainless steel not only looks sleek but also ensures durability and longevity.

2. Non-Stick and Easy-to-Clean Interiors

Air fryers like the Philips Premium Airfryer XXL and the T-fal ActiFry Genius XL use non-stick interiors and ceramic coatings, which are easier to clean and maintain. The premium coatings also prevent food from sticking, making the cooking process more enjoyable.

User-Friendly Features

1. Digital Interfaces and Presets

Models such as the Cuisinart TOA-65 Digital Convection Toaster Oven Air Fryer and the CruxGG 6-in-1 Digital Touchscreen Countertop Air Fryer come with intuitive digital interfaces and multiple presets. These features simplify the cooking process, allowing users to select the perfect setting for their meals with ease.

2. Safety Features

Top-tier air fryers are equipped with numerous safety features, including auto shut-off, cool-touch handles, and non-slip feet. These safety measures ensure that the appliance can be used safely, particularly in households with children.

Additional Accessories

1. Rotisserie Kits and Dehydrator Racks

Air fryers like the NuWave Brio 15.5-Quart Digital Air Fryer and the Yedi Total Package 18-in-1 Air Fryer Oven come with a range of accessories, including rotisserie kits and dehydrator racks. These accessories expand the cooking possibilities and enhance the overall value of the appliance.

2. Baking and Grilling Accessories

Models such as the PowerXL Air Fryer Grill and the Chefman TurboFry Touch 8-Quart Air Fryer include accessories for baking and grilling, making them versatile tools in the kitchen. These added accessories justify the higher price by offering more cooking options.

Conclusion

Investing in a high-end air fryer is about more than just the initial cost; it’s about the long-term benefits and enhanced cooking experience they offer. These 15 air fryers from Amazon stand out not only for their advanced features and superior build quality but also for their versatility and user-friendly designs.

By understanding what makes these air fryers expensive, you can make an informed decision that aligns with your cooking needs and lifestyle. Whether you’re looking for a multifunctional appliance that can replace several kitchen gadgets or a robust air fryer that can handle large meals, there’s a high-end model on this list that will meet your expectations.

Choosing the right air fryer can transform your cooking habits, offering healthier meals and saving you time in the kitchen. With the right investment, you’ll enjoy a durable, efficient, and versatile cooking appliance that delivers exceptional results every time.

Happy Cooking!

CHEFMAN Multifunctional Digital Air Fryer

Do One Appliance Do It All? Exploring the CHEFMAN Multifunctional Digital Air Fryer+

Looking for a kitchen appliance that can roast a chicken, Achieve crispy fries with ease and even dehydrate your favorite fruits? The CHEFMAN Multifunctional Digital Air Fryer+ might be your answer. This versatile wonder boasts a type of function and promises to refine your countertop while expanding your culinary horizons. But is it too good to be true? Now, let’s explore the features of this machine in detail and see how well it performs.

Multitasking Marvel: A Feature Frenzy

The CHEFMAN Multifunctional Digital Air Fryer+ isn’t your average air fryer. It boasts a range of functions that will have you questioning the need for other appliances. Here’s what it can do:

Air Fry: Enjoy healthier versions of your favorite fried foods with minimal oil.

Rotisserie: Get crispy, juicy rotisserie chicken at home with the included rotisserie spit and forks.

Dehydrate: Preserve fruits, vegetables, and even jerky with the dehydrating function.

Convection Bake: This function acts like a mini oven, ideal for baking everything from cookies to casseroles.

17 Pre-Programmed Settings: Take the guesswork out of cooking with pre-set options for various foods.

Family-Sized Feasts: Does It Have the Capacity?

This air fryer features a spacious 10-liter capacity, making it perfect for families or those who love to cook in sets. It can easily fit a whole chicken for rotisserie cooking or enough fries to serve a multitude of people.

Convenience at Your Fingertips

The CHEFMAN versatile Digital Air Fryer+ comes equipped with an intuitive touchscreen display. With just a few taps, you can select your desired cooking function, adjust time and temperature, and monitor progress through the large easy-view window. Plus, the auto shutoff feature ensures safety and peace of mind.

The Big But: Can It Replace All Your Kitchen Appliances?

While the CHEFMAN Multifunctional Digital Air Fryer+ is Proven All-Purpose, it’s important to consider your cooking habits. For those with limited counter space or who primarily cook basic meals, this appliance could be an innovation. However, dedicated bakers or those who love to test with complex recipes might still find themselves needing a traditional oven.

The Verdict: Is It Worth the Counter Space?

The CHEFMAN Multifunctional Digital Air Fryer+ is a captivating option for those seeking a multifunctional and convenient kitchen appliance. Its ability to air fry, roast, dehydrate, and bake offers a variety of cooking options, possibly reducing your reliance on other appliances. Consider your needs and budget to decide if this feature-packed wonder deserves a spot on your countertop.

Here are some additional points to consider when making your decision:

  • Read reviews: Check out online reviews to see what other users think about the performance and usability of this air fryer.
  • Compare features and prices: There are many versatile air fryers on the market. See how the CHEFMAN piles up against the competition.
  • Think about your cooking style: Do you often cook for large families? Do you prefer pre-programmed settings or more manual control?

By considering these factors, you can decide if the CHEFMAN Multifunctional Digital Air Fryer+ is the right fit for your kitchen.


Key Features

CHEFMAN Multifunctional Digital Air Fryer+ Features:

  • Multifunctionality: Replaces 4 appliances in 1: Air Fryer, Rotisserie, Dehydrator, and Convection Oven.
  • Large Capacity: 10-liter capacity allows you to cook family-sized meals.
  • Healthy Cooking: Uses rapid air technology for crispy fried textures with minimal oil.
  • 17 Preset Options: Streamline cooking with pre-programmed settings for various foods.
  • Digital Touchscreen: Easy to use controls for temperature, time, and other functions.
  • Large Easy-View Window: Observe food progress without opening the appliance.
  • Dishwasher-Safe Parts: Makes cleaning up easy.
  • Auto Shutoff: Ensures safety and prevents overheating.

Additional Features:

  • 1800 Watts of power for fast and effective cooking.
  • Black stainless steel design for a sleek look.
  • One-year warranty from Chefman.


How to Use the CHEFMAN Multifunctional Digital Air Fryer

While I can’t provide specific instructions without consulting the manual, here’s a general guide on how to use the CHEFMAN Multifunctional Digital Air Fryer+:

Before First Use:

1. Wash the basket, tray, and any other detachable parts with warm soapy water.

2. Dry the parts thoroughly before using.

3. It’s recommended to run an experiment to familiarize yourself with the appliance. Check with the manual for recommended settings for this initial run.

General Cooking Process:

1. Select your desired function (Air Fry, Rotisserie, Dehydrate, Bake, etc.). Check the manual for specific instructions on using each function.

2. Prepare your food according to the recipe or your desired cooking style.

3. Place the food in the basket or on the racks, following any recommendations in the manual for placement depending on the function.

4. Choose your cooking time and temperature using the digital touchscreen. If using a preset function, check with the manual for recommended settings.

5. Press start and the appliance will begin cooking.

6. The large view window allows you to monitor your food’s progress without opening the appliance.

7. When the cooking cycle is complete, the appliance will typically alert you with a beep or chime.

8. Be careful when removing hot food from the basket or racks.

9. Allow the appliance to cool down before cleaning.

Additional Tips:

  • Check with the included recipe book or search online for recipes specifically designed for multifunctional air fryers.
  • The manual will likely have specific instructions for using the rotisserie spit and dehydrator functions.
  • For even cooking, it’s recommended to shake the basket or flip the food halfway through cooking, especially for air frying.
  • Be sure not to stuff the basket, as this can obstruct air circulation and affect cooking results.

Cleaning:

  • Most parts of the CHEFMAN Multifunctional Air Fryer+ are dishwasher safe. Check the manual for specifics on which parts are dishwasher safe and any hand washing instructions.
  • Dab down the exterior of the appliance with a damp cloth.
  • Never dip the base unit in water.

Safety Precautions:

  • Always unplug the appliance from the outlet when not in use.
  • Do not touch hot surfaces. Use oven mitts when handling hot components.
  • Let the appliance cool down completely before cleaning.
  • Never leave the appliance unattended while in operation.

Remember, for detailed instructions and safety information, it’s always best to check the user manual that came with your CHEFMAN Multifunctional Digital Air Fryer+.


Tips and Recipes Suitable for the CHEFMAN Multifunctional Digital Air Fryer

Tips and Recipes for your CHEFMAN Multifunctional Digital Air Fryer+

General Tips:

  • Preheat: Unlike a traditional oven, preheating isn’t always necessary with air fryers. However, preheating for 3-5 minutes for some items like fries or wings can help achieve absolute crispness.
  • Shaking is key: For even browning and crisping, especially with air-fried items like vegetables or frozen snacks, shake the basket halfway through cooking to ensure circulation of hot air at all sides.
  • Don’t overcrowd: Resist the urge to fill the basket to the brim. Air circulation is essential for crispy results, so leave some space between your ingredients.
  • Parchment paper is your friend: Lining the basket with parchment paper can help catch drips and make cleanup easier. Just avoid using too many or excessively large bits that could block airflow.
  • Cooking times may vary: Recipes and cooking times may vary slightly depending on the size and thickness of your ingredients. It’s always a good idea to keep an eye on your food during the cooking process and adjust time as needed.

Recipe Ideas:

Air Frying:

  • Crispy French Fries: A classic! Cut russet potatoes into sticks, toss with a little oil and seasoning, and air fry for 15-20 minutes, shaking halfway through.
  • Healthy Chicken Wings: Coat wings in your favorite sauce or spices and air fry for 25-30 minutes, flipping halfway through.
  • Roasted Vegetables: Broccoli, Brussels sprouts, asparagus, and cauliflower all air fry beautifully. Toss with a bit of olive oil, salt, and pepper and cook for 10-15 minutes, shaking frequently.

Rotisserie:

  • Rotisserie Chicken: This is where the rotisserie function shines! Soak a whole chicken, secure it on the rotisserie spit, and cook according to the size and your desired level of crispness. Refer to the manual for recommended rotisserie settings.
  • Roasted Vegetables on the Rotisserie Skewers: Thread vegetables like peppers, onions, and zucchini onto the rotisserie skewers and cook for 15-20 minutes, flipping halfway through.

Dehydrating:

  • Homemade Fruit Jerky: Slice fruits like apples, bananas, or mangoes thinly and dehydrate at a low temperature (around 135°F) for a couple of hours, until completely dry and leathery.
  • Dried Herbs: Dehydrate fresh herbs like rosemary, thyme, or basil to preserve their flavor for later use. Simply wash and dry the herbs thoroughly, then dehydrate at a low temperature (around 100°F) for several hours until completely dry and crispy.

Baking:

  • Mini Pizzas: Use store-bought pizza dough or make your own, top with your favorite ingredients, and bake on the racks in the oven function for 8-10 minutes, or until the crust is golden brown and cheese is melted.
  • Cookies: Yes, you can bake cookies in this kitchen appliance! Use your favorite cookie recipe and bake according to the recommended baking time and temperature, checking for doneness a few minutes before the end of the suggested cook time.

Resources:

  • The CHEFMAN Multifunctional Digital Air Fryer+ may come with a recipe book. Be sure to reference that out for inspiration.
  • Many websites offer recipes specifically designed for multifunctional air fryers. A quick web search will turn up lots of options!
  • Analyze cookbooks focused on air fryer recipes, many of which can be adapted for use in your multifunctional air fryer.

With a little practice and exploration, you’ll be a master of your CHEFMAN Multifunctional Digital Air Fryer+ in no time!


A Cleaning Guide

Cleaning Your CHEFMAN Multifunctional Digital Air Fryer+

Keeping your CHEFMAN Multifunctional Digital Air Fryer+ clean is important for maintaining its performance and longevity. Here’s a breakdown on how to handle cleaning:

Before You Begin:

  • Safety First: Unplug the appliance and make sure it’s completely cool before cleaning.
  • Consult the Manual: For specific cleaning instructions and dishwasher-safe parts information, always check the user manual that came with your air fryer.

General Cleaning:

1. Basket and Tray: These are likely the parts that get the dirtiest. Wash them in warm, soapy water. You can use a non-abrasive sponge or dishcloth for tougher grime. Most parts of the CHEFMAN Multifunctional Digital Air Fryer+ are dishwasher safe, so consult the manual for confirmation.

2. Interior: Dab the inside of the appliance with a damp cloth. You can use a light dish soap solution for stubborn grease or food remnants. Avoid using harsh chemicals or abrasive scrubbers.

3. Exterior: Wipe down the outside of the appliance with a damp cloth to remove fingerprints or splash.

Deep Cleaning (Optional):

For occasional deep cleaning, especially if there’s baked-on grease or stubborn food remnants, you can try this:

1. Baking Soda Paste: Make a paste with baking soda and water. Apply the paste to greasy areas and let it sit for 15-20 minutes. Dab clean with a damp cloth.

2. Lemon Juice: For stubborn grime, you can try using a little lemon juice on a damp cloth. The acidity can help cut through grease.

Additional Tips:

  • Deodorize: If there are lingering odors, you can place a bowl of baking soda or lemon slices inside the appliance overnight to absorb any unwanted smells.
  • Heating Element: For the heating element itself, you can usually just wipe it down with a damp cloth. Avoid using any harsh cleaners or dipping it in water.
  • Don’t Submerge the Base Unit: Never submerge the base unit, which contains the electrical components, in water.

By following these cleaning tips, you can keep your CHEFMAN Multifunctional Digital Air Fryer+ sparkling clean and ensure it continues to function perfectly for all your cooking needs. Remember, for the most accurate cleaning instructions, always check the user manual that came with your specific appliance.


What to Avoid when Using the CHEFMAN Multifunctional Digital Air Fryer

Here are some things to avoid when using your CHEFMAN Multifunctional Digital Air Fryer+ to keep it functioning well and ensure your safety:

Overcrowding: This is a common mistake that can lead to uneven cooking and mushy results. Avoid filling the basket to the brim, especially when air frying. Leave space between your ingredients to allow for proper air circulation.

Using too much oil: While some oil can help achieve crispness, air fryers are designed to use significantly less oil than traditional frying methods. Adding too much can diminish the health benefits and lead to greasy food.

Not preheating (when necessary): Preheating isn’t always required, but for some items like fries or wings, preheating for a few minutes can help achieve maximum crispness. Check with your recipe or manual for recommendations.

Using the wrong utensils: Avoid using metal utensils that can scratch the non-stick coating of the basket or tray. Go for silicone or wooden utensils for safe and gentle stirring or flipping.

Cleaning with harsh chemicals or abrasive scrubbers: These can damage the non-stick coating of the basket and tray. Stick to warm soapy water, a non-abrasive sponge, and light dish soap for cleaning.

Submerging the base unit: The base unit houses the electrical components and should never be dipped in water. Dab the exterior with a damp cloth only.

Leaving it unattended while in use: It’s always a good idea to monitor your food while it’s cooking, especially when using new recipes or settings you are not familiar with.

Using parchment paper that’s too large: While parchment paper can be helpful for catching drips and making cleanup easier, using an excessively large piece can block airflow and obstruct cooking results.

Putting frozen food directly from the freezer into the air fryer: It’s generally recommended to thaw frozen food partially before air frying for more even cooking.

Not consulting the manual: The user manual is your best friend when it comes to using your air fryer safely and efficiently. Check it for specific instructions on using each function, recommended cooking times and temperatures for various foods, and proper cleaning procedures.

By following these tips, you can avoid common drawbacks and ensure you get the most out of your CHEFMAN Multifunctional Digital Air Fryer+. Remember, safety is essential, so always unplug the appliance when not in use and let it cool completely before cleaning.

In conclusion, the CHEFMAN Multifunctional Digital Air Fryer+ is a space-saving option for health-conscious cooks who want to do away with multiple appliances. It provides air frying, rotisserie cooking, dehydrating, and baking functions in one machine, all controlled by a simple touchscreen. While it might not be perfect for everyone, it’s a multifunctional choice for those seeking to merge and enjoy healthier cooking at home.

air fryers

Air Fryer: Complete Guide to Buying an Air Fryer

Air fryers have rapidly become one of the most popular kitchen appliances, offering a healthier alternative to traditional frying methods by using hot air circulation to cook food. This comprehensive guide will walk you through everything you need to know about buying an air fryer and maintaining it for long-term use. From understanding key features to keeping your appliance in top condition, we’ve got you covered.

 Buying an Air Fryer: Key Features to Consider

Before diving into maintenance tips, let’s start with the essential features you should consider when buying an air fryer. With so many options available, it can be overwhelming to choose the right one. Here are the crucial factors to keep in mind:

1. Capacity and Size

The capacity of an air fryer is measured in quarts or litres and determines how much food you can cook at one time. Here’s a general guideline:

Small Air Fryers (1-2 quarts): Suitable for singles or couples.
Medium Air Fryers (2-4 quarts): Ideal for small families.
Large Air Fryers (5-8 quarts): Great for larger families or cooking bigger meals.

Consider the available space in your kitchen as well. Air fryers come in various sizes, so ensure you have enough counter space for the model you choose.

2. Power and Temperature Range

The power of an air fryer, measured in watts, affects its cooking efficiency. Most air fryers range from 1,200 to 1,800 watts. Higher wattage typically means faster cooking times. Additionally, check the temperature range. A wider range (e.g., 180°F to 400°F) offers more versatility in cooking different types of food.

3. Cooking Functions and Presets

Modern air fryers often come with multiple cooking functions, such as baking, roasting, grilling, and dehydrating. Preset cooking programs for common foods like fries, chicken, and vegetables can simplify the cooking process. Look for an air fryer with a user-friendly interface and easy-to-read digital display.

 4. Build Quality and Materials

Quality materials ensure durability and safe cooking. Non-stick-coated baskets and trays are common, making them easier to clean. Stainless steel interiors and exteriors are also popular for their durability and sleek look.

 5. Ease of Cleaning

Choose an air fryer with dishwasher-safe components to save time and effort on cleaning. Removable baskets and trays should be easy to clean, either by hand or in the dishwasher.

6. Safety Features

Important safety features include automatic shut-off, cool-touch handles, and non-slip feet. These features prevent accidents and ensure safe operation, especially in households with children.

7. Brand Reputation and Warranty

Reputable brands typically offer better customer support and reliable products. Check for warranty details, as a longer warranty period can provide peace of mind and protection for your investment.

air fryers      air fryers


 Top Air Fryer Brands to Consider

When shopping for an air fryer, consider these top brands known for their quality and performance:

Philips: Known for innovative technology and high-quality designs.
Ninja: Offers versatile appliances with multiple cooking functions.
Cosori: Popular for user-friendly designs and excellent customer service.
Instant Pot: Known for multifunctional appliances that combine air frying with other cooking methods.
Cuisinart: Offers robust and stylish models with various features.

 Air Fryer Maintenance: Tips for Longevity

Proper maintenance is key to keeping your air fryer in top condition and ensuring it lasts for years. Follow these maintenance tips to maximize your air fryer’s lifespan and performance.

 1. Regular Cleaning

Regular cleaning is essential to prevent the buildup of grease and food particles, which can affect performance and cause unpleasant odours.

 Steps for Cleaning Your Air Fryer:

1. Unplug and Cool Down: Always unplug the air fryer and allow it to cool completely before cleaning.
2. Remove and Clean Accessories: Take out the basket, tray, and any other removable parts. These can usually be washed with warm, soapy water or in the dishwasher if they are dishwasher-safe.
3. Wipe Down the Interior: Use a damp cloth or sponge with mild detergent to wipe down the interior. Avoid abrasive sponges or cleaners that could damage the non-stick coating.
4. Clean the Heating Element: Occasionally, wipe the heating element with a damp cloth to remove any food particles. Ensure it is completely dry before using the air fryer again.
5. Exterior Cleaning: Wipe the exterior with a damp cloth. Avoid submerging the air fryer or allowing water to enter the main unit.

 2. Avoid Overfilling

Overfilling the air fryer basket can hinder airflow and result in uneven cooking. Follow the manufacturer’s recommendations for maximum capacity to ensure optimal performance.

 3. Preheat When Necessary

Some recipes and air fryer models require preheating. Preheating helps achieve better cooking results by ensuring the air fryer reaches the desired temperature before adding food.

 4. Use the Right Oil

While air fryers require little to no oil, using the right type can enhance flavour and texture. Opt for oils with high smoke points, such as canola, peanut, or avocado oil. Avoid spraying non-stick spray directly onto the basket, as it can damage the non-stick coating.

 5. Check and Replace Parts

Regularly inspect the basket and other removable parts for signs of wear and tear. Replace any damaged parts to maintain the efficiency and safety of your air fryer. Some manufacturers offer replacement parts, or you can find compatible parts from third-party suppliers.

 6. Avoid Using Metal Utensils

Metal utensils can scratch the non-stick coating, reducing its effectiveness and lifespan. Use wooden, silicone, or plastic utensils to preserve the coating and prevent damage.

 7. Store Properly

When not in use, store your air fryer in a clean, dry place. Ensure the cord is neatly wrapped and stored to prevent damage. If you have a larger model, consider covering it to protect it from dust and kitchen grime.

 Troubleshooting Common Air Fryer Issues

Even with proper maintenance, you may encounter some common issues with your air fryer. Here’s how to troubleshoot and resolve them:

 1. Air Fryer Not Turning On

Check the Power Source: Ensure the air fryer is plugged in securely and the outlet is functioning.
Inspect the Cord: Look for any damage to the power cord. If damaged, contact the manufacturer for a replacement.
Reset the Unit: Some air fryers have a reset button or require a simple unplugging and replugging to reset the system.

 2. Uneven Cooking

Do Not Overcrowd: Ensure food is arranged in a single layer with enough space for air circulation.
Shake the Basket: For foods like fries or chicken wings, shake the basket halfway through cooking to ensure even cooking.
Preheat If Necessary: Preheating can help achieve consistent cooking temperatures.

 3. Excessive Smoke

Remove Excess Fat: Fatty foods can produce smoke as the fat drips and heats up. Trim excess fat from meats before cooking.
Clean Regularly: Ensure the heating element and interior are clean and free of grease buildup.
Use Less Oil: Too much oil can cause smoking. Use only a light coating of oil when necessary.

 4. Unpleasant Odours

– Clean Thoroughly: Regular cleaning can prevent odours from building up.
– Use Lemon or Vinegar: Wipe the interior with a mixture of water and lemon juice or vinegar to neutralize odours.

5. Food Sticking to the Basket

Pre-Coat with Oil: Lightly coat the basket with oil before cooking to prevent sticking.
Use Parchment Paper: Air fryer-safe parchment paper can help reduce sticking and make cleanup easier.

 Enhancing Your Air Fryer Experience

Maximize your air fryer’s potential with these additional tips and tricks:

 1. Experiment with Recipes

Air fryers are versatile and can handle a wide range of foods beyond traditional fried items. Experiment with recipes for roasted vegetables, baked goods, grilled meats, and even desserts. Many cookbooks and online resources offer air fryer-specific recipes.

 2. Utilize Accessories

Expand your air fryer’s capabilities with accessories like:

Baking Pan: For cakes, quiches, and casseroles.
Grill Rack: For grilling meats and vegetables.
Skewers: For making kebabs.
Pizza Pan: For homemade pizzas.

 3. Adjust Cooking Times and Temperatures

Each air fryer model may vary slightly in performance. Use the recommended cooking times and temperatures as a guide, but adjust based on your specific model and personal preferences. Keep an eye on the food to prevent overcooking or burning.

 4. Batch Cooking

For larger quantities, consider batch cooking. Cook in smaller batches to ensure even cooking, and keep the first batch warm in the oven while the second batch cooks.

 5. Keep a Cooking Journal

Track your cooking experiments, noting the times, temperatures, and any adjustments made. This can help you perfect your favourite recipes and achieve consistent results every time.

 Conclusion

Buying and maintaining an air fryer involves careful consideration of various factors and a commitment to regular upkeep. By selecting the right model for your needs and following proper maintenance practices, you can enjoy delicious, healthier meals with minimal effort. Remember to clean your air fryer regularly, avoid overcrowding the basket, and use the right utensils to keep your appliance in top condition. With these tips and

insights, you’re well on your way to becoming an air frying expert, enjoying a wide range of culinary delights with ease and convenience.

Happy air frying!

SHOP: http://primehomegadget.com

FOLLOW: https://www.instagram.com/primevendors/

air fryers

10 Places you Can Get Cheap Air Fryers

Here are 10 top global e-commerce stores where you can find cheap air fryers:

With air fryers growing in popularity, finding an affordable yet quality air fryer has become a priority for many. Whether you’re looking to make crispy fries, juicy chicken wings, or even baked goods, having an air fryer can make your culinary adventures more exciting and health-conscious. Here’s a guide to the top 10 global e-commerce stores where you can find cheap air fryers without compromising on quality.


  1. Amazon: Offers a vast selection of air fryers at various price points, including budget-friendly options. They also have frequent sales and promotions.
     
    Image of Amazon air fryer
  2. Walmart: Another great option for affordable air fryers. They often have deep discounts on popular models.
    Image of Walmart air fryer
  3. Target: Carries a good variety of air fryers, including some exclusive brands. You can typically find good deals during their clearance sales.
  4. Best Buy: Specializes in electronics and appliances, including air fryers. They offer competitive pricing and sometimes bundle air fryers with other kitchen gadgets.

    Why Shop Here:
    – Tech Expertise: Knowledgeable staff and detailed product descriptions.
    – Price Match Guarantee: Ensures you get the best price available.
    – Geek Squad Protection: Additional warranty options for peace of mind.

    Notable Air Fryers:
    – Ninja Foodi 6-in-1 8-qt. 2-Basket Air Fryer
    – Insignia 5 Qt. Digital Air Fryer
    – Cuisinart Digital Air Fryer Toaster Oven

  5. eBay: A marketplace where you can find new and used air fryers at auction or at a fixed price. Be sure to check the seller’s ratings before making a purchase.

    Why Shop Here:
    – Auction and Buy Now Options: Flexibility to bid for lower prices or buy immediately.
    – Wide Range of Conditions: Options from brand new to refurbished.
    – Global Reach: Access to international sellers for unique finds.

    Notable Air Fryers:
    – Philips Avance Collection Air Fryer
    – Power Air Fryer XL
    – T-fal Actifry Air Fryer


  6. AliExpress: A Chinese online retailer that offers a wide variety of products, including air fryers, at very competitive prices. However, shipping times can be long.
  7. Wayfair: Wayfair specializes in home goods, including a selection of air fryers. You can sometimes find good deals on lesser-known brands.
    Image of Wayfair air fryer

    Why Shop Here:
    – Curated Collections: Stylish and curated options for every kitchen.
    – Sales and Deals: Frequent discounts and sales events.
    – Customer Service: Excellent support and return policies.

    Notable Air Fryers:
    – Magic Chef Digital XL Air Fryer
    – Instant Vortex 6 Quart Air Fryer
    – Cuisinart Compact Air Fryer

  8. Home Depot: You might be surprised to find that Home Depot also offers a decent selection of air fryers at competitive prices. They often have special promotions and discounts.
    Image of Home Depot air fryer

    Why Shop Here:
    – Extensive Selection: Wide variety of brands and models.
    – DIY Expertise: Additional resources and guides available.
    – Frequent Sales: Regular promotions and discounts.

     Notable Air Fryers:
    – NuWave Brio 6-Quart Air Fryer
    – Kalorik 6 Qt. Digital Air Fryer
    – Aria 10 Qt. Touchscreen Air Fryer Oven

  9. Wayfair: Wayfair specializes in home goods, including a selection of air fryers. You can sometimes find good deals on lesser-known brands.
    Image of Wayfair air fryer

    Why Shop Here:
    – Curated Collections: Stylish and curated options for every kitchen.
    – Sales and Deals: Frequent discounts and sales events.
    – Customer Service: Excellent support and return policies.

    Notable Air Fryers:
    – Magic Chef Digital XL Air Fryer
    – Instant Vortex 6 Quart Air Fryer
    – Cuisinart Compact Air Fryer

  10. Costco: Costco is a membership warehouse club, but if you’re a member, you can find great deals on air fryers. They typically sell popular models in bulk at discounted prices.
    Image of Costco air fryer

    Why Shop Here:
    – Bulk Pricing: Often cheaper due to the bulk buying model.
    – Member Exclusive Discounts: Additional savings for members.
    – Quality Assurance: High standard of products offered.

     Notable Air Fryers:
    – Gourmia 6 Quart Digital Air Fryer
    – NuWave Brio Digital Air Fryer
    – Kalorik Digital Air Fryer

Conclusion:
Finding an affordable air fryer doesn’t mean compromising on quality. These ten e-commerce platforms offer a variety of options that cater to different budgets and preferences. Whether you prioritize brand, functionality, or price, there’s an air fryer out there that suits your needs. By exploring these platforms, you can find great deals and enhance your kitchen with a versatile and health-friendly appliance.

Shopping Tips:
1. Compare Prices: Always compare prices across different platforms to ensure you get the best deal.
2. Read Reviews: Customer reviews can provide valuable insights into the product’s performance and reliability.
3. Check Return Policies: Make sure you understand the return policies in case the air fryer doesn’t meet your expectations.
4. Look for Sales: Keep an eye out for sales events and promotions to save even more.
5. Consider Refurbished Models: Sometimes, refurbished models offer significant savings without a noticeable difference in quality.

By following these tips and exploring the options available on these top e-commerce platforms, you’ll be well on your way to finding a cheap air fryer that perfectly suits your culinary needs. Happy cooking!


Socials:

Read our blogs: http://primehomegadget.com

Emeril Lagasse 26 QT Extra Large Air Fryer with Grill Plate

Emeril Lagasse’s 26 QT Air Fryer: Kitchen Counter Hero or Overhyped Gadget?

Ready to level up your taste buds, friends? Today we’re diving into the world of Emeril Lagasse’s signature appliances with a limelight on the Emeril Lagasse 26 QT Extra Large Air Fryer, Convection Toaster Oven with French Doors. Now, that’s a mouthful, but is this appliance a culinary game-changer or just another gadget destined for the back of the cabinet? Let’s find out!

Supersize Your Air Frying: The first thing that grabs your attention is the size. This air fryer offers a massive 26-quart capacity, which means you can air fry a whole rotisserie chicken, bake a family-sized pizza, or even roast a decent-sized turkey. Ideal for feeding a crowd or meal prepping for the week.

French Door Flair: Forget the clunky pull-down door! This air fryer features stylish French doors that open wide, making it easier to access your food and reducing the risk of burns. Plus, it adds a touch of elegance to your countertop.

Convection Powerhouse: This isn’t just your average air fryer. It also functions as a heat circulation toaster oven, providing a wider range of cooking options. Bake cookies, roast vegetables, or even dehydrate your favorite snacks – For perfectly cooked and crispy results, this appliance uses a powerful heating system.

Emeril’s Easy Eats: The package often includes a recipe book with Emeril’s signature flair, giving you inspiration for using all the functionalities of this appliance. From his famous “Bam! Burgers” to air-fried Jambalaya, you’ll have plenty of ideas to get you started.

The Big But: Of course, no appliance is perfect. This air fryer’s large size might be a drawback for those with limited counter space. Additionally, It can be a bit pricey, compared to some basic air fryers.

Will this be a worthwhile investment?

Here’s the verdict:

  • For those who love to entertain or have big families: This air fryer’s size and multifunctionality make it a great option.
  • For lovers of Emeril Lagasse and his recipes: This appliance is a fun way to remake his dishes at home.
  • For those with limited counter space or a tight budget: You might be better off with a more compact and affordable air fryer.

Finally, the decision depends on your individual needs and cooking habits. But one thing’s for sure, this Emeril Lagasse air fryer is a feature-packed appliance that will surely add some Bam! to your kitchen.


Key Features

Emeril Lagasse 26 QT Extra Large Air Fryer: Feature Breakdown

Emeril Lagasse’s 26 QT Extra Large Air Fryer with French Doors Offers a wide range of features that promise to transform your countertop cooking. Here’s a closer look at what this kitchen companion has to offer:

Supersized Capacity:

  1. Holds a whopping 26 quarts, allowing you to:
  • Air fry a whole rotisserie chicken
  • Bake a family-sized pizza (up to 12 inches)
  • Roast a medium-sized turkey
  • Ideal for large families or meal prepping

French Door Design:

  • Offers easier access to food compared to traditional pull-down doors
  • Minimizes the risk of burns from reaching into a hot cavity
  • Adds a touch of beauty to your countertop

Multifunctional Marvel:

  1. Not just an air fryer! It functions as a convection toaster oven as well:
  • Bake cookies, cakes, and other pastries
  • Roast vegetables and meats
  • Dehydrate fruits, herbs, and snacks for healthy homemade treats
  • Provides even and crispy results with circulating hot air

Emeril’s Culinary Inspiration:

  1. Many models include a recipe book featuring Emeril Lagasse’s signature dishes:
  • Get inspired with recipes from “Bam! Burgers” to air-fried Jambalaya
  • Explore new ways to utilize all the functionalities of this appliance

Additional Features (depending on the model):

  • 24 Pre-Programmed Settings: Streamline cooking with pre-set options for various foods (fries, chicken, pizza, etc.)
  • Dual-Speed Fan: Allows for precise control over air circulation for perfect cooking results
  • Digital Display: Easy-to-read display for monitoring cooking time and temperature
  • Automatic Shut-Off: Provides peace of mind by automatically turning off the appliance when finished
  • Accessories: May include a crisper tray, air fryer rack, baking pan, rotisserie spit set, and grill plate (depending on the model)

Remember: Features may differ depending on the specific model you choose. Be sure to check the manufacturer’s specifications before purchasing.


How to Use the Emeril Lagasse 26 QT Extra Large Air Fryer with Grill Plate

Mastering the Emeril Lagasse 26 QT Air Fryer: A Guide to Culinary Creations

The Emeril Lagasse 26 QT Extra Large Air Fryer with French Doors is more than just an appliance; it’s a gateway to delicious and convenient meals. But with all its features, Handling its functionalities might seem a bit overwhelming. Fear not, foodies! This guide will help you unlock the full potential of your Emeril Lagasse air fryer.

Getting Started:

1. Unboxing and Setup: Carefully unpack your air fryer and remove any packaging materials. Get to know the different parts – French doors, control panel, crisper tray, racks, etc. (Check with the user manual for specific details).

2. Pre-heat (Optional): While not always necessary for air frying, some recipes might recommend warming up the air fryer for perfect results. Check your recipe or the user manual for preheating instructions.

Air Frying 101:

1. Prepare your ingredients: Ensure your food is properly sized and cut for even cooking. Dab any wet ingredients to promote crispness.

2. Lightly oil your basket or food: A thin layer of oil helps achieve a golden brown color. You can use cooking spray or brush on a light coat of olive oil. (Note: Some recipes may not require oil)

3. Fill the basket but don’t overcrowd: Leave some space between your food pieces for proper air circulation. For even cooking and crispier textures, avoid overloading the basket.

4. Select your cooking settings: Many models offer convenient pre-sets for cooking different foods.(fries, chicken, etc.). You can also adjust the time and temperature manually for specific recipes.

5. Cooking Time: Check your recipe or the included Emeril Lagasse recipe book for recommended cooking times. Cooking times can differ depending on the food and the amount you’re cooking.

6. Shake it Up (Optional): For some recipes, shaking the basket halfway through cooking can help ensure even browning and crispness.

Beyond Air Frying:

The beauty of this appliance lies in its multifunctionality. Here’s how to use its other functions:

  • Baking: Use the baking function for cookies, cakes, pastries, or even pizza. Follow your recipe’s baking time and temperature recommendations.
  • Roasting: Roast vegetables, meats, or even a small turkey using the rotisserie function (if included).
  • Dehydrating: Dehydrate fruits, herbs, or vegetables for healthy homemade snacks. Check dehydrating instructions in your user manual or recipe book for specific settings and timings.

General Tips:

  • Check with your user manual for detailed instructions on using the specific features and functions of your model.
  • Always use oven mitts when handling hot components.
  • Clean your air fryer regularly for optimal performance. Check the user manual for cleaning instructions.

With a little practice, you’ll be whipping up Emeril-worthy dishes in no time!


Tips and Recipes Suitable for it

Emeril Lagasse 26 QT Air Fryer: Tips and Recipe Inspiration

The Emeril Lagasse 26 QT Extra Large Air Fryer with French Doors is a kitchen powerhouse, offering air frying, convection baking, roasting, dehydrating, and more. To unleash its full capabilities, here are some tips and recipe ideas to get you started:

Air Frying Tips:

  • Prep for Crispness: Dab any wet ingredients (meat, fish) to remove excess moisture for a crispy finish. Marinades are okay, but use them moderately.
  • Oil for Shine: A light coating of oil (avocado, olive, canola) helps achieve a golden brown color. Use a spray bottle for even distribution.
  • Don’t Crowd the Basket: Leave space between food pieces to allow for proper air circulation. This prevents uneven cooking and sogginess.
  • Shake it Up!: For some recipes, like french fries or chicken wings, shaking the basket halfway through cooking helps ensure even browning and crispness.

Air Fryer Recipe Inspiration:

  • Classic Air-Fried Chicken: Spice-marinated chicken pieces air-fried to juicy perfection.
  • Crispy Vegetables: From broccoli florets to Brussels sprouts, air frying brings out their caramelized sweetness with a delightful crunch.
  • Frozen Appetizers: Give store-bought goodies like onion rings or mozzarella sticks a healthier makeover by air frying them for a crispy, Snack with no regrets
  • Emeril’s Signature “Bam! Burgers”: Remake Emeril’s famous recipe using the air fryer for juicy burgers with a perfectly browned crust.

Convection Baking Tips:

  • Preheat for Best Results: For even baking, warm up the air fryer for 5-10 minutes before placing your food inside, especially for pastries and cakes.
  • Use Proper Bakeware: Heat-resistant oven-safe dishes are best. Ensure they fit comfortably within the air fryer.
  • Adjust Baking Times: Since the air fryer is smaller than a conventional oven, baking times may be slightly shorter. Check with your recipe or keep an eye on your food for doneness.

Convection Baking Recipe Inspiration:

  • Freshly Baked Cookies: From classic chocolate chip to chewy oatmeal raisin, the air fryer delivers delicious and perfectly baked cookies.
  • Golden Brown Pastries: Scones, muffins, and even brittle croissants can be achieved with the convection baking function.
  • Homemade Pizza: Whip up a personal pizza or use store-bought dough for a quick and satisfying meal.

Roasting Tips:

  • Cut for Even Cooking: For larger cuts of meat (chicken, small roasts), ensure they are properly sized and fit comfortably within the air fryer.
  • Use the Rotisserie Function (if available): This helps achieve crispy skin and evenly cooked roasts.
  • Braise Before Roasting (Optional): For tougher cuts of meat, consider pre-braising them in a slow cooker or on the stovetop for added tenderness.

Roasting Recipe Inspiration:

  • Whole Roasted Chicken: Enjoy a juicy and tasteful roasted chicken ideal for a small gathering.
  • Crispy Roasted Vegetables: Root vegetables like potatoes and carrots become beautifully caramelized and tender when roasted in the air fryer.
  • Small Roasts: Lamb shanks, pork tenderloin, or even a small turkey breast can be roasted to perfection in this multifunctional appliance.

Dehydrating Tips:

  • Slice Thinly: Ensure fruits, vegetables, and herbs are sliced thinly and evenly for consistent dehydrating results.
  • Follow Dehydrating Times: Check your user manual or a dehydrating recipe book for specific dehydrating times and temperatures for different ingredients.
  • Check for Doneness: Dehydrated foods should be delicate and dry to the touch, with no signs of moisture.

Dehydrating Recipe Inspiration:

  • Homemade Fruit Snacks: Dehydrate apple slices, banana chips, or even mango for healthy and delicious homemade snacks.
  • Dried Herbs: Preserve fresh herbs like parsley, basil, or rosemary for future use by dehydrating them in your air fryer.
  • Vegetable Jerky: Create your own healthy and tasteful veggie jerky using the dehydrating function.

Remember, these are just a few ideas to get you started. The possibilities are endless with the Emeril Lagasse 26 QT Air Fryer! Don’t be afraid to test and create your own culinary masterpieces.

Additional Tips:

  • Invest in a good quality air fryer cookbook specifically designed for the Emeril Lagasse model, or search online for recipes that use its functionalities.
  • Many Emeril Lagasse air fryers come with a recipe book Bursting with creative ideas. Explore the included recipes to get familiar with the appliance’s capabilities.


A Cleaning Guide

Keeping Your Emeril Lagasse Air Fryer Sparkling Clean: A Maintenance Guide

The Emeril Lagasse 26 QT Extra Large Air Fryer with French Doors makes cooking easy, but don’t forget about cleaning! Proper maintenance will ensure your appliance stays in tip-top shape and delivers delicious results for years to come. Here’s how to keep your air fryer clean:

After Every Use:

1. Before cleaning, unplug the appliance and let it cool completely.

2. Wipe down the exterior: Use a damp microfiber cloth to clean the exterior surfaces, including the French doors and control panel. For tougher messes, you can use a light dish soap solution.

3. Wash the removable parts: Most Emeril Lagasse air fryer models come with a detachable crisper tray, racks, and sometimes even a rotisserie basket (if applicable). These parts are typically dishwasher safe. However, check with your user manual for specific cleaning instructions for your model.

4. Clean the interior: While the air fryer is still warm (but not hot!), use a damp microfiber cloth or a non-abrasive sponge to wipe down the interior walls and heating element. You can also use a soft brush to remove any food debris stuck to the interior.

Deep Cleaning (Monthly):

1. Soak stubborn messes: For heavily soiled parts or baked-on grease, pre-soaking them in warm, soapy water for 15-30 minutes can loosen stains and make cleaning easier.

2. Clean the heating element: Never use abrasive cleaners or scrubbers on the heating element. Instead, use a damp cloth to gently dab it clean.

3. Clean the French Doors: For the glass doors, use a glass cleaner or a vinegar solution (water and white vinegar) to remove any fingerprints or grease splatters.

General Tips:

  • Never submerge the air fryer base in water.
  • Avoid using harsh chemicals or abrasive cleaning pads.
  • Don’t put the air fryer base in the dishwasher.
  • Dry all parts thoroughly before reconstructing the air fryer.

By following these simple cleaning tips, you can ensure your Emeril Lagasse Air Fryer stays clean and functions perfectly for a long time.

Additional Notes:

  • Some Emeril Lagasse air fryer models might have self-cleaning functions. Check with your user manual for specific instructions if your model provides this feature.
  • Often check the user manual for any additional cleaning recommendations specific to your air fryer model.


What to avoid when Using the Emeril Lagasse 26 QT Extra Large Air Fryer with Grill Plate

Here are some things to avoid while using your Emeril Lagasse 26 QT Extra Large Air Fryer to ensure safe and successful cooking:

Overcrowding the Basket:

  • This is a common mistake that can lead to uneven cooking and mushy results. Leave enough space between food pieces for proper air circulation. Check your user manual or recipe for recommended filling capacities.

Using Wet Batters:

  • Air fryers work best with dry or lightly oiled ingredients. Wet dipping mixtures tend to drip and cause a mess during air frying. Consider using bread crumbs or a light coating of flour instead for a crispy exterior.

Foil Liners:

  • While tempting to use foil liners for easier cleanup, they can hinder airflow and disrupt the cooking process. It’s best to stick with the provided trays and racks for ideal performance.

Overfilling with Oil:

  • A light coating of oil is enough to promote browning. Using too much oil can lead to greasy food and smoking during air frying.

Improper Cleaning:

  • Not cleaning your air fryer regularly can lead to food buildup and affect its performance. Follow the cleaning instructions in your user manual for after-every-use and deep cleaning maintenance.

Using Abrasive Scrubbers:

  • The air fryer’s interior and heating element have a non-stick coating. Avoid using harsh chemicals, abrasive scrubbers, or metal utensils as they can damage the coating.

Treating it Like a Deep Fryer:

  • Air fryers use significantly less oil than deep fryers. Don’t stuff the basket with oil expecting deep-fried results.

Forgetting to Preheat (for some recipes):

  • While preheating isn’t always necessary, some recipes might recommend preheating the air fryer for perfect results, especially for baking or roasting.

Unplugging While Hot:

  • Always allow the air fryer to cool completely before unplugging it and cleaning.

Leaving unattended:

  • It’s a good habit to stay nearby while your air fryer is operating, especially when using it for the first time with a new recipe.

By following these tips, you can avoid common mistakes and ensure safe and successful air frying with your Emeril Lagasse 26 QT Extra Large Air Fryer.

In conclusion, the Emeril Lagasse 26 QT Air Fryer is a feature-rich appliance with a large capacity and multiple functions. It’s optimal for big families or fans of Emeril Lagasse who want to recreate his dishes. However, the size and price might not be suitable for everyone. To make the perfect choice, weigh your needs and budget against the features of this air fryer.

Ninja SP101 8-in-1 Digital Countertop Oven Air Fryer

Unleash Your Inner Chef with the Ninja SP101: The All-in-One Countertop Powerhouse

Crave guilt-free crispy fries? Do you dream of a kitchen chameleon that can toast, bake, and air fry? Look no further than the Ninja SP101 Digital Countertop Oven Air Fry! This innovative appliance is more than just an air fryer; it’s a kitchen chameleon, transforming your countertop into a culinary command center.

Eight Functions in One Sleek Package:

The SP101 boasts a whopping eight cooking functions, eradicating the need for several appliances. Here’s a taste of its culinary capabilities:

  • Air Fry: Enjoy restaurant-worthy fried favorites like crispy fries, onion rings, and wings with up to 75% less fat compared to traditional methods of frying.
  • Air Roast: Achieve juicy and tasteful roasts with perfectly browned exteriors, perfect for chicken, vegetables, and more.
  • Air Broil: Lock in flavor and caramelize the surface of your food for a delicious finish on steaks, fish, and vegetables.
  • Bake: Whip up a set of cookies, cakes, or casseroles – the SP101 handles baking needs with ease.
  • Bagel: Get those bakery-style bagels with a perfectly toasted exterior and a chewy center all the time.
  • Toast: From golden brown to lightly toasted, the SP101 provides precise control for your morning toast routine.
  • Dehydrate: Create healthy and delicious dried fruits, vegetables, and even homemade jerky.
  • Keep Warm: Maintain the temperature of your cooked dishes for easy serving later.

Space-Saving Design:

Small Kitchens, Big Dreams? We Got You! The SP101’s ingenious flip-away design allows you to store it upright against your backsplash, freeing up beneficial counter space when not in use. This makes it ideal for apartments, dorms, or anywhere with limited countertop real estate.

Cleaning Made Easy:

The detachable air fry basket, wire rack, and crumb tray are dishwasher-safe, making post-meal cleanup effortless.

Unleash Your Culinary Creativity:

The SP101’s diverse cooking options and easy-to-use digital controls allow you to explore a world of culinary possibilities. From appetizers to main courses and even desserts, this countertop oven has you covered.

Is the Ninja SP101 Right for You?

If you’re looking for a countertop appliance that provides air frying, baking, roasting, and more, all in a space-saving package, then the Ninja SP101 is a great option. It’s ideal for busy home cooks, health-conscious individuals, or anyone who wants to streamline their kitchen routine without sacrificing delicious results.

Ready to take your cooking to the next level? Consider the Ninja SP101 Digital Air Fryer Countertop Oven and open a world of culinary possibilities in your own kitchen!


Key Features

Features of the Ninja SP101 Digital Air Fryer Countertop Oven:

  • 8-in-1 Functionality: Air Fry, Air Roast, Air Broil, Bake, Bagel, Toast, Dehydrate, and Keep Warm.
  • Digital Controls: Easy-to-use digital controls with a LED display for temperature and time selection.
  • Large Capacity: Enjoy enough space to cook a 13-inch pizza, a 1kg set of fries, or toast 6 slices of bread at once.
  • Up to 75% Less Fat: Achieve crispy, delicious fried favorites with substantially less fat compared to traditional frying methods.
  • Digital Crisp Control Technology: Ensures perfectly crispy results every time. (For further explanation on the details of this exact technology would be worth looking into)
  • Fast and Even Cooking: Powerful 1800-watt (or 2400 watts depending on the model) heating delivers fast and even cooking for different kinds of dishes.
  • Detachable Parts: The air fry basket, wire rack, and crumb tray are all removable and dishwasher-safe for easy cleaning.
  • Flip-Away Design: Stand the oven vertically against your backsplash for maximized counter space..
  • Temperature Range: Adjustable temperature range from 40°C to 230°C (104°F to 446°F) for different kinds of cooking needs.

By adding this features section, you provide a more technical breakdown of the SP101’s functionalities, giving readers a clear knowledge of what this appliance can do.


How to Use the Ninja SP101 8-in-1 Digital Countertop Oven Air Fryer

Conquering the Kitchen with Your Ninja SP101: A Step-by-Step Guide

The Ninja SP101 boasts a variety of functions, but using it is easy! Here’s a step-by-step guide to get you started on your culinary adventures:

1. Preparing for Takeoff:

  • Read the Manual: For specific instructions and safety information, it’s always wise to check with the user manual before using any new appliance.
  • Wash the Parts: Before your first use, wash the air fry basket, wire rack, and crumb tray with warm soapy water and dry them thoroughly.
  • Choose Your Function: Decide what you want to cook and select the corresponding function using the digital control panel. The SP101 provides Air Fry, Air Roast, Air Broil, Bake, Bagel, Toast, Dehydrate, and Keep Warm.

2. Gearing Up for Success:

  • Preheat (Optional): While preheating isn’t always necessary, some functions like Air Fry or Air Roast may benefit from preheating for 5-10 minutes for even better results. Check with the manual or cooking charts for specific recommendations.
  • Prepare Your Food: Cut your ingredients according to the recipe or your desired outcome. For air frying, ensure your ingredients are in a single layer in the air fry basket for perfect airflow and crispy results.

3. Time to Cook!

  • Place Your Food: Once preheated (if needed), carefully place your food in the air fry basket or on the wire rack, depending on the function you selected.
  • Set the Time and Temperature: Using the digital controls, adjust the cooking time and temperature according to your recipe or the SP101’s cooking chart.

4. Let the SP101 Work its Magic:

  • Sit Back and Relax (Kind Of): The beauty of the SP101 is its user-friendly operation. You can monitor your food visually through the viewing window and shake the basket occasionally (for air frying) to ensure even cooking.

5. Bon Appétit!

  • Safety First: Use oven mitts to carefully detach the basket or rack when your food is finished cooking. Let it cool slightly before digging in.
  • Cleaning Up: Once you’re done, detach the removable parts and wash them with warm soapy water. Most parts are dishwasher-safe for added convenience.

Bonus Tip: Invest in a set of silicone air fryer liners or parchment paper for easier cleanup, especially with messy or sticky foods.
With these simple steps, you’ll be whipping up delicious and versatile dishes with your Ninja SP101 in no time.


Tips and Recipes Suitable for the Ninja SP101 8-in-1 Digital Countertop Oven Air Fryer

Ninja SP101: Tips, Tricks, and Tasty Treats!

Having conquered the fundamentals of operating your Ninja SP101, we now delve into practical advice and delectable dishes to gratify your palate!

Tips for Air Frying Perfection:

  • Don’t Crowd the Basket: Ensure there’s enough space between your ingredients for optimal air circulation. This ensures consistent cooking throughout for perfectly cooked food.
  • Pat It Dry: Excess moisture on your food can curtail crispiness. Use paper towels to remove surface moisture before air frying, especially for frozen foods.
  • Shake It Up: For french fries, onion rings, or similar items, shake the basket occasionally during air frying to ensure even browning and prevent sticking.
  • Cooking Time Variations: Cooking times can vary depending on the thickness and amount of food you’re cooking. Monitor your food closely and adjust the cooking time accordingly.

Unlocking Flavorful Possibilities:

  • Go Beyond Frying: The SP101 isn’t just for fried favorites. Utilize the Air Roast function for juicy chicken, salmon, or vegetables. Bake delicious cookies, cakes, or muffins. Even dehydrate fruits, vegetables, or jerky for healthy snacks.
  • Explore Online Resources: The internet is a cache of Ninja SP101 recipes! Search for recipes specifically designed for air fryers or adapt your favorite oven recipes for the SP101.

Easy and Delicious SP101 Recipes:

  • Crispy Air Fryer Chicken Wings: Toss your wings in your favorite sauce or seasoning, air fry for 20-25 minutes at 200°C (400°F) for a healthier alternative to traditional wings.
  • Roasted Vegetables: Cut your favorite veggies like broccoli, Brussels sprouts, or carrots into bite-sized pieces, toss with olive oil and herbs, and air roast for 15-20 minutes at 200°C (400°F) for a colorful and healthy side dish.
  • Homemade Veggie Burgers: Ditch the pre-made! Craft your own delicious veggie burger mixture from scratch. Air fry for 10-12 minutes at 200°C (400°F) for a delicious and satisfying plant-based meal.
  • Air Fryer Salmon: Steep your salmon in your favorite sauce, then air roast for 10-12 minutes at 200°C (400°F) for perfectly cooked and flaky fish.
  • Quick and Easy Breakfast Frittata: Saute your favorite vegetables and breakfast meats, pour in some whisked eggs, and use the Bake function to cook your frittata to fluffy perfection.

These are just a few ideas to get you started. With a little creativity and the multifunctionality of the Ninja SP101, you can create endless culinary delights in your own kitchen!

Safety Reminder: Always check with the user manual for specific cooking times and temperatures for different foods. Never leave your appliance unattended while cooking.


A Cleaning Guide

Keeping Your Ninja SP101 Sparkling Clean: A Breeze Through Maintenance

The Ninja SP101 is designed for easy cleanup, allowing you to spend less time scrubbing and more time enjoying your delicious creations. Here’s how to maintain your appliance:

Cleaning After Each Use:

1. Unplug the Unit: Always ensure the SP101 is unplugged before cleaning.

2. Let it Cool Down: Let the appliance cool completely before usage.

3. Empty the Crumb Tray: Remove the crumb tray and discard any crumbs or food particles. Wash it with warm soapy water or place it in the dishwasher (check the manual for dishwasher-safe confirmation).

4. Tackle the Basket and Rack: The air fry basket and wire rack are typically the most cluttered parts. Remove them and wash them with warm soapy water. You can use a soft sponge or brush for stubborn stains. Most models have dishwasher-safe baskets and racks, so check your manual for confirmation.

5. Wipe Down the Interior: Once the removable parts are clean, use a damp microfiber cloth to wipe down the interior surfaces of the SP101. For tougher messes, you can use a light dish soap solution on the cloth, but avoid harsh chemicals or abrasive scrubbers that can damage the surface.

6. Clean the Exterior: Clean the exterior of the SP101 with a damp cloth to remove any fingerprints or smudges.

Deep Cleaning (Optional):

For occasional deep cleaning, you can handle any grease buildup on the interior. Here’s what you can do:

  • Make a Cleaning Solution: Mix a solution of warm water and a few drops of light dish soap.
  • Dampen a Cloth: Dip a microfiber cloth or sponge in the cleaning solution and squeeze it out so it’s damp, not soaking wet.
  • Wipe Down the Interior: Wipe down the interior surfaces of the SP101, paying attention to any greasy areas.
  • Rinse and Dry: Rinse the cleaning solution with a clean damp cloth and dry the interior thoroughly with a paper towel to prevent rust.

Additional Tips:

  • Never Submerge the Unit: The Ninja SP101 is not dishwasher-safe and should never be dipped in water.
  • Avoid Abrasive Scrubbers: Stick to soft sponges or microfiber cloths to avoid scratching the non-stick surfaces.
  • Deodorize Occasionally: If you notice any lingering odors, you can deodorize the SP101 by placing a bowl of lemon wedges or baking soda inside overnight with the door closed.

By following these simple cleaning tips, you can ensure your Ninja SP101 stays sparkling clean and functions at its best for years to come. Your culinary adventures await!


What to Avoid when Using the Ninja SP101 8-in-1 Digital Countertop Oven Air Fryer

Here are some things to avoid while using your Ninja SP101 Digital Air Fryer Countertop Oven to ensure safe and successful cooking:

Overcrowding the Basket:

  • Airflow is Key: When air frying, avoid stuffing the basket with your food. Leave space between each piece for optimal air circulation. This guarantees consistent heat distribution for uniformly cooked dishes.

Using Wet Batters or Breading:

  • Sticking and Mess: The Ninja SP101 uses hot air circulation to cook food, not oil. Wet batters or breading tend to drip and cause sticking or burning on the basket and crumb tray. Go for dry rubs, marinades, or a light coating of oil for best results.

Cooking Excessive Oil:

  • Healthy Choice, Not Deep Fryer: While the SP101 can handle some oil, it’s not a deep fryer. Too much oil can drip and smoke, causing a mess and potential fire hazard. Stick to little oil for added taste or use non-stick cooking spray.

Unattended Cooking:

  • Safety First: Always monitor your food while it’s cooking in the SP101. Just like any cooking appliance, it’s important to watch your food to prevent burning or overcooking.

Using Metal Utensils:

  • Scratching the Surface: Avoid using metal utensils inside the SP101, as they can scratch the non-stick coating. Select silicone or wooden utensils that are safe for non-stick surfaces.

Cleaning with Harsh Chemicals:

  • Gentle Does It: The SP101 has a non-stick interior that can be damaged by harsh chemicals or abrasive scrubbers. Stick to warm soapy water, a soft sponge, or a microfiber cloth for cleaning.

Forgetting to Preheat (When Necessary):

  • Crispy Perfection: While warming up isn’t always required, some functions like Air Fry or Air Roast benefit from preheating for 5-10 minutes. This helps ensure even cooking and crispy results, especially for thicker cuts of meat. Check with your manual or cooking charts for specific recommendations.

Following Unreliable Cooking Times:

  • Know Your Food: Cooking times can differ depending on the thickness, amount, and type of food you’re cooking. Cooking times from online sources or recipes might not be ideal for your specific situation. It’s wise to monitor your food and adjust the cooking time as needed for perfect results.

By following these tips and familiarizing yourself with the Ninja SP101’s functionalities, you can avoid common complications and ensure a safe and enjoyable cooking experience. Remember, the user manual is also a great resource for specific instructions and safety precautions.

In conclusion, the Ninja SP101 air fryer oven is a multifunctional kitchen tool that provides air frying, baking, roasting, and more in a compact design. It’s easy to use, clean, and opens up a world of culinary options for busy cooks or health-conscious eaters. Say goodbye to counter clutter! The SP101 does it all, becoming your new culinary partner.

32QT Extra Large Toaster Oven Air Fryer Combo

Conquer Your Kitchen with the All-in-One 32QT Air Fryer Toaster Oven!

Are you yearning for perfectly crisp, restaurant-style fries? Do you dream of baking pizzas, roasting vegetables, and dehydrating fruit – all in one countertop appliance? Well, dream no more! The 32QT Extra Large Air Fryer Toaster Oven is here to transform your kitchen.

This mighty machine boasts an impressive 32-quart capacity, making it ideal for feeding a crowd or prepping family meals. Imagine whipping up a batch of golden chicken wings, a juicy roast chicken, or even a decadent 13-inch pizza – all in the same oven.

Here’s what makes this air fryer toaster oven a kitchen must-have:

  • Crispy Perfection with 360° Hot Air Circulation: Say goodbye to greasy, mushy food! This innovative technology ensures even cooking and crispy results every time.
  • Healthier Indulgence: Enjoy your favorite fried foods with up to 90% less oil! This air fryer uses hot air to obtain a crispy texture, allowing you to savor without the extra fat.
  • Double the Functionality, Double the Fun: This isn’t just an air fryer – it’s a fully functional toaster oven as well! Bake, broil, roast, dehydrate, and more – all at the touch of a button. With 12 pre-set functions, you can achieve culinary perfection with ease.
  • Spacious and Versatile: The 20-in-1 functionality and double-rack design provide sufficient space and flexibility for all your cooking needs. From whipping up quick snacks to preparing family meals, this air fryer has you covered.
  • Effortless Cooking: The user-friendly digital controls and easy-to-read display make operating this air fryer easy. Plus, the convenient transparent door allows you to monitor your food without opening the oven and letting heat escape.
  • Cleaning Made Simple: There’s no need to scrub greasy messes! The non-stick interior ensures effortless cleaning, so you can spend less time cleaning and more time enjoying delicious food.

But wait, there’s more! This air fryer toaster oven comes with a complete set of 7 attachments, including an oven rack, air fryer basket, baking pan, rotisserie spit, rotisserie basket, crumb tray, and even a remote handle – everything you need to get started on your air frying adventures!

Ready to take your cooking game to the next level? Invest in the 32QT Extra Large Air Fryer Toaster Oven and open a world of culinary possibilities. It’s the perfect appliance for busy families, health-conscious cooks, and anyone who loves delicious, convenient meals.

In addition, here are some ideas to expand your content:

  • Include mouthwatering recipe ideas specifically designed for air fryer toaster ovens.
  • Dedicate a section to the different functionalities of the oven, highlighting its multifunctionality.
  • Create a comparison chart showcasing the features of this air fryer toaster oven against similar models on the market.
  • Offer tips and tricks for using your air fryer toaster oven for ideal results.


Key Features

32QT Extra Large Air Fryer Toaster Oven: Feature Packed for Culinary Mastery

The 32QT Extra Large Air Fryer Toaster Oven is a kitchen powerhouse, offering countless features to upgrade your cooking experience. Here’s a breakdown of its key functionalities:

Supersize Your Cooking:

  • Extra Large Capacity (32QT): Cook for the whole family or prepare party trays with ease. This spacious interior allows you to roast a whole chicken, bake a 13-inch pizza, or air fry a mountain of crispy delights.

Crispy & Healthy:

  • 360° Hot Air Circulation: This innovative technology ensures even cooking and a delightful crispy texture, using vastly less oil compared to traditional deep-frying methods. Enjoy healthier versions of your favorite fried foods without sacrificing flavor.

Multifunctional Marvel (20-in-1):

  • This isn’t just an air fryer – it’s a master of many cuisines! Air Fry, Bake, Roast, Broil, Toast, Dehydrate, and more! With 12 pre-set functions, you can achieve restaurant-quality results at the touch of a button.

Double the Racks, Double the Fun:

  • Double-Rack Design: Maximize your cooking potential with two oven racks. Prepare multiple dishes simultaneously, or use the extra space for larger items.

Effortless Operation:

  • Intuitive Digital Controls & Easy-Read Display: Figure out cooking functions and monitor your food’s progress with ease.
  • Transparent Viewing Window: Keep an eye on your culinary creations without opening the oven door and letting heat escape.

Cleaning Made Easy:

  • Non-Stick Interior: Effortless cleaning after every cooking adventure. Say goodbye to scrubbing greasy messes – simply wipe down the interior for a sparkling clean oven.

Complete Accessory Kit (7-piece):

  • Everything you need to get started is included! This air fryer toaster oven comes with an oven rack, air fryer basket, baking pan, rotisserie spit and basket, crumb tray, and even a detachable handle.

Additional Features to Consider Highlighting (depending on the model):

  • Rapid Preheat: Enjoy shorter wait times with a quick warm up function.
  • Automatic Shutoff: Ensures safety and peace of mind by automatically turning off the oven after a set time.
  • Adjustable Temperature Controls: Provides precise control over the cooking process for perfectly cooked food every time.
  • Interior Light: Easily monitor your food’s progress with built-in oven lighting.
  • Sleek and Stylish Design: Enhances the look of your kitchen with a modern and attractive design.

By emphasizing these features, you can display the multifunctionality and convenience of the 32QT Extra Large Air Fryer Toaster Oven. This comprehensive feature list will provide potential buyers with all the information they need to make an informed decision.


How to use the 32QT Extra Large Toaster Oven Air Fryer Combo

Unleash Your Inner Chef: A Guide to Using Your 32QT Air Fryer Toaster Oven

The 32QT Extra Large Air Fryer Toaster Oven is your gateway to a world of culinary possibilities. From perfectly crispy air-fried delights to restaurant-worthy roasts, this multifunctional appliance can do it all. But with so many functions, how do you get started? Worry less, this guide will walk you through the basics of using your air fryer toaster oven:

Getting Started:

1. Read the Manual: Every appliance is unique, so familiarizing yourself with the user manual is essential. This will provide specific instructions on operation, cleaning, and safety precautions.

2. Set Up Your Oven: Place your air fryer toaster oven on a stable, heat-resistant surface away from walls and flammable materials. Ensure proper ventilation around the appliance.

3. Preheating (Optional): While preheating isn’t always necessary for air frying, some functions like baking or broiling may require it. Check your manual or the pre-set options for recommended preheating times.

Air Frying:

1. Prepare Your Food: For perfect results, pat your ingredients dry with paper towels to remove excess moisture. This ensures crispy perfection.

2. Choose Your Basket: Depending on the model, you might have an air fry basket or a separate air fry rack. Choose the appropriate one based on your food and the user manual’s instructions.

3. Fill the Basket: Don’t congest the basket! Leave space between your ingredients for proper air circulation. Check your manual for recommended filling capacities.

4. Set Time and Temperature: Select the pre-set “Air Fry” function or manually adjust the time and temperature based on your chosen recipe or the user manual’s recommendations.

5. Cooking Time: Most air-fried foods cook quickly. Check a recipe or the included cooking chart for estimated cook times. You can also shake the basket occasionally for even cooking (check your manual for shaking recommendations for specific foods).

6. Enjoy! Once the timer goes off, carefully detach the basket and enjoy your crispy, delicious air-fried food.

Additional Functions:

Your air fryer toaster oven likely offers different kinds of functions besides air frying. Each function may have specific instructions or pre-set options. Here’s a general approach for using other functionalities:

1. Choose Your Function: Select the desired function from the pre-set options (e.g., Bake, Roast, Broil) or adjust settings manually (e.g., temperature, time) based on your recipe and the user manual’s guidance.

2. Prepare Your Food: Follow recipe instructions for preparing your food for the chosen cooking method (baking, roasting, etc.).

3. Place Food in Oven: Use the appropriate baking pan, rack, or rotisserie accessories (depending on the function and your recipe).

4. Set Time and Temperature: Adjust settings based on your chosen function and recipe.

5. Cooking Time: Check your recipe or the included cooking chart for estimated cooking times. You can monitor your food visually through the transparent window.

6. Enjoy! Once the timer goes off, carefully remove your food using oven mitts.

Cleaning Up:

  • Allow the oven to cool completely before cleaning.
  • Most models feature a non-stick interior for easy cleaning. Wipe down the interior with a damp cloth and light soap.
  • Wash the basket, baking pan, and other accessories with warm soapy water. Check with the manual for dishwasher compatibility of specific parts.

Tips for Success:

  • Check with the recipe guides or cookbooks specifically designed for air fryer toaster ovens.
  • Try out different ingredients and cooking times to find your ideal results.
  • Don’t congest the basket or oven – this can lead to uneven cooking.
  • Use the included accessories to unlock the full potential of your air fryer toaster oven.

By following these steps and exploring the various functions, you’ll be a master of your 32QT Extra Large Air Fryer Toaster Oven in no time. Get ready to experience a world of delicious and healthy cooking possibilities!


Tips and Recipes Suitable for the 32QT Extra Large Toaster Oven Air Fryer Combo

Tips and Tricks to Master Your 32QT Air Fryer Toaster Oven:

Unlocking Crispy Perfection:

  • Moisture Matters: For perfectly crisp air-fried results, pat down your ingredients with paper towels to remove excess moisture. This allows hot air to circulate and create a crispy exterior without a mushy interior.
  • Don’t Crowd the Basket: Resist the urge to overfill the basket! Leaving space between your ingredients ensures even air circulation and perfect crisping. Check your manual for recommended filling capacities for different foods.
  • Shake It Up: For some air-fried foods like fries or chicken wings, shaking the basket halfway through cooking helps achieve even browning and crisping. Consult your user manual for shaking recommendations specific to certain foods.
  • Preheating (Optional): While not always necessary for air frying, preheating for a few minutes can help ensure even cooking, especially for thicker ingredients.

General Cooking Hacks:

  • Seasoning is Key: Don’t forget to liberally season your food before air frying! This adds flavor and enhances the whole taste.
  • Cooking Time Variations: Cooking times can differ depending on the size and thickness of your ingredients, as well as the wattage of your air fryer toaster oven. It’s helpful to check with a recipe or cooking chart as a guide, but be prepared to adjust timings slightly based on your specific appliance and food.
  • Utilize the Accessories: Don’t just air fry! Take advantage of the various accessories included with your oven. The rotisserie spit is ideal for juicy roasted chicken, while the baking pan allows you to bake cookies, cakes, and more.
  • Leftover Magic: Warm up leftovers in your air fryer toaster oven for a quick and crispy refresh. This is a great way to revive leftover fries, chicken nuggets, or even pizza slices.

Cleaning and Maintenance:

  • Clean as You Go: Wipe down any spills or splatters inside the oven after each use. This prevents build-up and makes cleaning easier in the long run.
  • Wait for Cool Down: Always ensure the oven is completely cool before cleaning. This ensures safety and prevents burns.
  • Non-Stick Advantage: Most models feature a non-stick interior for easy cleaning. Simply wipe down the interior with a damp cloth and light soap.
  • Accessory Care: Wash the basket, baking pan, and other attachments with warm soapy water. Check with the user manual for dishwasher compatibility of specific parts.

Recipes to Get You Started:

Air-Fried Crispy Classics:

  • French Fries: A classic air-fryer recipe. Cut your potatoes into desired shapes, toss them with oil and seasonings, and air fry until golden brown and crispy.
  • Chicken Wings: Who says healthy can’t be delicious? Unleash restaurant-worthy wings with a marinade, then air fry them for a burst of flavor and a satisfying crunch.
  • Onion Rings: These air-fried onion rings are a healthier option to deep-fried versions. Simply coat onion slices in batter and air fry until golden brown.
  • Mozzarella Sticks: Can’t resist the irresistible pull of rich, melted cheese? Air-fried mozzarella sticks hit the spot for a quick and satisfying snack or appetizer.

Beyond Air Frying:

  • Roasted Vegetables: Toss your favorite veggies with olive oil and herbs, then roast in your air fryer toaster oven for a healthy and tasteful side dish.
  • Baked Salmon: This air fryer toaster oven makes perfectly cooked salmon with a crispy skin. Simply season your salmon filet and bake according to recipe instructions.
  • Pizza Perfection: Enjoy homemade pizzas or warm up frozen pizzas in your air fryer toaster oven for a quick and delicious meal.
  • Dehydrated Fruits and Snacks: Dehydrate fruits like apples, bananas, or even make your own healthy fruit leathers using the dehydrating function of your air fryer toaster oven.

These are just a few ideas to get you started. With a little creativity, you can explore a world of delicious recipes using your multifunctional 32QT Air Fryer Toaster Oven! Remember to check with recipe resources and cookbooks specifically designed for air fryer toaster ovens for even more inspiration.


A Cleaning Guide

Keeping Your 32QT Air Fryer Toaster Oven Sparkling Clean:

Maintaining a clean air fryer toaster oven is essential for ideal performance and longevity. Luckily, the non-stick interior and detachable parts make cleaning a breeze! Here’s a breakdown of the cleaning process:

Safety First:

  • Always unplug your air fryer toaster oven and allow it to cool completely before cleaning. This prevents accidental burns and makes cleaning safer.

Cleaning the Interior:

  • Wipe down the interior with a damp cloth and mild soap. For stubborn stains, you can use a slightly abrasive sponge (avoiding metal scouring pads that can damage the non-stick coating).
  • Clean the glass door: Use a glass cleaner or a damp microfiber cloth to remove any fingerprints or splatters.
  • Don’t submerge the oven in water! Never dip the entire appliance in water.

Cleaning the Accessories:

  • Most accessories, like the air fryer basket, baking pan, rotisserie spit and basket, and crumb tray, are dishwasher safe. Check with your user manual for specific dishwasher compatibility information.
  • For hand washing: Wash the accessories with warm, soapy water. You can use a soft sponge or brush for tougher stains.
  • Dry everything thoroughly before storing. Moisture left behind can promote mildew growth.

General Cleaning Tips:

  • Clean as you go: Wiping down spills or splatters after each use helps prevent build-up and makes cleaning easier in the long run.
  • Deep clean occasionally: Depending on usage frequency, you may want to do a more thorough cleaning every few months. This might involve removing any stubborn grease or stains with a baking soda paste or a mild degreaser (always check with your manual for recommended cleaning solutions).
  • Avoid harsh chemicals: Stay away from abrasive cleaners, scouring pads, or harsh chemicals, as these can damage the non-stick coating of your oven.

By following these simple cleaning steps, you can keep your 32QT Air Fryer Toaster Oven looking and functioning like new for years to come!


What to Avoid when Using the 32QT Extra Large Toaster Oven Air Fryer Combo

Avoiding Common Pitfalls: How to Get the Most Out of Your 32QT Air Fryer Toaster Oven

Your 32QT Air Fryer Toaster Oven is a culinary all in one appliance, but like any appliance, there are a few things to keep in mind to ensure optimal performance and delicious results. Here’s what to avoid when using your air fryer toaster oven:

Overcrowding the Basket:

  • This is a cardinal sin of air frying! Avoid overcrowding the basket. Leaving space between your ingredients allows for proper air circulation, which is key to achieving that coveted crispy texture. Check with your user manual for Ideal fill levels.

Using Wet Batter:

  • Air frying depends on hot air to crisp up food. Wet batters tend to drip and can cause smoking or burning at the bottom of the oven. If you crave an uneven texture, consider using a light breadcrumb coating instead.

Adding Oil Too Early:

  • For most air-fried foods, a light coating of oil after tossing with seasonings is enough. Adding too much oil upfront can make your food greasy instead of crispy.

Not Preheating (When Necessary):

  • While preheating isn’t always required for air frying, it can be valuable for certain functions like baking or roasting. Check with your user manual or recipe instructions for recommended preheating times.

Neglecting to Shake (Sometimes):

  • Shaking the basket frequently during air frying (consult your manual for specific recommendations) helps ensure even cooking and crisping, especially for items like fries or chicken wings.

Using the Wrong Cooking Time or Temperature:

  • Cooking times can differ depending on the size and thickness of your ingredients, as well as the wattage of your air fryer toaster oven. It’s always best to check with a recipe or cooking chart as a guide, but be prepared to adjust timings slightly based on your specific appliance and food.

Cleaning with Harsh Chemicals:

  • The non-stick interior of your air fryer toaster oven is designed for easy cleaning. Avoid using abrasive cleaners, scouring pads, or harsh chemicals, as these can damage the coating. Adhere to light soap and water for routine cleaning.

Forgetting About the Accessories:

  • Your air fryer toaster oven likely comes with a variety of accessories like a baking pan, rotisserie spit, and crumb tray. Be open to trying new things These accessories unlock the full potential of your oven, allowing you to bake, roast, dehydrate, and more.

Following these simple tips will help you avoid frequent errors and ensure you get the most out of your multifunctional 32QT Air Fryer Toaster Oven. The kitchen awaits your culinary conquest!

In conclusion, the 32QT Air Fryer Toaster Oven is a multifunctional kitchen appliance that provides air frying, baking, roasting, and more. It boasts a large capacity, user-friendly features, and easy cleaning. Ideal for busy families, health-conscious cooks, or anyone who loves to cook, this air fryer toaster oven Ignites a passion for endless culinary creations.

air fryers

Ninja AF101 Air Fryer

Ninja AF101 Air Fryer: Crispy Perfection in a Compact Package

Wishing to elevate your favorite recipes with a sprinkle of health-focused crispness? Then the Ninja AF101 Air Fryer might be your new kitchen hero. This kitchen gadget provides versatility, ease of operation, and a modern aesthetic, making it a great option for anyone looking to explore the world of air frying.

Crispy with Minimal Oil

The AF101 uses rapid air circulation technology to cook food to crispy perfection with little to no oil. This means you can enjoy your favorite fried foods in a lighter, more nutritious way., like french fries, onion rings, and even chicken wings. Plus, you can enjoy the satisfying crunch without the greasy mess.

More Than Just Frying

Don’t let the name deceive you; the AF101 is a versatile kitchen companion. Besides air frying, it can also roast, bake, reheat, and dehydrate. This allows you to whip up everything from frozen veggies to homemade jerky, all in one handy appliance.

Compact Yet Functional

The 4-quart capacity makes the AF101 ideal for small families or individuals. It won’t take up too much counter space, It packs a punch in terms of capacity, ensuring you can cook enough for a fulfilling meal. The ceramic-coated basket is dishwasher safe for easy cleaning, another plus for busy weeknights.

Simple to Use

With user-friendly controls and different kinds of preset functions, the AF101 is accessible to even beginner cooks. The stylish design, with a high gloss finish in grey, brings a touch of sophistication to your kitchen aesthetic.

Is the Ninja AF101 Right for You?

If you’re looking for a multifunctional and easy-to-use air fryer that won’t take over your countertop, the Ninja AF101 is a much better option. It’s ideal for creating healthy and delicious meals with minimal effort.

Here are some additional things to consider:

  • Capacity: If you’re cooking for a larger family, you might want to consider a bigger air fryer model.
  • Features: While the AF101 offers basic functions, some air fryers come with additional features like digital displays and temperature probes.

Overall, the Ninja AF101 Air Fryer is a solid choice for anyone looking for a user-friendly and affordable way to enjoy healthier versions of their favorite fried foods. With its compact size and multiple functions, it can be a beneficial addition to your kitchen.


Key Features

Ninja AF101 Air Fryer: Key Features

The Ninja AF101 Air Fryer boasts a variety of features that make it a multifunctional and user-friendly appliance. Here’s a breakdown of its key functionalities:

  • Multi-functionality: This air fryer goes beyond just frying. It offers settings for air frying, roasting, baking, reheating, and dehydrating, allowing you to prepare different kinds of dishes.
  • Rapid Air Circulation: This technology ensures even cooking and crispy results by circulating hot air throughout the appliance.
  • Temperature Control: With a wide temperature range (typically 105°F to 400°F), you can adjust the heat to perfectly suit your recipe, whether you’re gently dehydrating fruit or searing vegetables.
  • Timer: The built-in timer allows you to set cook times and walk away, ensuring your food doesn’t overcook. Timer increments differ depending on the function (e.g., 1-minute increments for air frying, 15-minute increments for dehydrating).
  • 4-Quart Capacity: Perfect for small families or individuals, this capacity allows you to cook enough food for a satisfying meal without taking up inordinate counter space.
  • Easy to Use Controls: The user-friendly control panel highlights simple buttons or dials for smooth operation, making it accessible to cooks of all experience levels.
  • Non-Stick Ceramic Coating: The basket and crisper plate feature a ceramic-coated non-stick surface that promotes healthier cooking with little oil and makes cleaning a breeze (although typically not dishwasher safe).
  • Sleek Design: The high-gloss finish in grey adds a touch of modern style to your kitchen countertop.

Additional Considerations:

  • While the AF101 offers basic functionalities, some air fryer models may include additional features like digital displays, pre-programmed settings for specific foods, or temperature probes for more precise cooking.
  • The size of the air fryer might be a factor depending on your needs. If you’re cooking for a larger family, you might want to consider a bigger model with a higher capacity.


How to Use the Ninja AF101 Air Fryer

The Ninja AF101 Air Fryer is designed for easyuse, so you can whip up crispy and delicious meals in no time. Here’s a general guide to get you started:

1. Prep your ingredients: Cut your food into similar-sized bits to ensure even cooking. Check your recipe or the included cooking guide for recommended sizes and pre-heating instructions (if necessary).

2. Preheat (optional): Some recipes recommend preheating the air fryer for a few minutes to achieve perfect crisping. Check with your recipe or the manual for preheating times specific to the function you’re using (air fry, roast, etc.).

3. Load the basket: Place your food in a single layer on the crisper plate in the basket. Avoid stuffing, as this can hinder air circulation and affect crispiness.

4. Select your function: Using the control panel, select the appropriate function for your recipe (air fry, roast, reheat, dehydrate).

5. Set the temperature and time: Adjust the temperature and cooking time based on your recipe or the included cooking guide. The AF101 typically allows temperature settings from 105°F to 400°F and timer increments differ by function.

6. Start cooking: Press the start button and let the AF101 work its magic.

7. Shake or flip (optional): For some recipes, shaking or flipping the food halfway through cooking can help ensure even browning and crisping. Check your recipe for instructions.

8. Check for doneness: Use a food thermometer or check for visual cues like golden brown color to determine if your food is cooked through.

9. Enjoy! Once your food is cooked to your liking, carefully detach the basket and enjoy your delicious and healthy meal.

Cleaning Up:

  • Allow the air fryer to cool down completely before cleaning.
  • The basket and crisper plate typically have a non-stick ceramic coating, so you can often wipe them clean with a damp cloth.
  • Check with the manual for specific cleaning instructions, as some parts may not be dishwasher safe.

Additional Tips:

  • For best results, use a light coating of oil on your food, especially when air frying.
  • The included cooking guide can be a helpful resource for cook times and temperatures for diverse foods.
  • Some online resources and recipe websites offer inspiration for air fryer cooking.

With a little practice, you’ll be a master of the Ninja AF101 Air Fryer in no time, creating healthy and tasteful meals for yourself and your loved ones.


Tips and Recipes Suitable for the Ninja AF101 Air Fryer

Ninja AF101 Air Fryer: Tips and Recipe Ideas
The Ninja AF101 Air Fryer offers a world of possibilities for healthy and delicious meals. Here are some tips and recipe ideas to get you started:

Tips:

  • Master the preheat: While not always necessary, preheating the air fryer for a few minutes, especially for functions like roasting or baking, can help achieve crispier results.
  • Don’t overcrowd: For maximum crispiness, even air flow is essential. Spread food out in a single layer on the crisper tray, allowing space between each piece.
  • Shake it up! For some recipes, like french fries or chicken wings, shaking the basket halfway through cooking helps ensure even browning and crisping.
  • Oil for a friend: Using a light coating of oil on your food before air frying helps promote browning and crisping. Go for healthy options like avocado oil or olive oil spray.
  • Clean as you go: While the air fryer is still warm, wipe down the basket and crisper plate to ensure easy cleaning.
  • Seasoning is key: Don’t be shy with the spices! Air frying allows seasonings to adhere beautifully, so experiment with your favorite herbs and spices for extra flavor.

Recipe Ideas:

Classic Air Fryer Fare:

  • Crispy French Fries: Cut potatoes into even strips, toss with a light coating of oil and your favorite seasonings, and air fry for 15-20 minutes, shaking occasionally.
  • Air Fryer Chicken Wings: Steep your wings in your favorite sauce, then air fry for 20-25 minutes, flipping halfway through, for juicy and tasteful results.
  • Roasted Vegetables: Chop up your favorite veggies like broccoli, Brussels sprouts, or carrots, toss with olive oil and herbs, and air fry for 10-15 minutes, or until tender-crisp.

Beyond the Basics:

  • Air Fryer Salmon: Season a salmon filet with lemon pepper and air fry for 10-12 minutes for a perfectly cooked and crispy fish.
  • Mini Quiches: Use pre-made pie crust to create mini quiche cups, fill with eggs, cheese, and your favorite fillings, and air fry for 10-12 minutes for a delicious and satisfying breakfast or brunch.
  • Dehydrated Fruits: Slice fruits like apples, bananas, or strawberries thinly and dry out in the air fryer for a healthy and portable snack.

Resources:

  • The Ninja AF101 manual typically includes a basic cooking guide with suggested times and temperatures for various foods.
  • Online resources like recipe websites and cooking blogs offer a knowledge of inspiration for air fryer recipes specific to the AF101’s capacity. There are even recipe collections dedicated primarily to the Ninja AF101.

Remember, these are just a starting point. With a little creativity, you can discover endless possibilities and create delicious and healthy meals using your Ninja AF101 Air Fryer.


A Cleaning Guide

Keeping your Ninja AF101 Air Fryer clean is important for maintaining its performance and longevity. Here’s a breakdown of the cleaning process:

Safety First:

  • Ensure the air fryer is unplugged and allow it to cool completely before cleaning.

Cleaning the Basket and Crisper Plate:

1. These parts typically have a non-stick ceramic coating, making cleaning relatively simple.

2. Wipe them down with a damp cloth or sponge to remove any food remnant. You can use a light dish soap if needed.

3. For stubborn stains, baking soda can be your friend. Make a paste with a little water and apply it to greasy areas. Let it sit for 15-20 minutes, then scrub gently with a soft brush and wipe clean.

4. Important Note: Avoid using abrasive sponges or scouring pads, as they can damage the non-stick coating.

Cleaning the Interior:

1. The interior of the air fryer can be wiped down with a damp cloth. You can add a few drops of light dish soap to the cloth for tougher stains.

2. If there are crumbs or food particles lodged within the heating element, you can use a small, non-abrasive brush to gently remove them.

General Cleaning Tips:

  • The Ninja AF101 manual may have specific cleaning instructions. It’s always best to check with the manual for your model for any additional guidance.
  • While the basket and crisper plate are often dishwasher-safe (double-check the manual!), it’s generally recommended to wash them by hand to preserve the non-stick coating for longer.
  • Never submerge the main unit of the air fryer in water or place it in the dishwasher.

Keeping it Fresh:

  • To prevent lingering odors, you can occasionally run the air fryer on a high setting for a few minutes after cleaning.
  • Leaving the basket and crisper plate out to air dry completely can also help prevent moisture build-up and potential odors.

By following these simple cleaning tips, you can ensure your Ninja AF101 Air Fryer stays clean and functions perfectly for years to come.


What to Avoid when Using the Ninja AF101 Air Fryer

Here are some things to avoid when using your Ninja AF101 Air Fryer to keep it running properly and ensure safe and delicious meals:

Overcrowding:

  • Don’t overload the basket. Air circulation is key for crispy results, so leave space between pieces of food. This allows hot air to properly surround your food for even cooking.

Using too much oil:

  • While a light coating of oil can enhance browning and crisping, using too much oil can defeat the purpose of air frying, which is a healthier alternative to deep frying. Go for spraying the basket or your food with a light mist of oil instead of submerging it.

Improper preheating (for some functions):

  • While not always necessary, preheating can be essential for certain functions like roasting or baking. Skipping this step might result in uneven cooking or mushy food. Check your recipe or the manual for preheating recommendations based on the function you’re using.

Cleaning with harsh chemicals or abrasive tools:

  • The Ninja AF101 typically has a non-stick ceramic coating that can be easily damaged by harsh scrub pads, scouring powders, or abrasive cleaning chemicals. Stick to gentle sponges, clothes, and light dish soap for cleaning.

Using batter-dipped foods:

  • Batter tends to drip and can cause unwanted mess and smoking during air frying. Opt for breaded or lightly dusted items for best results.

Unrealistic expectations for cooking times:

  • While air frying is generally faster than conventional oven cooking, it might not always copy deep-frying speeds. Cooking times can differ, depending on the food and the amount you’re cooking. It’s always best to check with a recipe or the included cooking guide for estimated times and keep an eye on your food for doneness.

Using parchment paper that isn’t perforated:

  • Imperforate parchment paper can block airflow and impede even cooking. If you choose to use parchment paper for easier cleanup, ensure it’s perforated to allow air circulation.

By following these tips, you can avoid common mistakes and ensure your Ninja AF101 Air Fryer offers delicious and healthy meals for a long time.

In conclusion, the Ninja AF101 Air Fryer is a great choice for small kitchens and those new to air frying. It’s easy to use, cleans up easily, and lets you cook different kinds of dishes beyond just fried foods. While the 4-quart capacity might not be optimal for large families, it’s a well-rounded air fryer for the price.

Air fryer

Ninja DZ201 Foodi 8 Quart 6-in-1 DualZone 2-Basket Air Fryer

Ninja DZ201 Foodi 2-Basket Air Fryer: Double Duty for Weeknight lifesaver

Looking to upgrade your kitchen game with an appliance that offers versatility and speed? Then the Ninja DZ201 Foodi 8 Quart 6-in-1 DualZone 2-Basket Air Fryer might be worth considering. This feature-packed air fryer goes beyond just crispy fries, allowing you to whip up different kinds of dishes in no time.

Double the Fun with DualZone Technology

The DZ201’s most impressive feature is its DualZone Technology. With two independent baskets, you can cook different foods at the same time, even if they require different temperatures or cook times. No more waiting for one dish to finish before starting another! This is a game-changer for busy weeknights when you’re juggling various tasks.


Six Cooking Functions in One Appliance

This isn’t just an air fryer; it’s a multi-cooker extraordinaire. The DZ201 boasts six cooking functions:

  • Air Fry: Achieve that coveted crispy texture with little to no oil.
  • Roast: Perfectly cook vegetables, meats, and more with even heat distribution.
  • Broil: Lock in taste and get a delicious caramelized finish.
  • Dehydrate: Create healthy snacks like dried fruit and homemade dried meat.
  • Match Cook: Cook both baskets at the same temperature and time for easy meals.
  • Smart Finish: Dual-zone control with independent timers lets you cook different dishes at their optimal times.

Perfect for Family Meals and Entertaining

With its generous 8-quart capacity, the DZ201 can tackle enough food for the whole family. Plus, the two independent baskets allow you to provide different dietary needs or preferences. Imagine whipping up crispy chicken wings in one basket while roasting vegetables in the other, all in the same appliance!

Easy Cleanup for Busy Lives

Nobody enjoys a mountain of dirty dishes after a meal. Thankfully, the DZ201 highlights non-stick baskets that make cleanup easy. Just toss them in the dishwasher for an effortless ending to your cooking experience.

Is the Ninja DZ201 Foodi Right for You?

If you’re looking for a multifunctional and time-saving kitchen appliance, the Ninja DZ201 Foodi is definitely worth considering. With its DualZone Technology, multiple cooking functions, and large capacity, it can handle different kinds of dishes and make weeknight meals easy. However, be sure to consider your budget and counter space, as the feature-packed design of the DZ201 comes with a slightly larger footprint and price tag than some no-frills models.


Key Features

Ninja DZ201 Foodi 2-Basket Air Fryer: Feature Breakdown

The Ninja DZ201 Foodi boasts a variety of features that make it a rival for your kitchen counter. Here’s a quick recap of what this air fryer offers:

  • DualZone Technology: Two independent cooking zones with separate baskets, allowing you to cook different foods at the same time with different temperatures and times.
  • Six Cooking Functions: Air Fry, Air Broil, Roast, Bake, Reheat, and Dehydrate for definite cooking versatility.
  • Smart Finish: Ensures both baskets finish cooking at the same time, even if the foods require different time for cooking.
  • Match Cook: Easily copy settings across both zones for full 8-quart capacity cooking, ideal for larger batches.
  • Large Capacity: 8-quart total capacity with two independent 4-quart baskets, optimal for family meals or entertaining.
  • Digital Control Panel: Easy-to-use controls with clear settings and timers for seamless cooking.
  • Non-Stick Coating: Makes cleaning the baskets easy, saving you time and effort.
  • Dishwasher-Safe Parts: The crisper plates can be tossed in the dishwasher for Effortless cleaning.
  • Wide Temperature Range: Offers Versatility for various recipes, from dehydrating at low temperatures (105°F) to air frying at higher heats (up to 450°F).


Additional Features to Consider (depending on your source):

  • Automatic Shut-Off: Provides safety and Ease
  • Nonstick Interior: May also extend to the interior of the appliance for easier cleaning.
  • Recipe Included: May come with a recipe book or access to an online recipe library for inspiration.

Note: Not all retailers may list every feature, so it’s always a good idea to check the manufacturer’s website for the most comprehensive list.


How to Use the Ninja DZ201 Foodi 8 Quart 6-in-1 DualZone 2-Basket Air Fryer

Mastering the Ninja DZ201 Foodi: A Guide to Getting Started
The Ninja DZ201 Foodi offers different kinds of functions, but don’t worry, using it is actually quite straightforward. Here’s a basic guide to get you started:

1. Get Familiar:

  • Before you plug it in, take a moment to get familiar with the appliance. Identify the two baskets, crisper plates (if included), and the control panel.
  • Check the manual (which you can likely find online if you don’t have a physical copy) for functions, buttons, and any cleaning instructions.

2. Prepping for Use:

  • Wash the baskets and crisper plates (if applicable) with warm soapy water and dry them thoroughly.
  • Choose your recipe and warm up the air fryer if required. The Ninja DZ201 allows cooking without preheating for some functions, but always check your recipe or the manual for specific instructions.

3. Load Up Your Baskets:

  • Place your food in a single layer on the crisper plates (if using) placed inside the baskets. Avoid stuffing, as this can affect cooking times and crispness.
  • The Ninja DZ201 allows independent control of each zone, so you can cook different foods requiring different temperatures or times.

4. Selecting Your Function and Settings:

  • Turn on the appliance and choose your desired cooking function using the control panel.
  • Set the temperature and time based on your recipe or the recommended settings in the manual.

5. Match Cook or Smart Finish (Optional):

  • If you’re cooking the same food in both baskets and want them to finish at the same time, use the Match Cook function.
  • For dishes requiring different cook times, use the Smart Finish function. Set the cook time and temperature for each basket independently. The air fryer will hold the first basket warm until the second one finishes cooking.

6. Cooking and Monitoring:

  • The Ninja DZ201 may have an indicator light or beep to signal when halfway through the cooking cycle, alerting you to shake or flip your food for even cooking (check your recipe for specific instructions).
  • You can always check on your food during the cooking process by carefully pulling out the baskets.

7. Enjoy and Clean Up!

  • Once the cooking cycle is complete, the Ninja DZ201 may signal you with a sound or notification.
  • Carefully detach the baskets using oven mitts and enjoy your delicious meal!
  • When the appliance cools down, wash the baskets and crisper plates (if used) with warm soapy water. Some parts may be dishwasher safe, so check your manual for cleaning instructions.

Remember: Always check your specific Ninja DZ201 Foodi manual for detailed instructions and safety information.


Tips and Recipes Suitable for the Ninja DZ201 Foodi 8 Quart 6-in-1 DualZone 2-Basket Air Fryer

Ninja DZ201 Foodi: Tips and Recipe Inspiration to Take Your Cooking Up a Notch
The Ninja DZ201 Foodi goes beyond just air frying, offering different kinds of functionalities to simplify your cooking adventures. Here are some tips and recipe ideas to help you get the most out of this multifunctional appliance:

Tips for Using Your Ninja DZ201 Foodi:

  • Master the DualZone Advantage: This is the DZ201’s shining feature! Use it to cook complete meals simultaneously. In one basket, roast some veggies at 400°F, while air frying crispy chicken tenders in the other at 450°F.
  • Smart Finish for the Win: No more waiting for side dishes! Use Smart Finish to program each basket for different cook times. Your food will be ready to eat together, saving you time and frustration.
  • Batch Cooking Made Easy: The 8-quart capacity allows you to cook large groups for meal prep or feeding a crowd. Double a recipe and freeze half for another night!
  • Explore Beyond Air Frying: While air frying is fantastic for crispy goodness, don’t be afraid to try out with the other functions. Roast salmon for a flaky and tasteful main course or dehydrate some fruit slices for healthy snacks.
  • Preheat When Necessary: While some functions work well without preheating, check your recipe or consult the manual for specific recommendations. Preheating can ensure even cooking, especially for roasting or baking.


Recipe Ideas for the Ninja DZ201 Foodi:

  • Crispy Air Fryer Chicken Wings: A classic for a reason! Toss your wings in your favorite sauce or seasoning and air fry for perfectly cooked, crispy wings with little oil.
  • Roasted Vegetables with Herbs: Cut up your favorite veggies like broccoli, Brussels sprouts, and peppers. Toss with olive oil, herbs, and spices, and roast in the DZ201 for a colorful and nutritious side dish.
  • Salmon with Lemon and Dill: This restaurant-worthy dish is surprisingly easy in the DZ201. Season your salmon filet and place it on a bed of lemon slices and fresh dill. Roast for a flaky and tasteful main course.
  • Dehydrated Apple Slices: A healthy and delicious alternative to store-bought snacks. Thinly slice apples, arrange them in a single layer, and dry out using the DZ201’s dehydrate function. Enjoy homemade, healthy apple chips!
  • Frozen French Fries: The DZ201 beats at reheating frozen appetizers like fries and onion rings. Get that restaurant-style crisp without the deep fryer.

With a little creativity and exploration, you can turn your Ninja DZ201 Foodi into a kitchen powerhouse, whipping up delicious and multifunctional meals that will have you abandoning the traditional oven and stove top in no time!


A Cleaning Guide

Keeping your Ninja DZ201 Foodi clean is important for maintaining its performance and longevity. Here’s a breakdown of the cleaning process:

Before You Begin:

  • Unplug the appliance and make sure it’s completely cool before cleaning.
  • Never submerge the main unit in water.

Cleaning the Baskets and Crisper Plates:

  • These are the parts that come into contact with food the most and will likely need the most cleaning attention.
  • The good news is that both the baskets and crisper plates (if applicable) are typically dishwasher safe. Check your manual for confirmation, but most sources recommend putting them on the top rack of your dishwasher for easy cleaning.
  • For stubborn grease or food remnant, you can pre-soak the baskets and crisper plates in warm, soapy water before placing them in the dishwasher.

Cleaning the Interior:

  • The interior of the Ninja DZ201 Foodi, including the heating element, should not be immersed in water.
  • Wipe down the inside with a damp cloth to remove any crumbs or food particles. You can use a light dish soap solution for tougher messes.
  • Avoid using abrasive cleaners or scouring pads, as these can damage the non-stick coating.

Additional Cleaning Tips:

  • The exterior of the appliance can be wiped down with a damp cloth for a quick clean.
  • To remove any crumbs that may have fallen into the bottom cavity of the appliance, you can carefully turn it upside down (unplugged and cool) and wipe away any debris with a damp cloth or paper towel.
  • For areas with stubborn stains, you can try using a slightly damp microfiber cloth.

Remember to consult your Ninja DZ201 Foodi manual for specific cleaning instructions. Following these tips will ensure your air fryer stays clean and functions like new for years to come!


What to Avoid while using the Ninja DZ201 Foodi 8 Quart 6-in-1 DualZone 2-Basket Air Fryer

Here are few things to avoid while using your Ninja DZ201 Foodi to ensure safe and optimal operation:

Overcrowding the Baskets:

  • Resist the urge to stuff too much food into the baskets. Good air circulation is key to achieving crispy results. Overcrowding can lead to uneven cooking and mushy food.

Using Utensils That Can Scratch:

  • The Ninja DZ201 likely has a non-stick coating on the baskets and crisper plates. Avoid using metal utensils that can scratch this coating. Go for silicone or wooden utensils for safe and gentle stirring or flipping your food.

Using Foil or Parchment Paper Incorrectly:

  • While aluminum foil and parchment paper can be helpful for certain recipes, use them with caution. Never cover the entire bottom of the basket with foil, as this can block airflow and hinder cooking performance.
  • If using parchment paper, cut it to a size slightly smaller than the bottom of the basket to prevent it from touching the heating element.

Adding Oil Directly to the Basket:

  • The Ninja DZ201 uses air circulation to achieve a crispy texture, so you typically don’t need to add a lot of oil directly to the basket. Instead, glaze your food lightly with oil using a mister or brush to achieve that crispy perfection with minimal added fat.

Cleaning with Abrasive Scrubbers:

  • As with most non-stick cookware, avoid using abrasive scrubbers or harsh chemicals to clean your Ninja DZ201 Foodi. These can spoil the non-stick coating and shorten the lifespan of your appliance.

Forgetting to Preheat (When Necessary):

  • While the DZ201 boasts some functions that work well without preheating, check your recipe or manual for specific recommendations. Preheating can ensure even cooking, especially for functions like roasting or baking.

Exceeding the Maximum Capacity:

  • Don’t overload the baskets or the appliance itself. Follow the recommended weight limits to avoid damaging the heating element or falter a circuit breaker.

Using the Wrong Wattage Outlet:

  • The Ninja DZ201 is a powerful appliance and requires a specific wattage outlet. Check the manual to ensure you’re plugging it into a circuit with the appropriate amperage to avoid overloading the circuit.

By following these simple tips, you can avoid common mistakes and ensure your Ninja DZ201 Foodi delivers delicious and healthy meals for a long time.

In conclusion, the Ninja DZ201 Foodi air fryer offers double the cooking baskets and functions for a multifunctional kitchen experience. It lets you prepare multiple dishes at once and features user-friendly settings for easy weeknight meals. Despite its bigger size and price, the DZ201 can replace multiple appliances, making it a Valuable investment for busy cooks.

Air fryer

Vortex 6-in-1 Plus 4QT Air Fryer

Instant Vortex Plus 4QT Air Fryer: Mini Powerhouse for Crispy Goodness

Looking to scrap the deep fryer but still crave crispy, flavorful food? The Instant Vortex Plus 4QT Air Fryer might be your new kitchen hero. This compact appliance from the makers of the beloved Instant Pot Offers a variety of healthy and delicious cooking options with a fraction of the oil typically used

Big Features, Small Footprint

The Vortex Plus boasts a 4-quart capacity, Perfectly sized for creating both single-serve meals and sides for small families. Don’t be deceived by the size, though. This air fryer packs a punch with 6-in-1 functionality. You can:

  • Air Fry: Achieve that golden-fried texture on everything from wings and fries to vegetables and tofu.
  • Broil: Lock in juices and caramelize surfaces for restaurant-quality steaks and chops.
  • Roast: Enjoy perfectly cooked chicken, veggies, and more with the ease of a single button.
  • Dehydrate: Preserve fruits, herbs, and veggies for healthy snacks or homemade seasonings.
  • Bake: From cookies and rolls to mini pizzas, this air fryer can handle your baking needs.
  • Reheat: Leftovers never tasted so good! Warm up last night’s dinner with crispy exteriors and perfectly warmed centers.

Smarter Than Your Average Fryer

The Vortex Plus isn’t just multifunctional; it’s smart too. The customizable Smart Programs take the guesswork out of cooking. Simply select your desired function and the air fryer takes care of the rest, ensuring perfectly cooked food every time.

Plus, with over 100 recipes available through the Instant Pot app, you’ll never be short on conception. From appetizers to desserts, the app guides you through the entire process, making it easy to explore the air fryer’s potential.

Cleaning Up is a Breeze

Cleaning greasy messes is a chore most people would rather avoid. Luckily, the Vortex Plus features a non-stick basket that’s dishwasher safe, making cleanup easy.

The Verdict

The Instant Vortex Plus 4QT Air Fryer is a captivating option for those seeking a healthier way to enjoy crispy, delicious food. Its compact size, versatility, and smart features make it a great choice for small kitchens and busy cooks alike.

Considering this air fryer? Here are some additional things to keep in mind:

  • The 4-quart capacity might be limiting for larger families.
  • While the app offers recipe inspiration, it may require a separate smartphone or tablet.

In general, the Instant Vortex Plus 4QT Air Fryer seems like a handy and multifunctional kitchen tool for those looking to explore the world of air frying.


Key Features

Instant Vortex Plus 4QT Air Fryer: Feature Rundown

The Instant Vortex Plus 4QT Air Fryer Boasts a rich feature set in a space-saving design. Here’s a quick breakdown of its key features:

Versatility:

  • 6-in-1 Functionality: Air Fry, Broil, Roast, Dehydrate, Bake, Reheat
  • EvenCrisp Technology: Circulates hot air for crispy, tender results with minimal oil (95% less oil than traditional frying)
  • Adjustable Temperature Range: 95°F to 400°F (for a wide variety of recipes)

Convenience:

  • Compact Design: Perfect for small kitchens or limited counter space
  • 4-Quart Capacity: Perfectly sized for both individual portions and feeding a few
  • Customizable Smart Programs: Pre-programmed settings for easy cooking of popular dishes (e.g., wings, veggies, desserts)
  • Digital Touchscreen Display: Simple and intuitive controls
  • Easy Cleaning: Non-stick basket and tray are dishwasher-safe

Additional Perks:

  • Over 100 Recipes Available Through Instant Pot App: Provides inspiration and guidance for using your air fryer
  • Fast Preheating: Minimal preheating required

Things to Consider:

  • Capacity: Might not be suitable for large families
  • App Integration: Requires a separate smartphone or tablet to access recipes


How to Use the Vortex 6-in-1 Plus 4QT Air Fryer

Here’s a basic rundown on how to use your Instant Vortex Plus 4QT Air Fryer:
1. Get it Ready:

  • Wash the basket and tray with warm soapy water and dry thoroughly.
  • For the first time, Instant Pot recommends running a test run without any food. Check your manual for specific instructions on this initial run.

2. Choose Your Function:

  • The digital touchscreen display highlights buttons for each of the 6 cooking functions (Air Fry, Broil, Roast, Dehydrate, Bake, Reheat). Simply select your desired function.

3. Set Time and Temperature (if applicable):

  • Depending on the function you choose, you may need to adjust the cooking time and temperature. Use the up and down arrows on the display to adjust.
  • Smart Programs might have pre-set options for common dishes, reducing the need to manually set time and temperature.

4. Prepare Your Food:

  • Check your recipe or consult the Instant Pot app for guidance on preparing your food for air frying. Generally, air frying requires little oil, so a light coating or spritz with oil is often enough.
  • Tip: For crispier results, preheat the air fryer for 3-5 minutes before adding your food, especially for frozen items.

5. Load Up the Basket:

  • Put your food in a single layer in the basket, ensuring there’s enough space for air to circulate. Avoid stuffing the basket, as this can affect cooking times and crispness.

6. Cook and Flip (if necessary):

  • Slide the basket into the air fryer and close the door. The air fryer will alert you with a beep to indicate when preheating is complete (if applicable) and again when cooking time is finished.
  • Some Smart Programs or recipes might prompt you to shake or flip the food halfway through cooking for consistent results.

7. Enjoy!

  • Once the cooking cycle is complete, use oven mitts to carefully remove the basket.
  • Let the food cool slightly before Savoring and enjoy your crispy, air-fried creation!

Additional Tips:

  • Check your Instant Vortex Plus 4QT Air Fryer manual for detailed instructions and safety information.
  • The Instant Pot app boasts a treasure trove of air fryer recipes.
  • Don’t be afraid to experiment with different ingredients and cooking times to find your perfect air-frying technique.


Tips and Recipes Suitable for Vortex 6-in-1 Plus 4QT Air Fryer

Instant Vortex Plus 4QT Air Fryer: Tips and Recipe Inspiration

The Instant Vortex Plus 4QT Air Fryer unlocks a world of healthy and delicious possibilities. Here are some tips and recipe ideas to get you started:

Tips for Mastering Your Air Fryer:

  • Preheating: While it’s not always necessary, preheating for 3-5 minutes, especially for frozen foods, can help achieve crispier results.
  • Oil Right: Unlike deep frying, air frying requires minimal oil. A light coating with cooking spray or a brush with olive oil is usually enough.
  • Shake It Up: For even cooking and browning, shaking or flipping your food halfway through cooking is recommended for some recipes (like fries or wings).
  • Don’t Crowd the Basket: Leave space between your food pieces to allow for proper air circulation. Overcrowding can lead to uneven cooking and Mushy results.
  • Start Small: If you’re new to air frying, start with a simple recipe and adjust cooking times based on your desired level of crispiness.
  • Clean Up is Easy: The non-stick basket and tray are dishwasher safe for effortless cleaning.

Recipe Inspiration:

  • Crispy Classics: Air fry your favorite frozen snacks like fries, onion rings, or chicken nuggets for a healthier twist on traditional favorites.
  • Veggie Delight: Explore a world of air-fried veggies! Asparagus, broccoli florets, Brussels sprouts, and zucchini all air fry beautifully. Toss them with your favorite seasonings for a flavorful side dish.
  • Protein Powerhouse: Salmon, chicken breasts, and tofu are all excellent candidates for air frying. Marinate them beforehand for extra flavor.
  • Mini Meals: Get creative with air-fried appetizers and snacks. Try mini quiches, spring rolls, or air-fried dumplings.
  • The Sweet Side: Believe it or not, the air fryer can handle sweet treats too! From air-fried cookies and brownies to mini pies and cinnamon rolls, the possibilities are endless.

Recipe Resources:

  • Instant Pot App: With over 100 air fryer recipes, the Instant Pot app is a treasure trove of inspiration.
  • Air Fryer Cookbooks: Several cookbooks specifically focus on air fryer recipes. These can provide a great starting point with detailed instructions and variations.

Remember, the key to air fryer success is experimentation. With a little practice,in no time you’ll be whipping up delicious and healthy meals.


A Cleaning Guide

Keeping your Instant Vortex Plus 4QT Air Fryer clean is essential for maintaining its performance and longevity. Here’s a rundown on how to handle cleaning:

Safety First:

  • Always unplug the air fryer and let it cool completely before cleaning.

Cleaning the Basket and Tray:

  • These are the dishwasher-safe parts of the air fryer. Simply detach them, wash them with warm, soapy water, and place them on the top rack of your dishwasher.

Cleaning the Interior:

  • For light cleaning, use a damp microfiber cloth to wipe down the interior surfaces.
  • For tougher grease or grime, you have some options:

Baking Soda Paste: Make a paste with baking soda and water. Apply the paste to greasy areas and let it settle for 15-20 minutes. Wipe clean with a damp cloth and then dry thoroughly.

Steam Cleaning (Optional): If you have a handheld steamer, you can use it to loosen stuck-on grease and food particles. Be careful not to infuse the interior with too much steam. After steaming, wipe clean with a damp cloth and dry thoroughly.

Additional Tips:

  • Never use abrasive cleaners, scouring pads, or metallic utensils on any part of the air fryer, as these can damage the non-stick coating.
  • Clean the heating element periodically. After the air fryer has cooled completely, use a soft brush to remove any crumbs or food debris that may have gathered around the element.
  • Wipe down the exterior of the air fryer with a damp cloth as needed.

By following these simple cleaning tips, you can keep your Instant Vortex Plus 4QT Air Fryer looking and functioning its best for years to come! Check your air fryer’s manual for any specific cleaning instructions or warnings.


What to avoid when using your Vortex 6-in-1 Plus 4QT Air Fryer

Here are some things to avoid when using your Instant Vortex Plus 4QT Air Fryer to ensure safe and successful cooking:

Overcrowding: This is a common mistake that can lead to rough cooking and soggy results. Leave space between your food items for air to circulate.

Using Too Much Oil: Unlike deep frying, air frying requires little oil. A light coating with cooking spray or a brush with olive oil is usually enough. Using too much oil can surpass the purpose of air frying and lead to smoking or dripping.

Adding Wet Batter: Wet batters tend to drip and cause splattering during air frying. Consider using a dry coating or breadcrumbs instead, or pre-bake battered items in a traditional oven before moving them to the air fryer for crisping.

Using Incompatible Utensils: Avoid using metal utensils that can scratch the non-stick coating of the basket and tray. Go for silicone or wooden utensils for safe handling.

Forgetting to Preheat (Sometimes): While preheating isn’t always necessary, it can be helpful for frozen foods or achieving a crispier texture. Check your recipe or manual for specific preheating recommendations.

Cleaning with Harsh Chemicals: Abrasive cleaners, scouring pads, and harsh chemicals can spoil the non-stick coating. Stick to warm soapy water, gentle sponges, or baking soda paste for cleaning.

Putting Aluminum Foil Directly on the Basket: Aluminum foil can obstruct air circulation and potentially cause overheating. Use parchment paper liners instead, or place food directly on the basket for perfect results.

Overfilling the Basket: Surpassing the basket’s fill line can restrict airflow and lead to uneven cooking. Stick to the recommended capacity for your chosen recipe.

Leaving the Air Fryer Unattended: It’s always a good practice to check on your food frequently, especially when air frying for the first time with a new recipe.

Using the Wrong Cooking Time or Temperature: Refer to your recipe or check the Instant Pot app for recommended cooking times and temperatures for specific ingredients. Experimenting in small batches is a good way to find your perfect settings.

By following these tips, you can avoid common challenges and ensure safe and delicious air-frying experiences with your Instant Vortex Plus 4QT Air Fryer. Remember, always check your air fryer’s manual for specific instructions and safety warnings.

In essence, the Instant Vortex Plus 4QT Air Fryer is a solid choice for those seeking a healthy way to enjoy crispy food. It’s multifunctional, easy to use, and cleans up well. However, its small capacity might not be perfect for large families, and you might need your smartphone or tablet for recipes.

Instant Vortex 2QT Mini Air Fryer

Big Flavor, Small Footprint: The Instant Vortex 2QT Mini Air Fryer

Seeking a way to cook healthier and crispier food with minimal effort? Look no further than the Instant Vortex 2QT Mini Air Fryer! This compact countertop appliance from the makers of the ever-popular Instant Pot packs a punch of versatility into a space-saving design.

Crispy on the Outside, Juicy on the Inside
This mini air fryer boasts the ability to air fry your favorite foods, from frozen snacks to chicken wings, resulting in a crispy golden exterior and a juicy, flavorful interior – all with little oil. You can finally savor your favorite fried foods without the guilt!

Beyond Air Frying
The Instant Vortex 2QT Mini goes beyond just air frying. It also offers baking, roasting, and warming up functions, making it a multifunctional tool for whipping up quick and easy meals. Bake some delicious pastries, roast some veggies, or reheat leftovers – Multitasking marvel appliance.

Simple and Convenient
This air fryer highlights a user-friendly design with an angled control panel for easy access. Plus, it comes with over 100 in-app recipes to inspire your culinary creations. No matter your cooking skill level, you’ll be a pro in no time.

Clean Up is a Breeze
The detachable basket and crisper tray are dishwasher-safe, making cleanup a breeze. No more scrubbing greasy pots and pans!

Perfect for Small Spaces and Single Serving Needs
The compact size of the Vortex 2QT Mini makes it ideal for apartments, dorm rooms, or kitchens with limited counter space. With a 2-quart capacity, it’s perfect for whipping up single servings or meals for two.

Eye-Catching Aqua Makes a Splash
Who says capability can’t be stylish? The Aqua color option adds a pop of personality to your kitchen counter.

Is the Instant Vortex 2QT Mini Air Fryer Right for You?
If you’re looking for a compact, versatile, and easy-to-use appliance to create healthier and tastier meals, then the Instant Vortex 2QT Mini Air Fryer is definitely a better option. With its ability to air fry, bake, roast, and reheat, along with its dishwasher-safe parts and in-app recipe inspiration, this little air fryer can be a valuable addition to your kitchen power house.


Key Features

Instant Vortex 2QT Mini Air Fryer Features:

  • Multi-functionality: Air fries, bakes, roasts, and reheats for various cooking needs.
  • EvenCrisp Technology: Circulates hot air for crispy, golden results and tender insides.
  • Compact Design: Fits perfectly on countertops with limited space.
  • 2-Quart Capacity: Perfect for single servings or meals for two.
  • Digital Touch Controls: Easy to operate with an angled control panel.
  • Over 100 In-App Recipes: Get inspired and cook delicious meals with the Instant Pot app.
  • Dishwasher-Safe Parts: Basket and crisper tray make cleanup a breeze.
  • Adjustable Temperature Control: Up to 400°F for definite cooking.
  • Auto Shut-Off: Ensures safety and prevents overcooking.
  • Stylish Aqua Color: Adds a pop of personality to your kitchen.


How to Use the Instant Vortex 2QT Mini Air Fryer

Here’s a general guide on how to use your Instant Vortex 2QT Mini Air Fryer:

  1. Prep and Preheat: Wash and dry your food according to the recipe. For air frying, it’s recommended to pat your food dry to promote crisping. Check your recipe or the manual for warming up recommendations, as some functions may require preheating.

2. Load the Basket: Place your food in a single layer in the detachable basket, avoiding overcrowding. Check the manual for maximum capacity recommendations.

3. Choose Your Function: Choose your desired cooking mode (Air Fry, Bake, Roast, Reheat) using the digital touch controls.

4. Set Time and Temperature (if needed): Many functions will have default settings, but you can usually adjust the cooking time and temperature using the up and down arrows. Check your recipe or the included manual for recommended settings for specific foods.

5. Start Cooking: Press the “Start” button to begin the cooking process.

6. Shaking (Optional): For smooth cooking, especially with air frying, shaking the basket halfway through the cooking time is recommended for some foods (like fries or chicken wings).

7. Cooking Complete: The air fryer will alert you with a beep when the cooking cycle is finished. Carefully detach the basket using an oven mitt and check for doneness.

8. Enjoy! Let your food cool slightly before serving and enjoy your delicious and healthy meal.

Additional Tips:

  • Check the included recipe booklet or the Instant Pot app for innovation and specific cooking instructions for various foods.
  • Don’t stuff the basket for optimal airflow and crispy results.
  • Use a silicone or parchment paper liner in the basket for easier cleanup, especially with messy foods.
  • Let the air fryer cool down completely before cleaning.

Remember: It’s always best to check the user manual for your specific Instant Vortex 2QT Mini Air Fryer model for detailed instructions and safety precautions.


Tips and Recipes Suitable for the Instant Vortex 2QT Mini Air Fryer

Instant Vortex 2QT Mini Air Fryer Tips and Recipes:

Here are some tips and recipe ideas to get the most out of your Instant Vortex 2QT Mini Air Fryer:

Tips:

  • Preheating: While not always necessary, preheating your air fryer for 3-5 minutes, especially for baking and roasting, can help obtain crispier results.
  • Shaking it Up: For even cooking and crisping, give the basket a shake halfway through the cooking time, particularly for items like fries, wings, or nuggets.
  • Oil for a Crisp: To promote crisping, especially with homemade items, lightly coat your food with a thin layer of oil (avocado or olive oil work well) before air frying. You can use a mister to apply a light, even coating.
  • Parchment Paper Power: Parchment paper liners are more like your companion! They help prevent sticking, make cleanup a breeze, and can even be used to create little “packets” for steaming vegetables or fish.
  • Leftover Love: The Instant Vortex 2QT Mini Air Fryer is fantastic for reheating leftovers! This can help revive french fries, pizza, or chicken nuggets without the mushiness associated with microwaving.
  • Start Small: When trying a new recipe, start with a shorter cook time and check for doneness. You can always add more time, but make sure it doesn’t get burnt!

Recipe Ideas:
Classic Air-Fried Favorites:

  • Crispy French Fries: Cut potatoes into equal strips, toss with a little oil, and air fry according to recipe or package directions for fries.
  • Buffalo Chicken Wings: Coat your wings in your favorite buffalo sauce and air fry until cooked through and crispy.
  • Air Fryer Onion Rings: Use store-bought frozen onion rings or make your own with sliced onions and a light batter. Air fry until golden brown.
  • Nourishing Chicken Nuggets: Bake or air fry homemade chicken nuggets made with lean ground chicken and whole-wheat breadcrumbs for a healthier twist on a classic.

Beyond the Basket:

  • Roasted Vegetables: Toss your favorite veggies (broccoli, Brussels sprouts, asparagus) with olive oil, herbs, and spices and air roast until tender-crisp.
  • Mini Quiches: Use pre-made pie crust and fill with your favorite quiche ingredients (eggs, cheese, veggies, etc.). Bake in the air fryer until set and golden brown.
  • Salmon with Lemon and Herbs: Spice a salmon filet with lemon, herbs, and olive oil and air fry for a quick and flavorful main course.
  • Reheated Pizza: Give leftover pizza a new life by recrisping it in the air fryer for a crispy crust.

Recipe Inspiration:

  • Don’t forget the Instant Pot app! It has over 100 recipes specifically designed for the Instant Vortex Air Fryer, offering different kinds of options for breakfast, lunch, dinner, and even desserts.
  • Look online for air fryer recipe websites and blogs. There are countless resources dedicated to air fryer cooking, providing lots of inspiration for your next meal.

With a little practice and these tips and recipe ideas, you’ll be whipping up delicious and healthy meals in your Instant Vortex 2QT Mini Air Fryer in no time!


A Cleaning Guide

Keeping your Instant Vortex 2QT Mini Air Fryer clean is easy! Here’s how:

Safety First:

  • Always unplug the air fryer and make sure it’s completely cool before cleaning.

Simple Steps:

1. Basket and Crisper Tray: These are typically the dishwasher-safe parts of the air fryer. Detach them and wash them with warm, soapy water or place them in the dishwasher.

2. Interior Cleaning: Wipe down the interior with a damp, non-abrasive cloth. You can also use a mild dish soap solution for sturdy messes.

3. Exterior Cleaning: Wipe down the outside of the air fryer with a damp cloth for a quick clean. Avoid using harsh chemicals or abrasive cleaners.

For Tough Stains:

If you encounter stubborn grease or baked-on food particles, you can try these methods:

  • Baking Soda Paste: Make a paste with baking soda and water. Apply the paste to the greasy areas and let it sit for 15-20 minutes. Wipe clean with a damp cloth.
  • Lemon Juice: For a natural cleaning option, wipe down the interior with a cloth dipped in lemon juice.
  • Hot Water Soak: For the crisper tray or basket, you can fill a sink with hot, soapy water and let it soak for 30 minutes to soften any stuck-on food particles.

Drying:

  • Once everything is clean, be sure to dry all the parts thoroughly with a clean cloth before storing the air fryer.

Additional Tips:

  • To prevent grease buildup, it’s recommended to clean your air fryer after each use, especially if you’ve cooked greasy foods.


  • Never submerge the air fryer itself in water.

By following these simple cleaning tips, you can keep your Instant Vortex 2QT Mini Air Fryer looking and functioning like new for years to come!


What to avoid while Using the Instant Vortex 2QT Mini Air Fryer

Here are some things to avoid while using your Instant Vortex 2QT Mini Air Fryer to ensure safe and successful cooking:

Overcrowding:

  • Resist the urge to stuff too much food in the basket. Air circulation is key to achieving crispy results, and overcrowding can lead to uneven cooking and soggy food.

Using Too Much Oil:

  • While a light coating of oil can promote crisping, avoid using excessive oil. Air frying is all about reducing fat, and using too much oil defeats the purpose.

Foil Liners:

  • It’s generally not recommended to use traditional foil liners in your air fryer. Metal can block airflow and potentially cause uneven cooking. If you need a liner for easier cleanup, consider using parchment paper liners specifically designed for air fryers.

Abrasive Sponges or Cleaners:

  • The non-stick coating on the basket and crisper tray can be delicate. Avoid using abrasive sponges, scouring pads, or harsh cleaners, as they can scratch the coating.

Unattended Cooking:

  • Just like any other cooking appliance, it’s important to not leave your air fryer unattended while it’s operating. Keep an eye on your food and check for doneness frequently, especially when trying a new recipe.

Flammable Materials:

  • Never place flammable materials like parchment paper that overhangs the basket or utensils inside the air fryer while it’s operating. This is a fire hazard and very risky

Overheating:

  • Don’t exceed the recommended maximum temperature of 400°F (205°C) for your air fryer.

Cutting the Basket:

  • Don’t cut or slice food directly in the basket, as this can damage the non-stick coating. Use a separate cutting board for food preparation.

Very Wet Batters:

  • Avoid using very wet batters in the air fryer, as they can drip and cause smoking. Choose for thicker batters or lightly coat your food with breadcrumbs before air frying.

By following these tips, you can avoid common snags and ensure safe and enjoyable cooking with your Instant Vortex 2QT Mini Air Fryer.

In conclusion, the Instant Vortex 2QT Mini Air Fryer is a great choice for those looking to cook healthier, crispier meals in a compact appliance. Its small size, multiple functions, and user-friendly design make it ideal for small kitchens or single servings.

air fryers

Before You Buy an Air Fryer

20 Factors to Consider Before You Buy an Air Fryer

Air fryers give you healthier versions of our favourite fried foods without sacrificing taste or texture. But before you jump on the bandwagon, here are 20 key factors to consider specifically for American and European kitchens, ensuring you choose the perfect air fryer for your needs.

Air fryer

Sizing Up Your Needs:

  1. Capacity: Consider your household size and typical cooking quantities. Choose an air fryer that can comfortably handle the amount of food you usually prepare for meals or gatherings.
  2. Cooking Functions: Look beyond frying! Does the air fryer offer baking, grilling, roasting, and reheating functions to suit your culinary style and desired versatility?
  3. Power Consumption: Energy efficiency matters! Opt for models with lower wattage to minimize electricity costs in your American or European home.
  4. Countertop Real Estate: Check the dimensions of the air fryer to ensure it fits comfortably on your kitchen counter. This is especially important if you have limited countertop space.

Optimizing Performance:

  1. Temperature Range: A wider temperature range allows for greater cooking flexibility. Look for models that reach high temperatures for frying and lower settings for gentler cooking methods.
  2. Cooking Baskets/Trays: Consider the design and capacity of the baskets or trays. Non-stick, easy-to-clean surfaces are ideal, and the size should accommodate your typical portion sizes.

Convenience and Control:

  1. Presets for Busy Cooks: Pre-programmed settings for common dishes can save time and effort, especially for busy lifestyles.
  2. Safety First: Prioritize air fryers with safety features like automatic shutoff and overheat protection. Cool-touch handles are a bonus to prevent accidental burns.
  3. Intuitive Controls: Opt for user-friendly controls with clear digital displays. Easy-to-understand settings make cooking a breeze.

Investing Wisely:

  1. Brand Reputation: Research reputable brands known for quality and reliability. Check customer reviews to gauge user satisfaction and ensure you’re investing in a trusted product.
  2. Extra Versatility: Consider models with additional accessories like baking pans, racks, or skewers. These extras can expand the air fryer’s capabilities and make it even more versatile.
  3. Budget-Friendly: Set a realistic budget based on affordability and desired features. Compare prices and features of different models to find the best value for your money.

Making an Informed Choice:

  1. Read the reviews: Don’t just go by specs! Read customer reviews for insights into real-world experiences with different models.
  2. Noise Level: Consider the air fryer’s noise level during operation. Quieter models are preferable for open-plan kitchens or noise-sensitive environments.
  3. Warranty Coverage: Verify the warranty period and coverage offered by the manufacturer. A comprehensive warranty protects your investment and provides peace of mind.

Cooking Efficiency:

  1. Cooking Time Matters: Research the cooking time required for various recipes in different air fryer models. Faster cooking times are ideal for busy households.
  2. Easy cleaning is key. Look for air fryers with removable, dishwasher-safe parts for hassle-free cleaning and long-lasting performance.
  3. Precise Temperature Control: Consistent and accurate temperature control ensures optimal cooking results for your favourite dishes.

Expanding Your Culinary Horizons:

  1. Recipe Inspiration: Check if the air fryer comes with recipe books, online resources, or cooking guides. These tools can inspire culinary creativity and help you explore a variety of delicious air-fried recipes.

Local Considerations (Remove for American and European audiences):

20. Local Availability: This section is specific to the Nigerian audience and can be removed for the American and European versions.

By carefully considering these 20 factors, you’ll be well-equipped to choose the perfect air fryer for your American or European kitchen. Embrace healthier, more flavorful cooking without sacrificing convenience. From crispy fries and juicy chicken to perfectly baked pastries, an air fryer can be a valuable addition to your culinary adventures!

SHOP: http://primehomegadget.com

FOLLOW: https://www.instagram.com/primevendors/

MONDIAL Air Fryer – 8.6 Quart Extra-Large Air Fryer

Ditch the Deep Fryer, Embrace Flavor: A Look at the MONDIAL Air Fryer

Do you crave crispy, golden fried foods but apprehend the unhealthy consequences? Well, fear not, fellow food lovers! The MONDIAL Air Fryer is here to transform your kitchen. This innovative appliance allows you to partake in your favorite fried foods, minus the guilt.

Spacious Capacity and Simple Operation:

This isn’t your average air fryer. The MONDIAL boasts a massive 8.6-quart capacity, ideal for whipping up large sets of french fries, chicken wings, or even a whole rotisserie chicken! No more waiting in several rounds to feed the whole family. Plus, with its intuitive design featuring just 2 simple dials, functioning this air fryer is a breeze. No complicated buttons or confusing menus – just set the temperature and time, and let the MONDIAL work its magic.


Healthy Frying Made Easy:

The secret weapon of the MONDIAL Air Fryer lies in its Quick Heat Circulation Technology. This powerful system blasts hot air throughout the entire cooking chamber, ensuring even and effective cooking. The result comes in Crispy exteriors and juicy, flavorful interiors – all achieved with scant oil! This converts to delicious guilt-free indulgence, with significantly less fat and fewer calories compared to traditional deep frying.

Effortless Cleaning:

We can’t deny that cleaning up after a greasy frying frenzy is no one’s idea of fun. But with the MONDIAL Air Fryer, cleanup is really easy. Both the detachable squared basket and the crisper plate are dishwasher safe, making post-frying maintenance a snap.

More Than Just Frying:

The MONDIAL Air Fryer is a multifunctional kitchen companion that goes beyond just frying. With its multiple functionalities, you can bake, broil, roast, dehydrate, and even warm up leftovers, all in one appliance. This not only saves you counter space but also optimizes your cooking process.

So, is the MONDIAL Air Fryer right for you?

If you’re looking for a way to enjoy healthier versions of your favorite fried foods, the answer is yes! With its spacious capacity, user-friendly design, and powerful technology, the MONDIAL Air Fryer makes healthy cooking effortless and delicious.


Key Features

Features of the MONDIAL Air Fryer:

Here’s a more detailed breakdown of the features, along with some additional points to consider:

1. Extra-large 8.6-quart capacity: This is perfect for families or those who like to cook in larger groups.

2. Simple operation with 2 dial controls: This makes it user-friendly for people of all technical abilities. Consider mentioning specific controls like temperature range (e.g., 180°F to 400°F) and timer settings (e.g., up to 60 minutes).

3. Quick Heat Circulation Technology: It explains how this technology works (e.g., rapid air circulation) and the benefit of even cooking.

4. Healthier frying with minimal oil: Mention the percentage of fat reduction compared to traditional deep frying (if available in product specifications).

5. Removable and dishwasher-safe squared basket and crisper plate: This makes cleaning up significantly easier. You can mention the basket’s non-stick coating for additional benefit.

6. Multifunctional: List all the functionalities in detail (e.g., bake, broil, roast, dehydrate, reheat). Consider mentioning pre-programmed settings for specific foods if available.

Additional features to consider including (depending on the model):

  • Digital display for temperature and time
  • Automatic shutoff for safety
  • Recipe book or online recipe collection for inspiration
  • Sleek and stylish design to complement your kitchen

By providing a more in-depth breakdown of the features, you can give readers a clearer picture of what the MONDIAL Air Fryer offers and how it might benefit them.


How to Use the MONDIAL Air Fryer – 8.6 Quart Extra-Large Air Fryer

Cooking Up a Storm with Your MONDIAL Air Fryer: A Step-by-Step Guide

The beauty of the MONDIAL Air Fryer lies in its plainness. Here’s a step-by-step guide to get you started on your journey to healthier, delicious fried foods:

1. Prepping Your Ingredients:

  • The key to successful air frying is proper preparation. Ensure your ingredients are dry to promote smooth crisping. Pat away any excess moisture with paper towels.
  • For best results with French fries or similar foods, consider pre-soaking and drying them to make them extra crispy.
  • You can use a light coating of oil to enhance browning, but it’s not necessary for most foods – a major benefit of air frying!

2. Setting Up Your Air Fryer:

  • Place your MONDIAL Air Fryer on a stable, heat-resistant surface.
  • Plug it in and ensure all dials are set to “off.”
  • Pull out the detachable basket and crisper plate.

3. Filling the Basket:

  • Arrange your chosen ingredients in a single layer on the crisper plate within the basket. Don’t stuff the basket, as this can obstruct air circulation and affect crispiness.
  • A general rule is to leave some space between each piece for optimal airflow.
  • For best results, check your user manual or the manufacturer’s website for recommendations on quantities and optimal layering for specific foods.

4. Selecting Settings and Cooking:

  • Slide out the basket and place it back into the air fryer.
  • Turn the dials to set your desired cooking temperature and time according to your chosen recipe or the recommendations in the user manual.

~ The MONDIAL Air Fryer typically offers a temperature range of 180°F to 400°F and a timer that goes up to 60 minutes.

  • Once set, the MONDIAL Air Fryer will get to work it’s magic! The heating element will quickly bring the air temperature up, and the rapid circulation will ensure smooth cooking.

5. Monitoring and Shaking (Optional):

  • Depending on the food you’re cooking, you might want to check on it halfway through the cooking process.

~ Some ingredients, like French fries or chicken wings, benefit from being shaken to ensure even browning and crispness. Use heat-resistant tongs to carefully shake the basket.

6. Time’s Up! Enjoy!

  • Once the timer beeps, signifying the end of the cooking cycle, carefully pull out the basket using oven mitts.
  • Be cautious of hot steam as you open the basket.
  • Move your perfectly cooked food to a plate and enjoy!

Cleaning Up:

  • The MONDIAL Air Fryer makes cleaning up easy.
  • Both the detachable basket and the crisper plate are dishwasher-safe. Simply allow them to cool down a bit before washing.
  • You can also wipe down the exterior of the air fryer with a damp cloth for easy maintenance.

Tips for Success:

  • Check the user manual that comes with your specific MONDIAL Air Fryer model for detailed instructions and recommendations.
  • Try out with different recipes and cooking times to find what works best for you and your favorite foods.
  • There are many online resources and recipe collections dedicated to air fryer cooking. Explore these for inspiration and amplify your air-frying repertoire!

With a little practice, you’ll be a master of your MONDIAL Air Fryer in no time, whipping up delicious and healthy meals that the whole family will enjoy.


Tips and Recipes Suitable for the MONDIAL Air Fryer – 8.6 Quart Extra-Large Air Fryer

Tips and Tricks to Maximize Your MONDIAL Air Fryer

Here are some additional tips to help you get the most out of your MONDIAL Air Fryer:

  • Preheating: While not always necessary, preheating your air fryer for 3-5 minutes can help ensure even cooking, especially for thicker foods like frozen items or whole roasts.
  • Parchment paper: Parchment paper liners can be your best friend. They help prevent sticking, make cleanup easier, and can even be used to create little pockets for ingredients that might drip (like stuffed peppers). Just be sure to avoid using parchment paper that’s too large and could block airflow.
  • Shaking it up: Shaking the basket halfway through cooking is especially important for foods like fries, tater tots, or chicken wings. This helps redistribute the ingredients and promotes even crisping on all sides.
  • Batch cooking: The MONDIAL Air Fryer’s large capacity is great, but avoid stuffing the basket. Cook food in groups for optimal airflow and crispy results.
  • Leftovers get a new life: Warm up leftovers in your air fryer! This is a great way to stimulate pizza, fries, or chicken nuggets without drying them out. Just use the reheat function or a lower temperature setting for a few minutes.

Delicious and Easy Recipes for Your MONDIAL Air Fryer

The beauty of the MONDIAL Air Fryer is its versatility. Here are some recipe ideas to get you started:

Classic Air Fryer Favorites:

  • Crispy French Fries: A healthier alternative to deep-fried fries, these can be made from scratch or using frozen lace potatoes.
  • Golden Chicken Wings: Perfectly crispy on the outside and juicy on the inside, these are a crowd-pleasing appetizer or main course.
  • Veggie Skewers: Thread your favorite vegetables like peppers, onions, and zucchini onto skewers and air fry for a colorful and healthy side dish.

Beyond the Basics:

  • Air Fryer Salmon: This quick and easy recipe results in perfectly cooked salmon with a crispy skin.
  • Air Fryer Mozzarella Sticks: Enjoy this cheesy appetizer or snack with a fraction of the fat compared to deep-frying.
  • Air Fryer Roasted Vegetables: Roasting vegetables in the air fryer brings out their natural sweetness and creates a tender-crisp texture.
  • Air Fryer Mini Quiches: A fun and delicious breakfast or brunch option, these can be customized with your favorite fillings.

Remember: These are just a starting point! There are endless possibilities for using your MONDIAL Air Fryer. Explore recipe websites and cookbooks dedicated to air fryer cooking to get exposed to new and exciting dishes.


A Cleaning Guide

Effortless Cleaning: Maintaining Your MONDIAL Air Fryer

The MONDIAL Air Fryer is designed for easy cleaning, allowing you to spend less time scrubbing and more time enjoying your delicious creations. Here’s how to keep your air fryer sparkling clean:

After Each Use:

1. Unplug the appliance and let it cool down completely before cleaning. This is important for safety reasons.

2. Remove the basket and crisper plate.

3. Throwaway any leftover food particles. You can use a paper towel or utensil to remove any loose crumbs.

4. Wash the basket and crisper plate in warm, soapy water. Both the basket and crisper plate are dishwasher-safe on the top rack for added accessibility.

5. Wipe down the interior of the air fryer with a damp cloth. You can use a light dish soap solution for tougher grime.

6. Clean the exterior of the air fryer with a damp cloth. A microfiber cloth can help prevent blots.

7. Dry all components thoroughly before reconstructing the air fryer. Moisture left behind can promote rust or mold growth.

Deep Cleaning (Optional):

1. For a more thorough cleaning every few uses, you can soak the basket and crisper plate in warm, soapy water for about 30 minutes to loosen any stubborn grease or food particles.

2. You can also use a soft brush to gently scrub any hard-to-reach areas.

3. Never use abrasive cleaning pads or harsh chemicals on your air fryer, as these can damage the non-stick coating.

Here are some additional tips for keeping your MONDIAL Air Fryer clean:

  • Clean up spills immediately: The sooner you clean up spills, the easier they will be to remove and the less likely for it to get stained.
  • Avoid using metal utensils in the basket: Metal utensils can scratch the non-stick coating. Opt for silicone or wooden utensils instead.
  • Don’t overload the basket: Stuffing can lead to splatter and make cleaning more difficult.

By following these simple cleaning tips, you can ensure your MONDIAL Air Fryer stays in good condition for years to come. With its easy-to-clean design and minimal maintenance requirements, you can focus on what truly matters – enjoying delicious and healthy meals made with your multifunctional air fryer!


What to avoid when using the MONDIAL Air Fryer – 8.6 Quart Extra-Large Air Fryer

Here are some things to avoid when using your MONDIAL Air Fryer to prevent safety hazards and ensure optimal performance:

Overcrowding the Basket:

  • This is a common mistake that can lead to uneven cooking and soggy results. Leave space between your ingredients to allow for proper air circulation and crisping. Check your user manual or recipe recommendations for optimal filling levels.

Using Wet or Marinated Foods:

  • Excess moisture can hinder the crisping process and lead to splatter. Pat dry any wet ingredients like fresh potatoes or meats before placing them in. Marinades can be used, but choose thicker marinades that coat the food without dripping.

Adding Oil Unless Necessary:

  • One of the biggest advantages of air frying is using minimal oil. Most foods don’t require added oil to achieve a crispy texture. You can lightly mist ingredients with oil for browning, but avoid overdoing it.

Using the Wrong Utensils:

  • Metal utensils can scratch the non-stick coating of the basket. Use heat-resistant silicone or wooden utensils for tossing or turning your food during cooking.

Using Parchment Paper Incorrectly:

  • Parchment paper liners can be helpful to prevent sticking and make cleanup easier. However, using a piece that’s too large can block airflow and affect cooking results. Make sure the parchment paper fits the basket comfortably without covering the holes.

Forgetting to Preheat (for some foods):

  • Preheating isn’t always necessary, it can be beneficial for thicker foods like frozen items or whole roasts. Preheating helps ensure smooth cooking, especially for these types of ingredients. Check your user manual for recommendations on when preheating is advised.

Cleaning with Harsh Chemicals:

  • The non-stick coating on the basket and crisper plate is fragile. Avoid using abrasive cleaning pads, scouring powders, or harsh chemicals that can damage the coating. Stick to warm, soapy water or a mild dish soap solution for cleaning.

Ignoring the User Manual:

  • The user manual that comes with your specific MONDIAL Air Fryer model is a valuable resource. It contains important information on recommended uses, safety precautions, cleaning instructions, and troubleshooting tips. Take some time to go through the manual to ensure you’re using your air fryer safely and efficiently.

By following these tips and avoiding these common mistakes, you’ll get the most out of your MONDIAL Air Fryer and enjoy healthy, delicious meals for a long time.

In conclusion, the MONDIAL Air Fryer is a captivating air fryer option with a large capacity, healthy frying capabilities, and user-friendly design. It boasts versatility with baking, broiling, and more, and boasts easy cleaning.If a big capacity, user-friendliness, and healthy cooking are your top priorities, the MONDIAL Air Fryer is worth considering!

fryers

Why People are Getting Rid of Air Fryers?

 Why Are People Getting Rid of Air Fryers? Here’s Why You Shouldn’t!

In recent years, air fryers have skyrocketed in popularity, transforming kitchens and meal preparations across the globe. However, you might have noticed some chatter about people getting rid of their air fryers. Why is that? Are these handy appliances losing their charm, or is there more to the story? This article aims to delve into the reasons why some might part ways with their air fryers and, more importantly, why you should consider holding onto yours or getting one if you haven’t already. By the end of this read, you’ll find more reasons to buy an air fryer than to let go of one.

 Common Reasons People Are Getting Rid of Air Fryers

Before we jump into the myriad reasons why an air fryer is a must-have, let’s first understand why some individuals are choosing to part ways with theirs.

1. Lack of Space

One of the primary reasons people get rid of their air fryers is the lack of kitchen space. Air fryers, especially the larger models, can take up significant counter space. For those with small kitchens, this can be a deal-breaker.

2. Underutilization

Some users find that they don’t use their air fryers as frequently as they anticipated. This underutilization might be due to a lack of understanding of the appliance’s full capabilities or simply not integrating it into their cooking routines.

3. Maintenance and Cleaning

While air fryers are generally easy to clean, some models with intricate parts can be a bit more demanding. Users who don’t enjoy frequent cleaning might find this aspect cumbersome.

4. Cooking Capacity

Families or individuals who cook large quantities of food might find that their air fryer’s capacity doesn’t meet their needs. Cooking in multiple batches can be time-consuming, leading some to revert to traditional ovens.

5. Initial Cost

The upfront cost of a high-quality air fryer can be off-putting for some. Although prices have decreased over the years, some consumers still view it as a significant investment.

 Why You Should Buy an Air Fryer: Debunking the Myths

Now that we’ve explored why some might abandon their air fryers, let’s pivot to why these reasons should not deter you from owning one. In fact, there are compelling reasons why an air fryer could be a game-changer in your kitchen.

1. Space Management: Compact Models Available

Concerned about counter space? Fear not. Air fryers come in various sizes, including compact models designed for smaller kitchens. These mini air fryers deliver the same powerful cooking capabilities without taking up too much room. Investing in a smaller model can solve the space issue while still providing all the benefits of air frying.

2. Maximizing Utilization: More Than Just Frying

Many people underestimate the versatility of an air fryer. Beyond making crispy fries, you can roast vegetables, bake desserts, grill meats, and even dehydrate fruits. By exploring a wider range of recipes and functions, you can make the air fryer an indispensable part of your cooking arsenal. Websites, cookbooks, and apps dedicated to air fryer recipes can inspire you to use your air fryer more frequently.

3. Easy Maintenance: Simplified Cleaning

Modern air fryers are designed with user convenience in mind. Look for models with dishwasher-safe components and non-stick coatings that make cleaning a breeze. Regular maintenance involves simple tasks like wiping down the exterior and ensuring the heating element remains clean. These minimal efforts are well worth the hassle-free cooking experience.

4. Adequate Cooking Capacity: Options for Every Need

If you need more cooking capacity, consider larger models or those with multiple racks. Some air fryers come with dual-zone cooking capabilities, allowing you to cook two different dishes simultaneously. This feature can significantly reduce cooking time, making it easier to prepare meals for larger families or gatherings.

5. Cost-Effectiveness: Long-Term Savings

While the initial investment might seem high, consider the long-term savings. Air fryers can reduce cooking times, which saves on energy costs. Additionally, they require less oil, leading to savings on cooking oil over time. The health benefits associated with reduced oil consumption can also translate to potential savings on healthcare in the long run.

 The Unmatched Benefits of Owning an Air Fryer

Let’s delve deeper into the numerous benefits that make air fryers a valuable addition to any kitchen.

1. Healthier Cooking

One of the most significant advantages of an air fryer is its ability to produce healthier meals. By using up to 80% less oil than traditional frying methods, air fryers allow you to enjoy your favorite fried foods with fewer calories and less fat. This can be a game-changer for those looking to maintain a healthy diet without sacrificing taste.

2. Versatility in Cooking

Air fryers are incredibly versatile. They can fry, bake, roast, and grill, making them a multi-functional appliance. Whether you’re making crispy chicken wings, baking a batch of cookies, or roasting a juicy pork loin, an air fryer can handle it all. This versatility can simplify meal prep and reduce the need for multiple kitchen appliances.

3. Time Efficiency

Air fryers cook food faster than traditional ovens. The rapid air circulation technology ensures even cooking and crisping, reducing overall cooking times. This efficiency can be a lifesaver on busy weekdays when you need to prepare meals quickly.

4. Energy Efficiency

Air fryers generally use less energy than conventional ovens. Since they cook food faster and don’t require preheating, they can save on electricity bills. This energy efficiency makes them an environmentally friendly choice as well.

5. Safety Features

Modern air fryers come equipped with various safety features, including automatic shut-off, cool-touch handles, and non-slip feet. These features make them safer to use, especially in households with children.

6. Consistency and Precision

Air fryers offer precise temperature control, ensuring consistent cooking results every time. Whether you’re reheating leftovers or cooking a gourmet meal, you can count on your air fryer to deliver perfect results with minimal effort.

7. Convenience and Ease of Use

Most air fryers are designed with user-friendly interfaces and preset cooking programs, making them incredibly easy to use. Simply select the appropriate setting, and the air fryer does the rest. This convenience can make cooking less intimidating for beginners and more efficient for seasoned chefs.

 Real-Life Testimonials: Why Users Love Their Air Fryers

To further emphasize the value of air fryers, let’s hear from real users who have incorporated them into their daily routines:

Mary, 34 – Busy Professional

“I absolutely love my air fryer! As someone with a hectic work schedule, I appreciate how quickly I can prepare meals. It’s perfect for making healthy dinners after a long day, and I’ve even started experimenting with air fryer desserts. It’s truly a versatile and indispensable tool in my kitchen.”

John, 45 – Health Enthusiast

“Switching to an air fryer has been a game-changer for my diet. I can enjoy all my favorite fried foods without the guilt. The reduced oil consumption has made a noticeable difference in my overall health, and the food tastes just as delicious as traditionally fried dishes.”

Emily, 29 – New Mom

“With a newborn at home, time is of the essence. My air fryer has made it so much easier to prepare nutritious meals quickly. I love that it’s safe to use and easy to clean, which is a huge plus when you’re juggling baby duties. It’s been a lifesaver for our family.”

Mark, 52 – Cooking Enthusiast

“As someone who loves experimenting in the kitchen, the air fryer has opened up a world of possibilities. From perfectly roasted vegetables to homemade jerky, I’ve been able to create a variety of dishes with ease. It’s a fantastic appliance that adds value to my culinary adventures.”

 Making the Most of Your Air Fryer

To fully harness the potential of your air fryer, here are some tips and tricks to enhance your cooking experience:

1. Explore Recipes

Take advantage of the vast array of recipes available online and in cookbooks dedicated to air frying. From appetizers to desserts, there’s no shortage of inspiration to keep your meals exciting and varied.

2. Use the Right Accessories

Invest in air fryer accessories like baking pans, grilling racks, and skewers to expand your cooking repertoire. These tools can help you prepare a wider range of dishes and make the most of your air fryer’s capabilities.

3. Experiment with Seasonings

Don’t be afraid to experiment with different seasonings and marinades. The high-speed air circulation in air fryers helps lock in flavors, so you can create deliciously seasoned dishes with minimal effort.

4. Batch Cooking

If you’re cooking for a larger group, consider batch cooking. Prepare your ingredients in advance and cook them in batches to ensure even cooking and optimal results. This approach can save time and make meal prep more efficient.

5. Monitor Cooking Times

Each air fryer model is slightly different, so it’s important to monitor cooking times, especially when trying new recipes. Start with recommended times and adjust as needed to achieve the perfect level of crispiness and doneness.

 Conclusion: Embrace the Air Fryer Revolution

While some might choose to part with their air fryers due to various reasons, the undeniable benefits of owning one far outweigh the drawbacks. Air fryers offer a healthier, more efficient, and versatile way to cook, making them a valuable addition to any kitchen. By understanding and addressing the common concerns, you can make an informed decision and fully enjoy the myriad advantages that air fryers bring.

If you’re considering adding an air fryer to your kitchen or rekindling

your interest in one, now is the perfect time. With countless models, sizes, and features available, there’s an air fryer to suit every need and preference. Embrace the air fryer revolution and discover how this incredible appliance can transform your cooking experience, making mealtime healthier, faster, and more enjoyable.

So, what are you waiting for? It’s time to invest in an air fryer and elevate your culinary adventures to new heights. Happy air frying!

Nostalgia 0.7 Cu Ft Retro Air Fryer Oven

Bringing Back the Classics: An assessment of the Nostalgia Retro Air Fryer Oven (in Red!)
Let’s face it, modern kitchens sometimes can be a bit banal. All that stainless steel and sleek design is great, but it can lack a certain…glamor. If you’re someone who loves the warmth and personality of vintage appliances, then the Nostalgia 0.7 Cu Ft Retro Air Fryer Oven might be your ideal match. This little red beauty combines modern functionality with a classic look, and it does it all in a compact size.

Style With Substance

The first thing that grabs one attention about this oven is definitely the design. It’s a dead ringer for the surface ovens of the good old days, with pewter accents and that cheerful red finish. It’s sure to add a pop of color and a touch of vintage charm to your kitchen. But don’t be deceived by the good looks, this oven makes a big impact.

Multi-Functioning Marvel

This isn’t just some pretty prop for your counter. The Nostalgia oven boasts different kinds of functions that make it a kitchen workhorse. With settings for baking, toasting, air frying, and broiling, you can whip up everything from crispy fries to golden brown pizzas. The 0.7 cubic feet capacity is surprisingly spacious, allowing you to fit in a surprising amount of food. Imagine, perfectly toasted bagels for breakfast, deliciously air-fried veggies for lunch, and a treacly chocolate chip cookie fix in the evening – all from the same appliance!

User-Friendly Features

This appliance offers convenience. The oven features an adjustable temperature control ranging from 200° to 450°F, so you can fine-tune your cooking for any recipe. A built-in 60-minute timer with an audible alert ensures you won’t overcook your food, and two nickel-plated racks and a baking pan provide everything you need to get started. Plus, a handy crumb tray makes cleanup easy.


Key Features

Nostalgia Retro Air Fryer Oven: Features at a Glance

The Nostalgia Retro Air Fryer Oven mixes the best of both worlds: classic design with modern functionality. Here’s a quick briefing of its features:

  • Retro Design: A charming red finish with chrome accents that brings a touch of vintage style to your kitchen.
  • Multi-Functioning: Bake, toast, air fry, and broil! This oven offers different kinds of settings to handle all your cooking needs.
  • Large Capacity (0.7 cu ft): Despite its compact size, it can fit 12 slices of bread or even two 12-inch pizzas.
  • Adjustable Temperature Control (200°F to 450°F): Fine-tune your cooking for optimal results every time.
  • Four-Stage Heating Selection: Choose upper, lower, upper & lower heating elements, or turn it off for complete control.
  • Built-in 60-Minute Timer with Auto Shut-Off: No more overcooked food. The timer will alert you when your food is done and automatically shut off for safety.
  • Easy Cleanup: Includes two nickel-plated racks, a baking pan, and a detachable crumb tray for effortless cleaning.

The bottom line is that this oven offers a lot of functionality in a user-friendly and stylish package.


How to use the Nostalgia 0.7 Cu Ft Retro Air Fryer Oven

The Nostalgia Retro Air Fryer Oven seems a bit straightforward to use, but here’s a breakdown to get you started:

  • Getting Started: Before you plug it in, make sure to remove any packaging materials and wash the racks, crumb tray, and baking pan with warm soapy water.
  • Choose Your Function: This oven offers a variety of settings – Bake, Toast, Air Fry, and Broil. Check your recipe or the manufacturer’s instructions (which might be available online if you don’t have a physical manual) to determine the best setting for your food.
  • Temperature and Time: Once you’ve chosen your function, use the knobs to set the desired temperature (between 200°F and 450°F) and cooking time (up to 60 minutes).
  • Preheat (Optional): While not always necessary, some recipes might recommend preheating the oven, especially for baking. Simply set the function and temperature you’ll be using for your recipe and let the oven heat up for a few minutes before placing your food inside.
  • Load Up: Place your food on the racks or baking pan, ensuring there’s enough space for air circulation (especially important for air frying). Check your recipe for specific rack placement if needed.
  • Let it Work its Magic: Close the oven door and let the timer do its job. You can check on your food through the window, but avoid opening the door too frequently as this can affect cooking times and temperatures.
  • Enjoy!: Once the timer goes off, carefully remove your food using oven mitts. Remember, the oven will be hot, so use caution.
  • Cleaning Up: Let the oven cool down completely before cleaning. The removable crumb tray and racks make cleaning up easy. You can wash them with warm soapy water, just like you did before using the oven for the first time.

Here are some additional tips:

  • Always check your recipe for specific cooking times and temperatures.
  • It’s a good idea to use oven mitts whenever handling hot racks or pans.
  • Avoid using metal cookware or utensils in the air fryer setting, as they can scratch the non-stick coating.
  • For best air frying results, don’t overcrowd the basket or pan. Leave some space for air to circulate around your food.

With a little practice, you’ll be a master of your Nostalgia Retro Air Fryer Oven in no time!


Tips and Recipes Suitable for your Nostalgia 0.7 Cu Ft Retro Air Fryer Oven

Nostalgia Retro Air Fryer Oven: Tips and Recipe Inspiration

The Nostalgia Retro Air Fryer Oven offers a variety of functions, allowing you to explore different recipes and cooking styles. Below are some tips and recipe ideas to get you started:

General Tips:

  • Preheat: While preheating isn’t always necessary, it can be helpful for baking tasks like cookies or cakes. Follow recipe instructions for preheating times and temperatures.
  • Don’t Crowd: Especially for air frying, avoid congesting the basket or pan. This allows for better air circulation and crispier results.
  • Flip or Shake: For air frying, occasionally flipping or shaking your food (like fries or chicken wings) ensures even cooking and browning.
  • Leftovers Reheated: The Nostalgia oven is great for reheating leftovers. Use the toast or air fry setting to bring back that crispy texture.
  • Small Batch Baking: The oven’s capacity is perfect for small-batch baking. This is perfect for satisfying sweet cravings without leftovers tempting you!

Recipe Ideas:

Air Frying:

  • Crispy French Fries: A classic! Cut your potatoes into sticks, toss them with a little oil and seasoning, and air fry for delicious guilt-free fries.
  • Air Fryer Chicken Wings: Who doesn’t love buffalo wings? Use the air fryer setting to get them nice and crispy on the outside while remaining juicy on the inside.
  • Roasted Vegetables: Broccoli, cauliflower, Brussels sprouts – the possibilities are endless! Toss your veggies with some olive oil, herbs, and spices, and air fry for a healthy and flavorful side dish.

Baking:

  • Mini Quiches: These are perfect for a quick breakfast or brunch. Use the baking pan and preheat the oven for a flaky crust.
  • Small-Batch Cookies: Feeling like a chocolate chip cookie? This oven is perfect for satisfying those cravings without a giant batch staring you down.
  • Chicken Nuggets or Tenders: Homemade chicken tenders or nuggets are easy to whip up and bake in your Nostalgia oven for a healthier alternative to takeout.

Beyond these ideas, there are tons of recipes online specifically designed for air fryer ovens. Just search for “air fryer recipes” or “retro air fryer oven recipes” and you’ll find plenty of inspiration to discover.

Here are some additional tips for finding recipes:

  • Look for recipes that specify cooking times and temperatures for air fryer ovens or toaster ovens, as these will be most compatible with your Nostalgia oven.
  • Many recipe websites allow you to filter recipes by appliance, so you can search for “air fryer” or “toaster oven” recipes specifically.
  • Don’t be afraid to experiment! The Nostalgia oven’s versatility allows you to try out different recipes and cooking techniques.

With a little creativity, you can use your Nostalgia Retro Air Fryer Oven to create delicious and healthy meals and snacks.


A Cleaning Guide

Keeping your Nostalgia Retro Air Fryer Oven sparkling clean is very easy! Here’s how:

Before Cleaning:

  • Always unplug the oven and let it cool completely before cleaning. This is important for safety reasons to avoid burns and electrical shock.

Cleaning the Interior:

  • Crumb Tray: This detachable tray catches any fallen food particles. Simply slide it out and dump the crumbs. You can wash it with warm soapy water and a soft sponge.
  • Racks and Baking Pan: These are also removable and can be washed with warm soapy water and a soft sponge. For stubborn grease or food remnants, you can sprinkle them with baking soda and let them sit for a few minutes before scrubbing gently.
  • Interior Walls and Door: For light cleaning, wipe down the interior surfaces with a damp microfiber cloth. For tougher grease stains, you can create a paste with baking soda and water. Apply the paste to the greasy areas, let it sit for 15-20 minutes, then wipe it clean with a damp cloth. Never use harsh chemicals or abrasive cleaners on the interior, so as to prevent the non-stick coating from any damage.

General Tips:

  • Don’t immerse the oven itself in water. Just wipe down the exterior surfaces with a damp cloth.
  • Avoid using metal scouring pads or abrasive sponges, as they can scratch the non-stick coating.
  • Let everything dry completely before reconstructing the oven.

By following these simple cleaning tips, you can keep your Nostalgia Retro Air Fryer Oven looking and functioning like new for years to come.


What to avoid when Using the Nostalgia 0.7 Cu Ft Retro Air Fryer Oven

Here are some things to avoid when using your Nostalgia Retro Air Fryer Oven to keep it functioning well and ensure safe cooking:

Overcrowding:

  • Especially important for air frying, avoid stuffing too much food into the basket or baking pan. This is because proper air circulation is important for even cooking and crispy results. Too much food can make air not to circulate effectively, leading to uneven cooking and soggy textures.

Using Metal Utensils:

  • The Nostalgia oven likely has a non-stick coating on the racks and baking pan. Avoid using metal utensils like forks, knives, or spatulas when handling food in the oven. Metal can scratch the non-stick coating, potentially reducing its effectiveness and even causing flaking. Use silicone or wooden utensils instead, as these are more gentle on the non-stick surface.

Adding Oil Directly to the Basket:

  • When air frying, it’s recommended to toss your food with a light coating of oil for best results. However, avoid pouring oil directly into the basket. This can pool at the bottom and potentially lead to smoking or burning. Instead, toss your food with oil in a bowl before placing it in the basket for air frying.

Using the Wrong Cooking Temperatures:

  • Always check your recipe or the manufacturer’s instructions for recommended cooking times and temperatures for specific foods. Using temperatures that are too high can burn your food or damage the oven. Conversely, temperatures that are too low might not cook your food thoroughly.

Cleaning with Harsh Chemicals:

  • The Nostalgia oven likely has a non-stick coating that can be easily damaged by harsh chemicals or abrasive cleaners. Avoid using scouring pads, steel wool, or abrasive cleaning products. Stick to warm soapy water, a soft sponge, or a microfiber cloth for cleaning the interior.

Forcing the Door Open:

  • If you need to check on your food while cooking, use the oven window. Avoid opening the door frequently, especially during air frying, as this can stall the cooking temperature and affect the final results.

By following these tips, you can get the most out of your Nostalgia Retro Air Fryer Oven and enjoy delicious and healthy meals for a long time.

In conclusion, the Nostalgia Retro Air Fryer Oven offers the perfect blend of vintage charm and modern functionality for your kitchen. It’s a multifunctional appliance that lets you bake, toast, air fry, and broil a variety of foods. With its large capacity (despite its compact size) and user-friendly controls, it’s perfect for small apartments, suites, or even as a secondary oven in a larger kitchen. The detachable racks, crumb tray, and easy-to-clean interior make maintenance easy. While it’s not suited for heavy-duty cooking tasks, this little red oven is a great choice for anyone who wants to add a touch of retro style and functionality to their kitchen.

GANIZA Food Processors, Electric Chopper

GANIZA Food Processor: A Time-Saving Kitchen Powerhouse
Do you fear chopping mountains of vegetables for dinner? Or maybe grinding meat for burgers feels like a task? If you’re looking for a way to simplify your food prep routine, the GANIZA Food Processor might be your new best friend in the kitchen.

Multifunctional Marvel

This food processor isn’t a one-trick pony. It boasts a powerful 450W copper motor that handles various kitchen tasks. With two sets of bi-level stainless steel blades, you can:

  • Chop and mince vegetables effortlessly, from delicate herbs to sturdy root vegetables.
  • Grind meat for burgers, meatballs, or even sausage stuffing.
  • Prepare baby food with smooth textures ideal for little eaters.
  • Whip up dips and sauces like salsa or guacamole.
  • Crush nuts for desserts, salads, or homemade nut butter.

Built for Efficiency

The GANIZA Food Processor comes with two BPA-free bowls: an 8-cup glass bowl for tasks where you can see what’s happening and an 8-cup stainless steel bowl for colder ingredients. Plus, it features two-speed settings, allowing you to tailor the chopping or grinding to the specific food item.

This appliance is designed with convenience in mind. The blades are detachable for easy cleaning, and the simple push-to-start operation makes using it a breeze.

Here’s what users love about the GANIZA Food Processor:

  • Saves time: No more tedious chopping or hand-grinding meat. This food processor gets the job done quickly and effectively.
  • Versatility: With multiple functions and blade options, it handles a wide range of food prep tasks.
  • Easy to clean: The detachable blades and dishwasher-safe bowls make cleanup a breeze.
  • Durable construction: The copper motor and stainless steel blades are built to last.

Is the GANIZA Food Processor Right for You?

If you’re looking for a way to simplify your food prep and enjoy more time in the kitchen creating delicious meals, then the GANIZA Food Processor is definitely worth considering. Its functionality, ease of use, and durability make it a great addition to any kitchen.

Additional points to consider before your purchase:

  • While user reviews mention the power of the motor, some users may prefer a larger capacity for bigger jobs.
  • Consider your budget and compare highlights with other food processor options on the market.

With its combination of power, versatility, and ease of use, the GANIZA Food Processor has the potential to become a valuable asset in your kitchen.


Key Features

GANIZA Food Processor Features:

1. Versatile: Chops, minces, grinds, blends, whips, and crushes.

2. Powerful Motor: 450W copper motor for tough tasks.

3. Double Bowls:

  • 8-cup glass bowl for visibility.
  • 8-cup stainless steel bowl for cold ingredients.

4. Two Sets of Bi-Level Stainless Steel Blades:

  • For chopping/mincing vegetables, meat grinding, and baby food prep.

5. Two-Speed Settings: Tailor power to the food item.

6. Easy to Use: Push-to-start operation.

7. Easy to Clean: Detachable blades and dishwasher-safe bowls.

8. Safe: Automatic shut-off and overheat protection.

9. BPA-Free: Ensures safe food contact.


How to Use the GANIZA Food Processors, Electric Chopper

Conquering the Kitchen with Your GANIZA Food Processor: A Step-by-Step Guide
The GANIZA Food Processor is designed to be user-friendly, and with a little know-how, you’ll be whipping up culinary creations in no time. Here’s a breakdown on how to use it:

1. Assemble the Appliance:

  • Choose the appropriate bowl for your task. The glass bowl allows you to see the progress, while the stainless steel bowl is ideal for colder ingredients.
  • Place the chosen bowl on the motor base, aligning the markings.
  • Attach the desired blade set. Ensure it clicks securely into place.

2. Prep Your Ingredients:

  • Cut larger vegetables or fruits into bits that will fit comfortably in the bowl.
  • For grinding meat, ensure it’s trimmed of excess fat and cut into small cubes.
  • Frozen fruits or vegetables may need some defrosting for easier processing.

3. Power Up and Process:

  • Fill the bowl with your ingredients, ensuring you don’t overload it. Check the user manual for recommended quantities.
  • Place the lid securely on the bowl.
  • Plug in the appliance.
  • Most GANIZA models highlight a push-to-start operation. Simply press the button to begin processing.
  • For some models, you may have two-speed options. Choose “Low” for softer ingredients or delicate tasks like making baby food. Use “High” for tougher ingredients like nuts or meat grinding.
  • If your model has a “Pulse” function, use it for short bursts of chopping, especially for fragile ingredients you want to retain some texture, like salsa or pesto.

4. Time to Stop:

  • For continuous processing tasks, keep an eye on the consistency of your ingredients through the lid (if using the glass bowl).
  • Once you achieve the desired texture, stop the processor.
  • Most models will have a stop button, while some may require you to release the pressure on the start button.

5. Disassemble and Clean Up:

  • Unplug the appliance before dismantling.
  • Carefully detach the lid.
  • Detach the blades by pressing the release button (check your user manual for specific instructions).
  • Empty the bowl.
  • Wash the blades and bowl with warm soapy water. You can also put them in the dishwasher (top rack recommended).
  • Wipe down the motor base with a damp cloth.

Safety Tips:

  • Never operate the food processor without the lid securely secured.
  • Don’t stuff the bowl.
  • Avoid processing very hot ingredients to prevent damage to the appliance.
  • Unplug the appliance before dismantling or cleaning.

By following these steps and checking your user manual for specific model details, you’ll be a GANIZA Food Processor pro in no time!


Tips and Recipes Suitable for the GANIZA Food Processors, Electric Chopper

GANIZA Food Processor: Tips and Recipe Inspiration
The GANIZA Food Processor’s multifunctionality opens doors to a world of culinary possibilities. Here are some tips and recipe ideas to get you started:

Tips:

Pulse vs. Continuous Processing:

  • Use the pulse function for short bursts when you want some texture, like salsa or chopped nuts.
  • Use continuous processing for blending ingredients like baby food or hummus.

Prep Matters: Preparing your ingredients properly ensures smooth processing. Cut vegetables and fruits into similar-sized bits to avoid uneven chopping.

Don’t Overload: Respect the capacity limitations of your bowls. Overfilling can lead to uneven processing or motor strain. Check your user manual for recommended quantities.

Frozen Treats: Frozen fruits can be used to create delicious sorbet or frozen yogurt in your food processor. Just tap them until smooth!

Recipe Inspiration:

  • Fresh and Flavorful Salads: Effortlessly chop vegetables like cabbage, carrots, and peppers for coleslaw or a colorful salad in seconds.
  • Homemade Hummus: Create creamy and delicious hummus from scratch using chickpeas, tahini, olive oil, lemon juice, and garlic.
  • Restaurant-Style Guacamole: Pulse avocados, onions, tomatoes, cilantro, lime juice, and spices for a crowd-pleasing guacamole.
  • Perfect Pesto: Whip up tasteful pesto with fresh basil, pine nuts, garlic, parmesan cheese, and olive oil.
  • Quick and Easy Sauces: From marinara to salsa, the food processor helps create smooth and tasteful sauces in minutes.
  • Baby Food Powerhouse: Prepare healthy and nutritious baby food blends from steamed vegetables, fruits, or cooked meats.
  • Desserts Made Easy: Make pie crusts, crumble toppings, or even nut butter in a flash with the help of your food processor.

Additional Resources:

  • The GANIZA user manual will likely have some recipe suggestions specific to your model.
  • Look online for recipe websites that have filters for “food processor recipes.”
  • Don’t be afraid to venture! The GANIZA Food Processor opens doors to endless recipe possibilities.

With a little creativity and these helpful tips, your GANIZA Food Processor can become your secret weapon in the kitchen, saving you time and effort while creating delicious dishes.


A Cleaning Guide

Keeping your GANIZA Food Processor clean is essential for maintaining hygiene and perfect performance. Here’s a breakdown on how to clean it effectively:

Disassembling for Cleaning:

  • Unplug the appliance: Safety first! Always unplug the food processor before dismantling it for cleaning.
  • Remove the lid: Carefully lift the lid straight up from the bowl.
  • Detach the blades: Most GANIZA models have a release button for the blades. Check your user manual for specific instructions on removing the blades in your model.

Cleaning the Parts:

Blades: Wash the blades with warm, soapy water. You can use a soft bristled brush to remove any stubborn food particles. Be cautious while handling the sharp blades.

Bowl: Wash the bowl with warm, soapy water. Both the glass and stainless steel bowls are dishwasher-safe (place on the top rack recommended).

Lid: Wipe the lid with a damp cloth. You can also wash the lid with soapy water, but avoid submerging the motor base into the water.

Motor Base: Wipe down the motor base with a damp cloth to remove any food remnant. Never submerge the motor base in water or any other liquids.

Drying:

  • Allow all the parts to air dry completely before reconstructing the food processor.
  • You can also use a clean dish towel to pat them dry.

Additional Tips:

  • For tougher stains or food buildup, you can soak the blades and bowl in warm, soapy water for a while before washing them.
  • Don’t use harsh chemicals, abrasive sponges, or scouring pads on any parts of the food processor, as they can damage the surfaces.
  • If your food processor has any nooks or crannies where food particles tend to get lodged, use a cotton wipe dipped in soapy water to clean those areas.

By following these cleaning steps and following the specific instructions in your user manual, you can ensure your GANIZA Food Processor stays clean, hygienic, and functions perfectly for a long time.


What to Avoid when Using the GANIZA Food Processors, Electric Chopper

Here are some things to avoid when using your GANIZA Food Processor to keep it running smoothly and safely:

Don’t Force It:

Overfilling: Resist the urge to stuff too many ingredients into the bowl. Check your user manual for recommended capacities to avoid straining the motor and ensure smooth processing.

Large Chunks: Pre-cut dense vegetables and fruits into manageable pieces before processing, especially for tougher items like root vegetables. This reduces stress on the motor and blades.

Frozen Ingredients: Avoid processing frozen solid ingredients like ice cubes or rock-hard vegetables. These can spoil the blades and strain the motor. Let them melt partially for easier processing.

Hot Ingredients: Hot liquids or ingredients can damage the plastic components of the bowl. Let them cool slightly before processing.

Misusing the Buttons:

  • Continuous Processing for Delicate Chopping: For chores like making salsa or pesto where you want some texture, use the pulse function in short bursts. Continuous processing will turn everything into mush.

General Cautions:

  • Improper Assembly: Ensure all parts are securely attached before starting the motor. This prevents uneven processing and potential safety hazards.
  • Unattended Operation: Never leave the food processor unattended while it’s running. Keep an eye on the consistency of your ingredients and stop the processor when you achieve the desired texture.
  • Wrong Tool for the Job: The GANIZA Food Processor isn’t designed for powerful tasks like mixing dough or grinding large quantities of grains. It’s better suited for chopping, grinding, and blending tasks.
  • Cleaning with Harsh Chemicals: Avoid using abrasive sponges, scouring pads, or harsh chemicals on any part of the food processor, to avoid damaging the surfaces. Stick to warm soapy water and a soft sponge or dishcloth.

By following these tips and following the instructions in your user manual, you can avoid damaging your GANIZA Food Processor and ensure it operates safely and effectively for a long time.

In conclusion, If you’re looking to simplify your food preparation and enjoy more time creating delicious meals, the GANIZA Food Processor is a captivating option. Its powerful motor and multiple blade configurations handle various tasks, from chopping veggies to grinding meat. The user-friendly design with push-to-start operation and dishwasher-safe parts makes it easy to use and clean. Remember to follow the recommended capacities and avoid forcing the appliance for perfect performance and longevity. With a little creativity, this versatile food processor can become your kitchen companion for effortless meal prep adventures.

dehydrators

15 Major Difference with Dehydrators and Air Fryer

Exploring the Culinary Universe: 15 Major Differences Between Dehydrators and Air Fryers

In the world of modern cooking appliances, two contenders stand out for their versatility and ability to transform ingredients into delectable delights: dehydrators and air fryers. While both are powerful tools in the kitchen, they serve distinct purposes and offer unique advantages. Let’s delve into the 15 major differences that set these culinary companions apart, uncovering surprising facts along the way.

1. Primary Function:
– Dehydrators: Designed primarily for removing moisture from foods, preserving their shelf life while retaining nutrients and flavour.
– Air Fryers: Specialize in producing crispy, golden-brown textures using hot air circulation, mimicking the results of deep frying with significantly less oil.

When it comes to food preservation and flavour enhancement, dehydrators are the go-to appliance. They work by circulating warm air around the food at low temperatures, typically between 95°F to 165°F (35°C to 74°C), to gently remove moisture. This process effectively preserves the nutritional content of the food while intensifying its flavour. Dehydrators are commonly used for drying fruits like apples, bananas, and mangoes, creating chewy and concentrated snacks bursting with natural sweetness.

On the other hand, air fryers revolutionize the way we enjoy crispy foods without excessive oil. The magic lies in their rapid air technology, which circulates hot air around the food at high speeds, creating a crispy outer layer while maintaining a moist interior. This method significantly reduces the amount of oil needed compared to traditional deep frying, making air-fried foods healthier without compromising on taste or texture. From crispy fries and chicken wings to crunchy vegetables and even desserts like churros, air fryers offer a guilt-free way to indulge in your favorite fried treats.


dehydrator          Air fryers

2. Versatility:
– Dehydrators: Ideal for creating dried fruits, vegetables, herbs, and jerky, perfect for snacks, trail mixes, and long-term storage.
– Air Fryers: Suited for cooking a wide range of foods, including fries, chicken wings, vegetables, and even desserts like doughnuts and cakes.

One of the key distinctions between dehydrators and air fryers is their versatility in the kitchen. Dehydrators excel at transforming fresh produce into nutritious snacks that are perfect for on-the-go munching or enhancing your culinary creations. You can easily make your own dried fruits such as apricots, raisins, and cranberries, packed with vitamins, minerals, and antioxidants. Additionally, dehydrators are ideal for preserving herbs from your garden, ensuring you have a steady supply of aromatic seasonings year-round.

Air fryers, on the other hand, offer a wide range of cooking possibilities beyond just fried foods. While they excel at creating crispy textures for classics like French fries and chicken nuggets, they also shine in preparing vegetables, meats, seafood, and even desserts. Imagine enjoying perfectly crispy yet tender Brussels sprouts, succulent air-fried salmon fillets, or decadent molten lava cakes, all achieved with minimal oil and maximum flavour.

3. Cooking Time:
– Dehydrators: Typically require extended hours (6–12 hours) to dry foods thoroughly.
– Air Fryers: Cook food relatively quickly, with most dishes ready in 20–30 minutes, making them ideal for busy schedules.

Time is of the essence in today’s fast-paced world, and both dehydrators and air fryers offer efficient cooking solutions suited to different needs. Dehydrators operate at low temperatures over extended periods, ranging from 6 to 12 hours, depending on the type and thickness of the food being dried. While this slow and steady approach ensures thorough dehydration and preservation of nutrients, it requires planning ahead, making it ideal for batch processing or overnight use.

On the contrary, air fryers are designed for speed and convenience, delivering crispy results in a fraction of the time it takes for traditional cooking methods. Most air-fried dishes are ready within 20 to 30 minutes, making them perfect for quick meals or satisfying cravings without a long wait. Whether you’re preparing a weeknight dinner or hosting a last-minute gathering, the rapid cooking capabilities of air fryers save you time and energy without compromising on taste.

4. Texture and Taste:
– Dehydrators: Yield chewy, concentrated flavours ideal for dried fruits and snacks.
– Air Fryers: Produce crispy exteriors while maintaining tender interiors, enhancing the overall taste and mouthfeel.

Texture and taste are paramount in culinary experiences, and both dehydrators and air fryers excel in delivering delightful outcomes. Dehydrators are renowned for creating chewy and intensely flavoured snacks that retain the essence of the original ingredients. Dried fruits like mango slices or apple rings become concentrated bursts of natural sweetness, perfect for snacking, baking, or adding to cereals and granola mixes.

In contrast, air fryers work their magic by achieving the coveted crispy texture associated with deep-fried foods, but with significantly less oil. This innovative cooking method results in golden-brown exteriors that are crunchy and satisfying, while the interiors remain moist and tender. From crispy chicken tenders to crunchy vegetable chips, air-fried dishes boast a delightful contrast of textures that elevate the overall taste experience.

5. Nutrient Retention:
– Dehydrators: Preserve nutrients like vitamins and minerals due to low-temperature drying.
– Air Fryers: Retain nutrients better compared to deep fryers, as they require minimal oil for cooking.

Preserving the nutritional value of foods is a priority for health-conscious individuals, and both dehydrators and air fryers offer advantages in this regard. Dehydrators employ gentle heat and airflow to remove moisture from foods without compromising their nutritional content. This low-temperature drying process helps retain essential vitamins, minerals, and antioxidants present in fruits, vegetables, and herbs, making dried snacks a wholesome choice.

Similarly, air fryers promote healthier cooking by reducing oil consumption while maintaining the desired texture and flavour. Compared to deep frying, which involves submerging food in hot oil, air frying requires only a fraction of the oil, or sometimes none at all, depending on the recipe. This translates to a lower calorie and fat intake, making air-fried foods a preferable option for those seeking healthier alternatives without sacrificing taste or indulgence.

6. Food Preparation:
– Dehydrators: Require slicing foods thinly for even drying.
– Air Fryers: Can accommodate larger pieces of food, reducing preparation time.

Efficiency in food preparation can make a significant difference in the kitchen, and understanding the requirements of dehydrators and air fryers can streamline your cooking process. Dehydrators work best with thinly sliced or uniformly sized pieces of food to ensure even drying. This preparation step is crucial for achieving consistent results and preventing uneven dehydration, especially for fruits, vegetables, and meats.

On the contrary, air fryers offer more flexibility in terms of food size and preparation. They can accommodate larger pieces of food, such as chicken breasts or whole potatoes, reducing the need for extensive slicing or chopping. This convenience not only saves time but also allows for a variety of meal options, from individual servings to family-sized portions, all cooked to perfection with crispy exteriors and juicy interiors.

7. Energy Consumption:
– Dehydrators: Typically consume less energy due to longer drying times.
– Air Fryers: Utilize rapid air technology, requiring more power but cooking food faster.

Energy efficiency is

an important consideration in today’s environmentally conscious world. Both dehydrators and air fryers have distinct energy consumption profiles that cater to different cooking styles and time requirements.

Dehydrators, with their longer drying times ranging from several hours to overnight, are designed to operate at low temperatures consistently. This characteristic results in lower energy consumption compared to appliances that require rapid heating or cooling cycles. While the exact energy usage varies depending on the model and duration of use, dehydrators generally consume less power per hour than air fryers due to their slower and steady operation.

On the other hand, air fryers leverage rapid air technology to cook food quickly and efficiently. The high-speed circulation of hot air ensures even cooking and crispy textures in a fraction of the time required for traditional cooking methods. However, this rapid cooking process may lead to higher energy consumption per hour of use compared to dehydrators. Despite this, the overall energy efficiency of air fryers shines through in their ability to cook meals swiftly, reducing overall kitchen time and energy usage for many households.

8. Storage Space:
– Dehydrators: Generally larger in size, requiring ample counter or storage space.
– Air Fryers: Compact designs make them suitable for smaller kitchens or countertop use.

Kitchen real estate is precious, and the size and design of cooking appliances can greatly impact usability and convenience. Dehydrators, with their trays for spreading out food evenly during drying, tend to be bulkier and occupy more space on countertops or in storage areas. Their larger footprint is ideal for batch processing or preserving larger quantities of food, making them a valuable addition for those with ample kitchen space.

In contrast, air fryers are designed with compactness in mind, featuring a sleek and space-saving design suitable for smaller kitchens or limited countertop areas. Their basket or tray configurations optimize cooking capacity while minimizing the appliance’s overall size. This makes air fryers a practical choice for individuals or families living in apartments, condos, or smaller homes where space optimization is crucial without compromising on cooking capabilities.

9. Cost Consideration:
– Dehydrators: Often more affordable upfront, with a range of models catering to different budgets.
– Air Fryers: Can be pricier, especially high-capacity or feature-rich models, but offer versatility in cooking styles.

Budget plays a significant role in choosing kitchen appliances, and both dehydrators and air fryers offer options across a range of price points to suit diverse financial considerations. Dehydrators, with their simpler designs focused on dehydration functions, are generally more affordable upfront. Entry-level models with essential features can be budget-friendly, making them accessible to those looking to start preserving foods or making homemade snacks without breaking the bank.

On the other hand, air fryers may have a higher initial cost, especially for models with larger capacities or advanced features such as digital controls, preset cooking programs, and additional accessories. However, their versatility in cooking a wide range of foods—from crispy appetizers to main dishes and desserts—adds value and convenience that justify the investment for many households. Furthermore, the potential savings in oil consumption and healthier cooking options contribute to the long-term cost-effectiveness of air fryers.

10. Noise Level:
– Dehydrators: Operate quietly, making them suitable for overnight use.
– Air Fryers: Produce noise due to the fan and heating element, although they are not excessively loud.

Kitchen appliances’ noise levels can impact overall comfort, especially during extended use or nighttime cooking. Dehydrators are known for their quiet operation, with most models producing minimal noise during the drying process. This quiet performance makes them ideal for overnight use, allowing you to set them up before bedtime and wake up to perfectly dried fruits, vegetables, or jerky without disturbances.

On the contrary, air fryers generate some noise due to the fan and heating element working together to circulate hot air and cook food evenly. While the noise level is generally moderate and not excessively loud, it’s worth considering if you prefer a quieter cooking environment. Many users find the noise level of air fryers manageable, especially considering the quick cooking times they offer, allowing for crispy and delicious meals without significant disruptions.

11. Ease of Cleaning:
– Dehydrators: Have removable trays and easy-to-clean components.
– Air Fryers: Require regular cleaning of the basket or tray and internal surfaces.

Maintenance and cleaning are essential aspects of appliance ownership, ensuring longevity and hygienic cooking experiences. Dehydrators are designed with user convenience in mind, featuring removable trays or shelves that are easy to clean and dishwasher-safe in many cases. This design allows for thorough cleaning between uses, preventing residue buildup, and maintaining optimal drying performance.

Air fryers require regular cleaning of their cooking basket or tray, as well as internal surfaces exposed to food and oil splatters during cooking. Most air fryer baskets are non-stick and dishwasher-safe, simplifying the cleaning process. Additionally, wiping down the interior of the air fryer with a damp cloth after each use helps maintain cleanliness and prevents odours. While air fryers may require slightly more frequent cleaning due to cooking oils and food particles, their removable components and straightforward cleaning procedures make maintenance manageable for most users.

12. Cooking Capacity:
– Dehydrators: Can handle large batches of food, making them perfect for preserving seasonal produce or making snacks in bulk.
– Air Fryers: Offer varying capacities, catering to individual servings or family-sized meals.

The cooking capacity of an appliance is crucial, especially for households preparing meals for multiple individuals or occasions. Dehydrators excel at handling large batches of food, making them ideal for preserving seasonal produce or creating snacks in bulk quantities. Whether you’re drying trays of sliced fruits, herbs from your garden, or marinated jerky strips, dehydrators provide ample space and consistent results for batch processing.

Air fryers come in a range of capacities to suit different needs, from compact models suitable for individual servings to larger units capable of preparing family-sized meals. This versatility allows you to choose an air fryer size that aligns with your typical cooking requirements, whether you’re preparing a quick snack for yourself or hosting a dinner party. Consider the cooking capacity that best fits your lifestyle and meal-planning habits when selecting an air fryer.

13. Recipe Adaptability:
– Dehydrators: Recipes are specific to drying foods, with adjustments for temperature and time.
– Air Fryers: Recipes range from traditional fried foods to healthier alternatives, providing culinary creativity.

The versatility of cooking appliances extends to the variety of recipes they can accommodate, allowing for culinary exploration and creativity in the kitchen. Dehydrators focus on recipes tailored to drying foods, with adjustments needed for temperature settings and drying times based on the type of food being processed. From fruit leather and vegetable chips to homemade jerky and dried herbs, dehydrator recipes offer a spectrum of healthy and flavorful options.

Air fryers offer a broader range of recipe possibilities, from classic fried foods like crispy chicken wings and onion rings to healthier alternatives such as air-fried vegetables, seafood, and even desserts. Many air fryer recipes involve minimal oil or utilize healthier cooking techniques, making them appealing to those seeking nutritious yet satisfying meals. The ability to experiment with various seasonings, coatings, and cooking times in an air fryer opens doors to culinary innovation and discovering new favourite dishes.

14. Health Considerations:
– Dehydrators: Promote healthy snacking by preserving nutrients and avoiding added sugars or preservatives.
– Air Fryers: Reduce oil consumption, making them a healthier choice for fried foods without sacrificing taste.


The health-conscious consumer often prioritizes kitchen appliances that support nutritious eating habits without compromising on flavor. Dehydrators play a vital role in promoting healthy snacking by preserving the natural nutrients, vitamins, and minerals present in fruits, vegetables, and herbs. Unlike store-bought dried snacks that may contain added sugars, preservatives, or artificial flavours, homemade dehydrated foods offer a wholesome alternative free from undesirable additives. This makes them an excellent choice for individuals looking to reduce their intake of processed snacks and incorporate more whole foods into their diet.


Air fryers contribute to healthier cooking practices by significantly reducing oil consumption compared to traditional deep frying methods. The hot air circulation technique used in air fryers achieves crispy textures with minimal oil, leading to a lower calorie and fat content in fried foods. This makes air-fried dishes a preferred option for those seeking healthier versions of their favourite fried treats, from crispy chicken tenders and potato wedges to crunchy vegetable chips. By promoting oil-free or oil-reduced cooking, air fryers support a balanced approach to enjoying indulgent foods without compromising on nutritional goals.


15. Culinary Innovation:

– Dehydrators: Enable creativity in making homemade snacks, fruit leathers, and preserving seasonal produce.

– Air Fryers: Inspire culinary experimentation with crispy textures and healthier versions of fried favourites.


Cooking enthusiasts thrive on creativity and experimentation in the kitchen, and both dehydrators and air fryers offer avenues for culinary innovation.


Dehydrators empower users to unleash their creativity by making homemade snacks and preserving seasonal produce at its peak freshness. From crafting fruit leathers and vegetable chips to drying fresh herbs for culinary use, dehydrators open up a world of possibilities for homemade treats and pantry staples. Imagine enjoying a medley of dried fruits in trail mix, adding homemade dried tomatoes to pasta dishes, or creating flavorful herb blends for seasoning various dishes—all made possible with a dehydrator’s versatility.


Air fryers ignite culinary exploration by providing a healthier approach to classic fried favourites while maintaining crave-worthy textures. The ability to achieve crispy exteriors without excess oil extends beyond traditional fried foods to include innovative recipes like air-fried avocado fries, crispy tofu bites, and even dessert creations like air-fried cinnamon sugar doughnuts. This versatility encourages home cooks to reimagine familiar dishes in healthier ways, using less oil and incorporating nutrient-rich ingredients for delicious results.


In conclusion, the 15 major differences between dehydrators and air fryers highlight their unique features, functions, and culinary capabilities. While dehydrators excel in preserving foods’ natural nutrients, creating homemade snacks, and extending shelf life, air fryers offer speedy cooking times, crispy textures, and healthier alternatives to deep-fried foods. Understanding these distinctions empowers individuals to make informed choices based on their cooking preferences, dietary goals, and kitchen space considerations. Whether you’re drying fruits for snacking, air-frying vegetables for a nutritious meal, or experimenting with new recipes, both dehydrators and air fryers serve as invaluable assets in modern kitchens, unlocking endless culinary possibilities.

SHOP: http://primehomegadget.com

FOLLOW: https://www.instagram.com/primevendors/

BLACK+DECKER 3-Cup Electric Food Chopper

Make Meal Prep a Breeze with the BLACK+DECKER 3-Cup Food Chopper (HC300B)
Chopping vegetables can be a wearisome chore, slowing you down in the kitchen. If you’re looking for a quick and easy way to handle this task, then the BLACK+DECKER 3-Cup Electric Food Chopper (HC300B) might be your new best friend! This compact and simple appliance is a great addition to any kitchen, offering a simple solution for chopping, mincing, and preparing different varieties of ingredients.

Small but Mighty

This little chopper is optimal for everyday tasks like whipping up dips, salsas, dressings, breadcrumbs, and more. It’s ideal for those who live alone or in small households, or for anyone who wants to avoid breaking out the bulky food processor for smaller jobs.

Simple One-Touch Operation

This food chopper is all about convenience. With its one-touch pulse operation, you have complete control over the chopping process. Simply press the button in short bursts for a coarse chop, or hold it down for a finer consistency. No complex settings or dials to worry about – just effortless chopping at your fingertips.

Sharp Performance

Equipped with a stay-sharp stainless steel blade, the HC300B handles tough ingredients with ease. You can trust this blade to deliver even results, time and time again. Plus, the dishwasher-safe design makes cleanup a breeze – simply toss the detachable parts in the dishwasher for easy cleaning.

Here’s a quick recap of the BLACK+DECKER 3-Cup Food Chopper’s key features:

  • Compact 3-cup capacity – ideal for small kitchens and everyday tasks
  • Powerful 175-watt motor for effective chopping
  • One-touch pulse operation for easy control
  • Stay-sharp stainless steel blade for consistent results
  • Dishwasher-safe removable parts for easy cleaning

Beyond the Basics

The HC300B isn’t just for chopping vegetables. Here are a few other ways you can use this multifunctional kitchen tool:

  • Grind nuts and seeds for homemade nut butters, pesto, or salad toppings.
  • Create fresh breadcrumbs from leftover bread.
  • Pulse fresh herbs for tasteful sauces and marinades.
  • Prepare baby food effortlessly.

Overall, the BLACK+DECKER 3-Cup Food Chopper (HC300B) is a great option for anyone who wants to refine food prep in the kitchen. Its compact size, user-friendly design, and powerful motor make it an essential tool for home cooks of all levels.


Key Features

Here’s a quick rundown of the features mentioned in the blog post:

  • Compact size: 3-cup capacity, perfect for small kitchens and everyday tasks.
  • Easy to use: One-touch pulse operation for simple control over chopping coarseness.
  • Powerful motor: 175-watt motor for effective chopping of various ingredients.
  • Sharp blades: Stay-sharp stainless steel blade ensures consistent chopping performance.
  • Easy cleaning: Dishwasher-safe detachable parts for effortless cleanup.

Additional features not mentioned in the blog:

  • Ergonomic design: May include a soft grip handle for comfortable use (depending on the model).
  • Safety features: May have a safety locking lid to prevent accidental operation (depending on the model).
  • Oil holes: May have a lid with small holes for adding oil during food processing, like making dressings (depending on the model).


How to Use your BLACK+DECKER 3-Cup Food Chopper (HC300B)

Here’s how to use the BLACK+DECKER 3-Cup Food Chopper (HC300B):

1. Prepare your ingredients:

  • Wash and cut your ingredients into pieces that will fit comfortably in the chopper bowl. Pre-cutting larger vegetables like carrots or potatoes will ensure they chop evenly.

2. Assemble the chopper:

  • Place the blade assembly in the bottom of the chopper bowl. Make sure it’s securely attached (check the manual if needed).
  • Add your chopped ingredients to the bowl.

3. Chop with control using the pulse function:

  • Attach the lid to the bowl securely. There might be a locking mechanism depending on the model, so ensure it’s properly locked for safe operation.
  • Plug in the chopper.
  • Use the one-touch pulse operation to chop your ingredients. Here’s how the pulse function typically works:

> Short pulses will result in a coarser chop. Give the motor short bursts (think fractions of a second) to get the desired texture.

> Holding down the button for longer pulses will create a finer mince.

4. Stop when you reach the desired consistency:

  • Constantly monitor the chopping process through the clear bowl (if available) to avoid over-chopping.
  • Once you’ve achieved the desired consistency, release the pulse button and unplug the chopper.

5. Empty the chopped ingredients and clean:

  • Carefully detach the lid and blade assembly.
  • Transfer the chopped ingredients to a bowl or container.
  • The BLACK+DECKER 3-Cup Chopper (HC300B) typically has dishwasher-safe removable parts (bowl, lid). Check the manual for specific cleaning instructions for your model. You can wash the blade assembly by hand using warm soapy water, but be cautious of the sharp blades.

Safety Tips:

  • Always unplug the chopper before dismantling or cleaning.
  • Never put your fingers near the blades while the chopper is plugged in.
  • Don’t process hot liquids in the chopper bowl.
  • Make sure the lid is properly secured before operating the chopper.

By following these steps, you can use your BLACK+DECKER 3-Cup Food Chopper safely and efficiently to simplify your food prep chore in the kitchen!


Tips and Recipes Suitable for the BLACK+DECKER 3-Cup Electric Food Chopper

Tips and Recipes for the BLACK+DECKER 3-Cup Food Chopper (HC300B)
The BLACK+DECKER 3-Cup Food Chopper (HC300B) is a handy tool for speeding up food prep. Here are some tips and recipe ideas to get the most out of your chopper:

Tips:

  • Pulse, don’t hold: Use the pulse function to achieve the desired consistency. Holding down the button for too long can turn your ingredients soft.
  • Pre-cut large or hard ingredients: For best results, pre-cut larger or harder vegetables like carrots, potatoes, or nuts into bits that fit comfortably in the bowl.
  • Chop soft and hard ingredients separately: If your recipe involves both soft and hard ingredients, chop them separately to avoid over-processing the softer ones.
  • Use the chopper for repetitive tasks: Chopping herbs, garlic, or onions can be tiresome. This chopper is perfect for these repetitive tasks, freeing you up for other parts of your recipe.
  • Make your own breadcrumbs: Refresh old bread by pulsing it into breadcrumbs for breading, stuffing, or topping casseroles.
  • Grind spices: You can grind small quantities of spices like peppercorns or cumin seeds in the chopper.
  • Think beyond savory: The chopper isn’t just for vegetables. Use it to make fresh fruit salsas, dips, or even baby food.
  • Oil for dressings: Some models have lids with oil holes, allowing you to drizzle oil while pulsing ingredients for dressings or sauces.

Recipes Suitable for the Chopper:

Fresh and flavorful:

  • Pico de Gallo: Throb together tomatoes, onions, cilantro, lime juice, and jalapenos (optional) for a quick and refreshing salsa.
  • Herb Pesto: Mix fresh basil, pine nuts, garlic, parmesan cheese, and olive oil for a delicious pesto sauce for pasta or sandwiches.
  • Guacamole: Chop avocado, onions, cilantro, lime juice, and tomatoes for a classic guacamole.

Easy and delicious dips:

  • Hummus: While a traditional hummus recipe might call for a food processor, you can use the chopper to make a smaller batch of hummus with chickpeas, tahini, olive oil, lemon juice, and garlic.
  • Whipped Feta Dip: Mix crumbled feta cheese, olives, olive oil, lemon juice, and oregano for a creamy and tasteful dip perfect with pita bread or vegetables.

Time-saving shortcuts:

  • Garlic Paste: No more mincing! Simply throw garlic cloves in the chopper for a quick and easy garlic paste for your recipes.
  • Chopped Nuts for Baking: Use the chopper to chop nuts for cookies, cakes, or salads.
  • Breadcrumbs: Reprocess leftover bread into fresh breadcrumbs for breading or topping casseroles.

Remember, these are just a few ideas to get you started. With a little creativity, you can use your BLACK+DECKER 3-Cup Food Chopper to tackle a variety of food prep tasks in the kitchen.

A Cleaning Guide

The BLACK+DECKER 3-Cup Electric Food Chopper (HC300B) is dishwasher safe, but for a more complete picture, here’s a detailed cleaning tip:

Easy Cleaning with a Dishwasher

The beauty of the HC300B is its dishwasher-safe parts. After chopping your ingredients, simply dismantle the unit (check the manual for proper disassembly if needed). The bowl, lid, and blade can be placed on the top rack of your dishwasher for a thorough cleaning.

For a Hand-Washing Option

If you prefer to wash by hand, you can do so with warm, soapy water. Just be sure to unplug the appliance first! Gently wash the bowl, lid, and blade with a dishcloth or sponge. For any stubborn food bits, you can use a soft-bristled brush.

Drying: After washing by hand or dishwasher, be sure to dry all the parts completely with a clean dishcloth before storing the appliance. This will help prevent rust and the growth of bacteria.

Remember: Never submerge the base of the motor unit in water! Wipe it down with a damp cloth if needed.


What to Avoid When Using the BLACK+DECKER 3-Cup Electric Food Chopper

Here are some things to avoid when using the BLACK+DECKER 3-Cup Electric Food Chopper (HC300B):

Exceeding Capacity:

  • Don’t overload the chopper. The 3-cup capacity is there for a reason. Chopping too much food at once can strain the motor and lead to uneven results. It can also make it harder to achieve the desired consistency for your ingredients.

Wrong Ingredients:

  • The HC300B isn’t meant for super hard ingredients. Avoid using it for things like very hard nuts, coffee beans, or ice cubes. These can spoil the blade and potentially overload the motor.

Hot Ingredients:

  • Let hot ingredients cool down before chopping them in the HC300B. The heat can warp the plastic bowl and potentially damage the appliance.

Continuous Use:

  • The HC300B is designed for pulsed operation. Don’t hold down the button for a long period of time. This can overheat the motor and shorten the longevity of the appliance. Take short bursts with the pulse control for perfect results.

Improper Assembly:

  • Always ensure the chopper is properly constructed before use. An improperly assembled chopper can leak, malfunction, or even cause injury. Check the user manual for proper assembly instructions.

Forcing the Lid:

  • If the lid doesn’t fit easily, don’t force it. There might be food particles stuck or the chopper might not be assembled correctly. Check for any blockages and reconstruct if necessary.

By following these tips, you can ensure your BLACK+DECKER 3-Cup Electric Food Chopper (HC300B) operates safely and effectively for a long time.

In conclusion, the HC300B by BLACK+DECKER is a win for small kitchens and quick chopping tasks. Its one-touch pulse and dishwasher-safe parts make food preparation easy. Just remember to avoid overloading and stick to softer ingredients for optimal outcome.

Bear Electric Food Processor Chopper

Bear Food Processor: Unleash Your Inner Chef with Effortless Chopping!
Looking to refine your meal prep and conquer kitchen duties with ease? Look no further than the Bear Food Processor! This versatile appliance is your one-stop shop for chopping, grinding, and blending different kinds of ingredients.

Power and Performance:

This mighty machine packs a punch with a 400-watt motor, making it proficient at handling both soft and hard ingredients. Whether you’re shredding cheese, mincing vegetables, or grinding meat, the Bear Food Processor handles the job effortlessly.

Double the Bowls, Double the Convenience:

This food processor comes equipped with not one, but two BPA-free glass bowls! The large 8-cup bowl offers ample capacity for family meals and set cooking, while the smaller 2.5-cup bowl is perfect for prepping smaller portions or chopping herbs and spices. Plus, the clear glass construction allows you to monitor your ingredients as you process them.

Versatility at Your Fingertips:

With two sets of sharp stainless steel blades, this food processor provides lasting versatility. Use the chopping blades for tasks like onions, vegetables, nuts, and cheese. Switch to the S-blades for finer grinding, perfect for creating meat pastes, breadcrumbs, or baby food.

Effortless Control, Delicious Results:

The user-friendly design features a simple 2-speed control knob. Choose the low setting for delicate tasks like chopping fruits and vegetables, or switch to the high setting for tougher ingredients like nuts and hard cheeses.

Cleaning Up a Breeze:

The dishwasher-safe parts make cleanup a breeze! Simply fling the blades and bowls into the dishwasher and relax – the Bear Food Processor takes care of the rest.

More Than Just Chopping:

This food processor isn’t just for chopping vegetables! It can be your secret weapon for creating dips, sauces, salsas, and even homemade nut butters. Plus, it lets you whip up perfectly smooth baby food for your little one.

The Bear Food Processor: Your Kitchen Companion

With its powerful motor, double bowls, versatile blades, and user-friendly controls, the Bear Food Processor is a beneficial addition to any kitchen. It saves you time and effort, allowing you to focus on the joy of cooking and creating delicious meals for your family.

Ready to unlock a world of culinary possibilities? Invest in the Bear Food Processor today!


 Key Features

Bear Food Processor: Feature Breakdown
Here’s a quick breakdown of the key features of the Bear Food Processor, identifying the benefits for potential buyers:

Double Bowl System:

  • 8-cup bowl: Ideal for meal prep and processing large quantities of ingredients.
  • 2.5-cup bowl: Optimal for smaller tasks like chopping herbs, spices, or preparing baby food.
  • BPA-free glass bowls: Allow easy monitoring of ingredients during processing.

Powerful Performance:

  • 400-watt motor: Handles a variety of ingredients with ease, from soft fruits to hard cheeses and nuts.
  • Effortless chopping, grinding, and puréeing: Saves time and reduces the use for prep work manually.

Versatile Blades:

Two sets of stainless steel blades:

  • Chopping blades for vegetables, nuts, cheese, etc.
  • S-blades for finer grinding of meat, breadcrumbs, or baby food.

Offers a variety of functions: Meets different food preparation needs.

Simple 2-Speed Control:

  • Low setting: Ideal for brittle tasks like chopping fruits and vegetables.
  • High setting: It is perfect for tougher ingredients like nuts and hard cheeses.
  • User-friendly control knob: It ensures ease of operation for any skill level.

Easy Cleaning:

  • Dishwasher-safe parts: Blades and bowls can be cleaned in the dishwasher without wasting time and effort.
  • Reduces post-processing cleanup.

Additional Benefits:

  • Time-saving: Minimizes food prep time compared to manual chopping and grinding.
  • Versatility: Creates dips, sauces, salsas, nut butters, and baby food.
  • Compact and convenient: Stores easily on your countertop.

This highlight breakdown provides potential buyers with a clear understanding of the Bear Food Processor works and benefits it offers.


How to Use the Bear Electric Food Processor Chopper

Conquering the Kitchen with Your Bear Food Processor: A Step-by-Step Guide
The Bear Food Processor is your key to effortless food prep! Here’s a step-by-step guide to get you started and unleashing your inner chef:

Before You Begin:

1. Wash the Parts: Wash the bowl and blades with warm soapy water before your first use. Dry them thoroughly before attaching.

2. Choose Your Bowl: Select the suitable bowl size based on your recipe. The 8-cup bowl is perfect for larger batches, while the 2.5-cup bowl is perfect for smaller tasks.

3. Pick Your Blade: Select the blade set that best fits your needs. The chopping blades are designed for vegetables, nuts, cheese, etc., while the S-blades are for finer grinding of meat, breadcrumbs, or baby food.

Assembly and Operation:

1. Place the Bowl: Securely position the chosen bowl onto the motor base, positioning the markings.

2. Attach the Blades: Carefully insert the chosen blade set into the center shaft of the bowl, ensuring it clicks securely into place.

3. Add Your Ingredients: Place your prepared ingredients into the bowl. Remember, don’t overload the processor for perfect results. Check your user manual for recommended quantities.

4. Secure the Lid: Put the lid firmly on top of the bowl, matching the tabs with the slots on the motor base.

Chopping and Processing:

1. Power Up: Plug the appliance into a power outlet and select your desired speed using the control knob.

2. Pulse or Hold: For tasks requiring short bursts, use the “pulse” function by repeatedly pressing the button. For continuous processing, hold down the button.

3. Process Until Desired Consistency: Briefly pulse or hold the button until your ingredients reach the desired consistency. Avoid over-processing, especially with softer ingredients.

After Use:

1. Turn Off and Unplug: Always turn off the appliance and unplug it from the power outlet before dismantling.

2. Disassemble Carefully: Carefully detach the lid, then remove the blades by holding the plastic center shaft and twisting the blade set counter-clockwise.

3. Cleaning Up: Wash the blades and bowls with warm soapy water. You can also toss them in the dishwasher (top rack recommended). Wipe down the motor base with a damp cloth.

Tips and Tricks:

  • Pre-cut larger vegetables or fruits for easier processing, especially when using the smaller bowl.
  • Pulse chopping is perfect for achieving a chunky salsa or retaining some texture in your ingredients.
  • Use the short pulse function to prevent over-processing softer ingredients like herbs or cooked vegetables.
  • Shred cheese using short pulses to avoid grinding it.
  • For tasks requiring a smooth consistency, like baby food or dips, hold down the button and process for a longer duration.

Safety Reminders:

  • Never operate the appliance without the lid properly secured.
  • Keep hands and utensils away from the blades while the processor is in operation.
  • Unplug the appliance before dismantling or cleaning.

With this guide and a little practice, you’ll be a Bear Food Processor pro in no time! Enjoy creating delicious and healthy meals with the smallest effort.


Tips and Recipes Suitable for your Bear Electric Food Processor Chopper

Bear Food Processor: Tips, Tricks, and Recipes to Unlock Its Potential
Your Bear Food Processor is a multifunctional kitchen companion waiting to be explored! Here are some tips, tricks, and recipe ideas to help you get the most out of it:

Tips and Tricks:

  • Master the Pulse: Don’t underrate the power of the “pulse” function. It’s optimal for achieving a coarse chop for vegetables in salsa or salad, or for maintaining some texture in dips and chutneys.


  • Embrace Short Pulses for Soft Ingredients: Learned from chopping herbs the hard way? Use short pulses for soft ingredients like cooked vegetables or fresh herbs to avoid turning them soft.


  • Grate Cheese Like a Pro: Short pulses are your friend for cheese grating! This prevents the cheese from turning into a powdery mess.


  • Don’t Overload: The Bear Food Processor is powerful, but resist the urge to overload the bowl. This can lead to uneven processing and strain the motor. Check your user manual for recommended quantities for each task.


  • Prepping Makes Perfect: For faster and more effective processing, especially when using the smaller bowl, pre-cut larger vegetables or fruits into manageable bits.


  • Thaw and Drain: For grinding meat, ensure it’s to some extent thawed and any excess moisture is drained to achieve the best results.


  • Unlock Hidden Talents: Your Bear Food Processor can do more than just chop and grind! Use it to make homemade nut butters, breadcrumbs, or even falafel.

Recipes to Put Your Bear Food Processor to the Test:

  • Fresh and Flavorful Pico de Gallo: Throb together chopped tomatoes, onions, cilantro, jalapenos (optional), and lime juice for a quick and Rich salsa.


  • Creamy Homemade Hummus: Roast chickpeas in the oven for added flavor, then mix them in the processor with tahini, lemon juice, olive oil, and garlic for a delicious and healthy dip.


  • Restaurant-Style Guacamole: Skip the pre-made stuff! Pulse together avocados, red onion, tomatoes, cilantro, lime juice, and spices for a fresh and chunky guacamole.


  • Effortless Pesto Perfection: Fresh basil, pine nuts, garlic, parmesan cheese, and olive oil come together in the Bear Food Processor for a vibrant and flavorful pesto sauce for pasta or sandwiches.


  • Delectable Dips and Spreads: From creamy spinach and artichoke dip to chunky black bean and corn salsa, the possibilities are endless. Try out with your favorite ingredients and seasonings!


  • Baby Food Bonanza! The Bear Food Processor is a lifesaver for parents! Steam or cook your favorite fruits and vegetables, then blend them in the processor for a smooth and healthy baby food.

Bonus Tip: Use online resources! Many recipe websites and blogs offer delicious recipes specifically designed for food processors. Explore and discover new ways to use your Bear Food Processor!

With a little creativity and these helpful tips, your Bear Food Processor can become your go-to kitchen gadget for effortless meal prep and creating delicious dishes. Happy cooking!

A Cleaning guide

Keeping your Bear Food Processor clean is easy with its dishwasher-safe parts! Here’s a breakdown of the cleaning process:

Before You Begin:

  • Unplug the appliance: Always ensure the Bear Food Processor is unplugged before detaching and cleaning.

Disassemble:

  • Remove the Lid: Lift the lid straight up and set it aside.
  • Detach the Blades: Hold the plastic center shaft of the blade set firmly. Carefully twist the blade set counter-clockwise to remove it from the bowl.

Cleaning the Parts:

  • Blades and Bowls: These are the dishwasher-safe parts! Place them on the top rack of your dishwasher for a thorough clean. On the other hand, you can wash them by hand with warm, soapy water.
  • Motor Base: Wipe down the motor base with a damp cloth to remove any food debris. Do not immerse the motor base in water or dishwasher.

Drying:

  • After washing, allow all parts to air dry completely before reattaching the Bear Food Processor. This helps prevent moisture build-up and potential malfunctions.

Additional Tips:

  • For stubborn food residue, you can pre-soak the blades and bowls in warm, soapy water before washing them.
  • If you notice any staining on the plastic parts, you can try wiping them down with a solution of baking soda and water to remove stains.
  • Avoid using harsh chemicals or abrasive sponges on any part of the Bear Food Processor, as this can damage the components.

Maintaining Peak Performance:

  • Regularly clean your Bear Food Processor after each use to prevent food build-up and ensure optimal performance.
  • If you notice any dulling of the blades after frequent use, you may consider replacing them for continued smooth and effective processing.

By following these simple cleaning steps, you’ll keep your Bear Food Processor functioning perfectly and ready to handle any food prep task in the kitchen!


What to avoid while using the Bear Electric Food Processor Chopper

Here are some things to avoid while using your Bear Food Processor to ensure safety, prevent damage to the appliance, and achieve the best results:

Safety Precautions:

  • Never operate without the lid: The lid acts as a safety barrier and prevents ingredients from splattering during processing. Always ensure the lid is securely fastened before turning on the appliance.


  • Keep hands and utensils away from blades: This is a general safety rule for any appliance with sharp blades. Avoid reaching into the bowl while the processor is running, and use the feeding chute if adding ingredients during processing.


  • Unplug before disassembling or cleaning: Always unplug the appliance from the power outlet before detaching it for cleaning or replacing blades.

Preventing Damage to the Appliance:

  • Don’t overload the bowl: The Bear Food Processor has a capacity limit. Surpassing this can strain the motor and damage the appliance. Check your user manual for recommended quantities for different tasks.


  • Process in short bursts for hard ingredients: For tough ingredients like nuts or hard cheeses, use the pulse function in short bursts. Continuous processing for a long period of time can put a strain on the motor.


  • Don’t chop very hot ingredients: The heat can damage the plastic components of the bowl and blades. Allow hot ingredients to cool slightly before processing.


  • Avoid processing liquids: The Bear Food Processor is not designed for blending liquids. It’s better suited for chopping, grinding, and blending solid ingredients. For blending tasks, consider using a blender.

Achieving Optimal Results:

  • Don’t over-process soft ingredients: Use short pulses for soft ingredients like herbs or cooked vegetables to avoid turning them soft.


  • Pre-cut large or hard ingredients: Especially when using the smaller bowl, pre-cutting larger vegetables or fruits into manageable pieces can improve processing effectively and avoid putting too much strain on the motor.


  • Thaw and drain meat before grinding: For grinding meat, ensure it’s partially softened and any excess moisture is drained to achieve the best texture and prevent the motor from being overworked.

By following these tips, you can safely operate your Bear Food Processor, avoid damaging the appliance, and achieve the best possible results for your food prep tasks.

In conclusion, invest in the Bear Food Processor and unlock a world of culinary convenience! This multifunctional appliance handles chopping, grinding, and blending tasks with ease, saving you time and effort in the kitchen. Remember to use it safely and keep it clean, and you’ll be a food prep pro in no time!

Davivy 16 Cup Multifunction 9-in-1 Food Processor

Davivy 16-Cup Food Processor: A Multifunctional Kitchen Powerhouse?
Looking to optimize your kitchen prep and release your inner chef? The Davivy 16-Cup Food Processor might be the answer. This 9-in-1 versatile appliance promises to handle a variety of tasks, from chopping vegetables to mixing dough. But does it live up to the hype? Let’s explore the features and see if this food processor is the perfect addition to your kitchen counter.

Features:

  • Large Capacity: With a spacious 16-cup (3.8L) processing bowl, the Davivy 16-Cup Food Processor can tackle large batches of ingredients, perfect for meal prepping or feeding a crowd.
  • Multiple Functions: This food processor boasts 9 functions in one appliance. It can chop, mince, puree, slice, shred, mix dough, and emulsify (think mayonnaise!), and even grind spices and coffee (with the included grinder accessory).
  • Easy to Use: The Davivy 16-Cup Food Processor features simple controls and replaceable attachments for easy operation and cleaning.
  • Powerful Motor: Equipped with a 600-watt motor, this food processor should be able to handle most food processing tasks with ease.
  • Dishwasher-Safe Parts: Cleanup is a breeze with dishwasher-safe bowls, blades, and attachments.

Potential Benefits:

  • Versatility: The Davivy 16-Cup Food Processor can potentially replace several single-function kitchen appliances, saving you counter space and money.
  • Time-Saving: Chopping, slicing, and shredding by hand can be tedious. This food processor can significantly reduce your prep time.
  • Effortless Food Prep: This appliance can make food preparation easier, especially for those with limited hand strength or proficiency.

Things to Consider:

  • Limited Reviews: There are currently not many reviews available for the Davivy 16-Cup Food Processor, making it difficult to scale user experience and long-term longevity.
  • Power Consumption: A 600-watt motor might not be as powerful as some high-end food processors. Consider your processing needs to see if this motor is sufficient.
  • Noise Level: Food processors can be noisy. There is no information available about the noise level of this specific model.

The Verdict

  • The Davivy 16-Cup Food Processor offers a fascinating offer: a feature-packed appliance at a potentially affordable price. However, with the lack of extensive user reviews, it’s difficult to say for certain if it delivers on its promises.

Here’s what we recommend:

  • Do your research: Look for reviews from esteemed sources to get a better understanding of the product’s performance and durability.
  • Consider your needs: Think about the tasks you’ll be using the food processor for most often. Does this appliance offer the functions you need?
  • Compare to similar products: See how the Davivy 16-Cup Food Processor piles up against other food processors in terms of features, price, and user reviews.

By carefully considering these factors, you can decide if the Davivy 16-Cup Food Processor is the right fit for your kitchen.


How to Use the Davivy 16 Cup Multifunction 9-in-1 Food Processor

Unleashing the Davivy 16-Cup Food Processor: A Step-by-Step Guide
The Davivy 16-Cup Food Processor promises to be a Proficient kitchen companion. But with its multiple functions and accessories, using it for the first time might seem Disconcerting. Here’s a breakdown to get you started:

Preparation:

1. Read the manual: This might seem obvious, but the manual will provide specific instructions and safety precautions for using your Davivy Food Processor.

2. Wash the parts before first use: Wash the bowl, lid, blades, and any attachments you plan to use with warm, soapy water. Rinse and dry them thoroughly.

General Steps:

1. Choose your attachment: Depending on the task at hand, select the appropriate blade or attachment. The manual should have a guide for which attachment to use for a particular function (chopping, slicing, etc.).

2. Assemble the food processor: Put the bowl on the motor base and secure it according to the manual’s instructions. Then, attach the chosen blade or attachment to the lid and lock it securely onto the bowl.

3. Prepare your ingredients: Cut larger ingredients into bits that will fit comfortably in the feed chute. This will help prevent jamming and ensure consistent processing.

4. Add ingredients to the bowl: Don’t glut the bowl. Start with a smaller quantity for the first time and add more as needed. Check the manual for recommended quantities for different functions.

5. Power on!: Plug in the food processor and turn it on using the control panel. The manual should explain the different settings and their uses (pulse, continuous processing, etc.).

6. Process your ingredients: Use the pulse function for short bursts for tasks like chopping or grinding. For continuous processing, like blending, hold down the appropriate button until the desired consistency is reached.

7. Turn it off: Once you’ve accomplished the desired results, turn off the food processor and unplug it before detaching.

Tips:

  • Use the pulse function for more control over the chopping or grinding process. Short bursts prevent over-processing.
  • Don’t process hot liquids in the food processor. Let them cool slightly first.
  • For tasks like mixing dough, use the pulse function in short bursts to avoid overheating the motor.
  • Clean the food processor thoroughly after each use. Check the manual for proper cleaning instructions for the bowl, blades, and attachments.

By following these steps and familiarizing yourself with the manual, you’ll be well on your way to mastering your Davivy 16-Cup Food Processor and creating culinary masterpieces in your kitchen!

Tips and Recipes Suitable for your Davivy 16 Cup Multifunction 9-in-1 Food Processor

Davivy 16-Cup Food Processor: Tips and Recipe Ideas to Unlock Its Potential
The Davivy 16-Cup Food Processor boasts a variety of functions, making it a versatile tool for home cooks. Here are some tips and recipe ideas to help you get the most out of this appliance:

Tips:

  • Master the Attachments: Each attachment is designed for a definite purpose. Use the manual’s guide to ensure you’re using the right attachment for the task at hand. This will optimize performance and prevent dulling the blades.
  • Prep is Key: Preparing your ingredients by cutting them into similar-sized bits ensures even processing. This is especially important for functions like chopping and slicing.
  • Embrace the Pulse Function: The pulse function offers more control, especially for tasks like chopping vegetables or grinding spices. Short bursts prevent over-processing and preserve texture.
  • Don’t Overload: Resist the urge to stuff the bowl. Start with smaller sets, especially when working with new ingredients or functions. This helps prevent jamming and motor strain.
  • Clean Up is a Breeze: Most parts are dishwasher-safe, making cleanup a breeze. However, consult the manual for specific cleaning instructions for each attachment.

Recipe Ideas:

  • Chopping/Mince:
  • Salsa Fresca: Pulse chopped tomatoes, onions, cilantro, jalapenos (optional) for a vibrant and flavorful salsa.
  • Homemade Veggie Burgers: Effortlessly chop vegetables like mushrooms, peppers, and onions for delicious veggie burger patties.
  • Fresh Pesto: Pulse together garlic, pine nuts, Parmesan cheese, and fresh basil leaves for a flavorful pesto sauce.

Slicing/Shredding:

  • Coleslaw: Shred cabbage and carrots for a quick and refreshing coleslaw side dish.
  • Potato Salad: Effortlessly slice potatoes for potato salad or hash browns.
  • Zucchini Noodles: Use the spiralizing accessory(if included) to create healthy and trendy zucchini noodles.

Doughing:

  • Pizza Dough: Skip the hand-mixing! This food processor can handle the task of creating pizza dough in minutes.
  • Pie Crust: Prepare flaky and delicious pie crust using the dough function.
  • Cookies and Pastries: The food processor can help blend ingredients for cookie dough, scones, or other pastry recipes.

Other Functions:

  • Hummus: Use the pulse function to create smooth and creamy homemade hummus.
  • Guacamole: Quickly whip up fresh guacamole by blending avocados, lime juice, onions, and cilantro.
  • Salad Dressings: Combine oil and vinegar with your favorite herbs and spices for homemade salad dressings.

These are just a few ideas to get you started. With its versatility, the Davivy 16-Cup Food Processor can handle a wide range of recipes, helping you save time and effort in the kitchen. Don’t be afraid to experiment and explore new culinary creations!

Additional Tips:

  • Look for online recipe resources specifically designed for food processors. Many websites offer recipe ideas with recommended attachment usage and processing times.
  • Once you’re comfortable with the basics, explore more challenging recipes that use Davivy’s versatility.
  • Remember, practice makes perfect! The more you use your food processor, the more comfortable and confident you’ll become in the kitchen.

A Cleaning Guide

Keeping Your Davivy 16-Cup Food Processor Sparkling Clean
The Davivy 16-Cup Food Processor simplifies food prep, but doesn’t let cleanup become a task. Here’s a guide to maintaining your appliance and ensuring it stays clean for future culinary adventures:

General Cleaning:

1. Unplug the appliance: Safety first! Always unplug your food processor before detaching it for cleaning.

2. Disassemble the food processor: Remove the lid, bowl, blades, and any attachments you used. Check the manual for proper detaching instructions.

3. Bowl and Lid: Wash the bowl and lid with warm, soapy water. You can use a soft sponge or dishcloth for scrubbing. Rinse thoroughly and dry completely before reassembling. Some manuals may recommend putting the bowl and lid on the top rack of your dishwasher for easy cleaning. Double-check your manual for specific dishwasher instructions.*

4. Blades and Attachments: Blades can be particularly sharp, so handle them with care. Wash them carefully with warm, soapy water. You can use a soft brush to clean any food remnants stuck around the blades. Rinse thoroughly and pat them dry completely before reassembling. Never submerge the motor base in water or dishwasher.*

Deep Cleaning:

For tougher stains or odors, you can periodically give your food processor a more thorough cleaning:

  • Wipe down the motor base: Use a damp cloth to wipe down the exterior of the motor base. Do not use abrasive cleaners or submerge the base in water.
  • Deodorize: If there are any lingering odors, you can try wiping down the bowl and lid with a solution of equal parts water and vinegar. Rinse thoroughly and ensure it is completely dried.

Additional Tips:

  • Clean immediately after use: Don’t let food remnant dry on the blades or attachments. This will make cleaning more tough and can also lead to staining.
  • Avoid harsh chemicals: Stick to gentle dish soap and warm water. Harsh chemicals can damage the appliance’s components.
  • Let parts dry completely before storing: Ensure all parts are completely dry before storing the food processor to prevent mold or mildew growth.

By following these cleaning guidelines, you can keep your Davivy 16-Cup Food Processor in spotless condition and ensure it continues to be a valuable asset in your kitchen.

What to Avoid while Using your Davivy 16 Cup Multifunction 9-in-1 Food Processor

Don’t Put a Damper on Your Cooking! Things to Avoid While Using Your Davivy 16-Cup Food Processor

The Davivy 16-Cup Food Processor can be a lifesaver in the kitchen, but to ensure its longevity and effective performance, there are a few things to keep in mind:

Food Processing Faux Pas:

  • Overfilling the Bowl: Resist the urge to stuff the bowl with ingredients. Start with smaller sets, especially when working with new ingredients or functions. This helps prevent jamming and motor strain. The manual should have recommended quantities for different tasks.
  • Processing Hot Liquids: The Davivy 16-Cup Food Processor isn’t designed for handling hot liquids. Let them cool slightly before processing to avoid damaging the appliance.
  • Wrong Attachment for the Job: Each attachment is designed for a specific purpose. Using the wrong one can lead to rough processing, dull blades, or even damage the appliance. Check the manual for the recommended attachment for each task (chopping, slicing, etc.).
  • Forgetting the Pulse Function: The pulse function offers more control, especially for delicate tasks like chopping vegetables or grinding spices. Short bursts prevent over-processing and preserve texture. Don’t just hold down the “on” button and walk away!

Safety Precautions:

  • Sharp Blades, Handle with Care: The blades are sharp! Be careful when handling them during assembly, detaching, and cleaning.
  • Unplug Before Disassembling: Always unplug the food processor before taking it apart for cleaning to avoid accidental activation.
  • Don’t Submerge the Motor Base: The motor base should never be dipped in water or placed in the dishwasher. Wipe it down with a damp cloth for cleaning.
  • Misuse and Abuse: Don’t use the food processor for anything other than its designated purposes.

Ingredient Incompatibility:

  • Very Hard Ingredients: The Davivy 16-Cup Food Processor might not be fit for very hard ingredients like whole nuts or ice cubes. These can damage the blades and motor. If unsure, check the manual for recommendations.
  • Excessively Sticky or Wet Ingredients: Very sticky or wet ingredients like thick peanut butter or uncooked whole grains can be difficult for the food processor to handle and may lead to jamming.

By following these simple guidelines, you can avoid common mistakes and ensure safe and effective use of your Davivy 16-Cup Food Processor. Remember, reading the user manual thoroughly is the best way to familiarize yourself with specific recommendations and safety precautions for this appliance.

In conclusion, the Davivy 16-Cup Food Processor offers versatile functions at an attractive price, potentially replacing several kitchen gadgets. Its large capacity and dishwasher-safe parts are convenient. However, the lack of reviews makes long-term durability unsure, and the 600-watt motor might not be the strongest. If you prioritize proven power and reviews, look elsewhere. But for budget-minded cooks seeking versatility, the Davivy could be worth considering.

15 Most Purchased Air Fryers in 2024

Air Fryer: Revolutionizing Healthy Cooking

In recent years, the kitchen landscape has been transformed by the rise of air fryers. These innovative appliances promise crispy, delicious food with significantly less oil than traditional frying methods, making them a hit among health-conscious consumers. As we delve into the year 2024, let’s explore the 15 most purchased air fryers that are revolutionizing the way we cook.

1. Ninja Foodi 8-Quart 9-in-1 Deluxe XL Pressure Cooker & Air Fryer:

Combining the functionalities of a pressure cooker and air fryer, this Ninja Foodi model has won hearts for its versatility and time-saving capabilities. Amazon users rave about its crisp results and easy cleanup.

2. Instant Vortex Plus 10 Quart Air Fryer Oven:

With a generous capacity and multiple cooking functions, the Instant Vortex Plus is a favorite for families and those who love entertaining. Its intuitive controls and consistent performance make it a top choice.

3. Cosori Air Fryer Max XL 5.8 Quart:

Known for its sleek design and efficient cooking, the Cosori Air Fryer Max XL is perfect for everyday use. Users appreciate its pre-programmed settings and the crispy texture it achieves without excess oil.

4. Philips Premium Airfryer XXL with Fat Removal Technology:

Philips remains a trusted name in air fryers, and this premium model lives up to expectations. Its unique fat removal technology sets it apart, delivering healthier meals without sacrificing flavor.

5. GoWISE USA 7-Quart Electric Air Fryer & Dehydrator:

Ideal for health enthusiasts, this GoWISE USA air fryer doubles as a dehydrator, adding versatility to your kitchen arsenal. Its spacious basket and user-friendly interface make it a popular choice.

6. Chefman TurboFry 3.6 Quart Air Fryer:

Compact yet powerful, the Chefman TurboFry is perfect for small kitchens or individuals. It boasts rapid air technology for quick and even cooking, earning praise from Amazon reviewers.

7. NuWave Brio 6-Quart Digital Air Fryer:

Offering precise temperature control and a spacious cooking basket, the NuWave Brio is a favorite among air frying aficionados. Its digital interface and consistent results make it a reliable kitchen companion.

8. Cuisinart TOA-60 Convection Toaster Oven Airfryer:

Combining the functionalities of a toaster oven and air fryer, this Cuisinart model is a space-saving solution for kitchens. Users love its versatility and the ability to toast, bake, and air fry with ease.

9. Dash Deluxe Electric Air Fryer + Oven Cooker:

Dash has carved a niche with its compact yet efficient air fryers, and the Deluxe Electric Air Fryer is no exception. It’s perfect for singles or couples looking to enjoy crispy meals without the guilt.

10. PowerXL Air Fryer Pro 6 Quart:

Air fryer

Boasting a large capacity and multiple cooking presets, the PowerXL Air Fryer Pro is a hit among busy households. Its rapid air technology ensures fast and delicious results every time.

11. Secura Air Fryer 4.2Qt:

Offering a budget-friendly option without compromising on quality, the Secura Air Fryer has garnered a loyal following. Its simple controls and consistent performance make it a top contender in the air frying market.

12. T-fal FZ700251 Actifry Oil Less Air Fryer:

Known for its patented stirring paddle technology, the T-Fal Actifry ensures even cooking without the need for manual shaking. Users appreciate its hands-free operation and healthier cooking results.

13. Black+Decker Purify 2-Liter Air Fryer:

Compact yet powerful, the Black+Decker Purify Air Fryer is perfect for small kitchens or dorm rooms. Its easy-to-clean design and budget-friendly price point make it a popular choice for beginners.

14. Hamilton Beach 5.8 Quart Digital Air Fryer:

Air fryer

Featuring a digital interface and a spacious cooking basket, the Hamilton Beach Digital Air Fryer is a reliable option for everyday cooking. Its adjustable temperature settings cater to a variety of recipes.

15. Gourmia 6 Quart Digital Air Fryer:

Air Fryer

Rounding off our list is the Gourmia Digital Air Fryer, known for its intuitive controls and consistent cooking performance. Users praise its reliability and the crispy results it delivers.

Amazon Comments Section Highlights:

– I love how the Ninja Foodi combines so many functions in one appliance. It’s a game-changer in my kitchen! – Sarah M.

– The Philips Premium Airfryer is worth every penny. I can enjoy my favorite fried foods guilt-free! – Mark T.

– The Chefman TurboFry is perfect for my small apartment. It’s compact yet powerful, and the food comes out crispy every time. – Emily R.

– I can’t believe I waited so long to get an air fryer. The Instant Vortex Plus has made cooking so much easier and healthier! – David L.

– The T-fal Actifry is a lifesaver for busy weeknights. I can throw in ingredients and let it do the work while I attend to other tasks. – Jessica S.

In conclusion, the 15 most purchased air fryers in 2024 are not just kitchen appliances; they are game-changers that have redefined the way we approach cooking. From compact models for small spaces to versatile options for larger households, there’s an air fryer to suit every need and culinary preference. With their ability to deliver crispy, delicious meals with less oil, it’s no wonder these air fryers have become must-have items in modern kitchens everywhere.

Contact us today!!

Our web: http://primehomegadget.com

Socials: Instagram

Air fryer

What are the Disadvantages of Air Fryer?

Air fryer

The Air Fryer: Turning “Disadvantages” into Delicious Advantages!

Hey there, fellow foodies! Are you considering joining the air fryer revolution? Well, let’s talk about the “disadvantages” of air fryers – or rather, the advantages in disguise! While air fryers offer a healthier alternative to deep frying by using significantly less oil, they do have some disadvantages and potential health concerns:

  • Limitations in Cooking Capacity and Style:

-Small Cooking Space: Air fryers generally have limited space, making it challenging to cook large meals or multiple dishes simultaneously.
-Cooking Style: The dry heat environment may not be suitable for all types of recipes, particularly those that require moisture.

  • Maintenance and Cost:

-Cleaning: Air fryers require regular cleaning to prevent the buildup of food particles and grease, which can be time-consuming.
-Initial Investment: Air fryers can be more expensive compared to traditional cooking appliances.

  • Nutritional Concerns:

-Loss of Nutrients: While air frying can retain more nutrients compared to boiling or deep frying, the high temperatures can still degrade some sensitive vitamins and minerals.

Counterclaim: Health Benefits of Air Fryers

Despite these concerns, air fryers still offer significant health benefits, primarily due to their ability to produce lower-calorie meals:

  1. Reduced Fat Content: Air fryers use little to no oil, which significantly reduces the fat content of the foods cooked in them. This makes air-fried foods lower in calories and healthier compared to deep-fried foods.
  2. Lower Risk of Heart Disease: By cutting down on the consumption of unhealthy fats, using an air fryer can help reduce the risk of heart disease and other related health issues.
  3. Retention of Nutrients: Air frying can preserve more nutrients in vegetables compared to other cooking methods that involve high heat or water, making it a good option for healthy meal preparation.
  4. Versatility in Cooking: Air fryers can be used to cook a wide variety of foods, including vegetables, lean proteins, and even certain baked goods, allowing for a diverse and balanced diet.

Not All Air Fryers Are Created Equal: But That’s What Makes the Good Ones Shine!

Not all air fryers are created equal, and that’s what makes the good ones truly special. Do your research, read reviews, and find the air fryer that’s right for you. With so many options on the market, you’re bound to find one that fits your cooking style and needs. And with the variety of features and settings, you’ll be able to cook a wide range of dishes, from classic comfort food to international cuisine.

In conclusion, while air fryers have some potential disadvantages and health concerns, their benefits in promoting a lower-calorie diet and reducing fat intake make them a valuable tool for healthier cooking when used properly and in moderation.

Send us a message on WhatsApp 😁 we’d be expecting and in the meantime visit our web page for more fascinating blogs here.

Follow our social media on Instagram

Breville Sous Chef Pro 16 Cup Food Processor

Breville Sous Chef Pro 16 Cup Food Processor BFP800XL: A Kitchen Powerhouse?
Looking to ditch the knife and chopping board grind? The Breville Sous Chef Pro 16 Cup Food Processor BFP800XL might be your new kitchen best friend. This machine promises to handle all your food prep needs with ease, but does it live up to the hype? Let’s dive in and take a look.

Spacious Capacity and Power

One of the first things that stands out about the Sous Chef Pro 16 is its size. With a huge 16-cup (3.8L) capacity work bowl, it can tackle large sets of ingredients, ideal for family meals or entertaining. The 1200-watt motor provides enough power to chop, puree, shred, and mix with ease, so you don’t have to worry about stalling it down with tough duties.

Versatility is King

The Sous Chef Pro 16 isn’t a one-trick pony. It comes with different kinds of discs and blades, offering a range of functions:

  • Slicing disc: Adjustable from paper-thin to thick cuts, for perfectly smooth slices of vegetables and fruits.
  • Shredding disc: Makes easy work of cheese, potatoes, and more.
  • French fry disc: Ideal for homemade fries, that are crispy on the outside and fluffy on the inside.
  • Dough blade: Mix bread dough effortlessly, saving you time and arm ache.
  • And more: Additional accessories may be available for purchase, like a julienne disc or a dicing kit.

Convenience Features

The Sous Chef Pro 16 boasts some features that make it a user-friendly equipments:

  • Large feed chute: Minimizes the need for pre-cutting most fruits and vegetables.
  • Double processing bowls: A large 16-cup bowl for big jobs, and a smaller 2.5-cup bowl for those smaller chopping duties.
  • LCD display: Shows timer functions and helps keep track of processing time.
  • Dishwasher-safe parts: Makes cleanup a breeze (although always double-check the manual for specific instructions).

Is it Right for You?

The Breville Sous Chef Pro 16 is a powerful and multifunctional food processor that can save you a lot of time and effort in the kitchen. If you’re someone who cooks often, in large groups, or enjoys trying out new recipes, this could be a great investment.

However, keep in mind its size and price tag. This is a significant appliance that takes up counter space, and it comes with a premium price compared to some more basic food processors.

Final Verdict

The Breville Sous Chef Pro 16 Cup Food Processor BFP800XL is a high-quality appliance that offers power, multifunctionality, and convenience. If you’re looking for a kitchen workhorse to handle all your food prep needs, this could be a great option. But, if you’re a casual cook or limited on space and budget, a more basic food processor might suit you better.


Key Features

Breville Sous Chef Pro 16 Cup Food Processor BFP800XL: Feature Breakdown
The Breville Sous Chef Pro 16 Cup Food Processor BFP800XL boasts a range of features designed to make food prep a breeze. Here’s a quick brief of the key highlights:

Capacity and Power:

Large Capacity: 16-cup (3.8L) work bowl allows processing big sets of ingredients.

Powerful Motor: 1200-watt motor tackles tough tasks like chopping nuts or mixing dough.

Versatility:

  1. Multiple Discs and Blades:
  • Slicing disc (adjustable thickness)
  • Shredding disc (for cheese, potatoes, etc.)
  • French fry disc (for homemade fries)
  • Dough blade (for effortless bread dough mixing)
  • Additional accessories available (julienne disc, dicing kit, etc.)

Convenience Features:

  • Large Feed Chute: Minimizes pre-cutting of most fruits and vegetables.
  • Dual Processing Bowls: Large 16-cup bowl for big jobs, and a smaller 2.5-cup bowl for smaller duties.
  • LCD Display: Shows timer functions and processing time.
  • Dishwasher-safe Parts: Easy cleanup (always check the manual for specific instructions).

How to Use your Breville Sous Chef Pro 16 Cup Food Processor

Here’s a general guide on how to use the Breville Sous Chef Pro 16 Cup Food Processor BFP800XL:

Before You Start:

1. Read the Manual: This is vital for ensuring safe and proper use. The manual will have specific instructions on using each attachment and for different functions.

2. Wash and Dry Parts: Make sure all the blades, discs, and bowls are clean and dry before reattaching the food processor.

Assembly:

1. Attach the Work Bowl: Put the work bowl on the motor base and twist it clockwise until it locks securely.

2. Insert the Blade or Disc: Choose the Suitable Blade or disc for your task. Place it on the drive shaft in the work bowl, Making sure it sits flat.

3. Lock the Lid: Place the lid on the work bowl and turn the top section clockwise to lock it into place.

Using the Food Processor:

1. Prepare Your Ingredients: Cut bigger fruits and vegetables into bits that can fit comfortably through the feed chute.

2. Pulse or Process: The Sous Chef Pro 16 offers two processing options:

  • Pulse: Use the pulse function for tasks where you want more control over the chop, like achieving a coarse or fine chop. Short bursts of pulsing give you more accuracy.
  • Process: Use the process function for continuous chopping, shredding, or kneading.

3. Use the Feed Chute: Add your ingredients gradually through the feed chute while the processor is running.

4. Timer (Optional): The LCD display allows you to set a timer for processing. This is helpful for tasks that require Constant processing time, like mixing dough.

After Use:

  • Turn Off and Unplug: Always turn off the food processor and unplug it before detaching.
  • Disassemble: Take off the lid and work bowl. Remove the blade or disc carefully, as they will be sharp.
  • Cleaning: Wash the blades, discs, and bowls with warm soapy water. You can put most parts in the dishwasher (refer to the manual for specifics). Wipe down the motor base with a damp cloth.

Safety Tips:

  • Never operate the food processor without the lid securely locked in place.
  • Always handle the blades and discs with care, as they are very sharp.
  • Don’t overload the work bowl. Process ingredients in batches if necessary.
  • Don’t use the food processor for hot liquids. Let them cool before processing.
  • Unplug the machine before making an attempt to clean it.

Additional Tips:

  • Check the manual for specific instructions on using each attachment and for different recipes.
  • Pulse briefly for a coarse chop and longer for a finer chop.
  • Use the small bowl for tasks requiring smaller quantities.

By following these guidelines, you can safely and efficiently use your Breville Sous Chef Pro 16 Cup Food Processor to optimize your food prep tasks in the kitchen.


Tips and Recipes Suitable for the Breville Sous Chef Pro 16 Cup Food Processor

Tips and Tricks for Your Breville Sous Chef Pro 16:

  • Master the Pulse: This is your friend for achieving the perfect texture. Pulse chopping vegetables gives you more control over the final consistency, whether you want a coarse salsa or a smooth blend.
  • Embrace the Mini Bowl: Don’t underestimate the small bowl! It’s perfect for chopping herbs, garlic, nuts, or processing smaller quantities of ingredients.
  • Pre-cut Wisely: While the feed chute is generous, pre-cutting bulky vegetables like potatoes or large onions will ensure more even processing and prevent jamming.
  • Shred Like a Pro: Use the reversible shredding disc. The larger holes facing up create a coarser shred, perfect for coleslaw. Turn it over for finer shreds for cheese or potatoes.
  • French Fry Fanatic? The French fry disc is a game-changer for homemade fries. Use russet potatoes cut into even sticks and avoid congesting the feed chute for ideal crispy results.
  • Doug Does: The dough blade is a lifesaver for bakers. Simply toss your bread dough ingredients in the bowl and let the machine do the mixing. No more sweaty palms!
  • Cleanup Champion: Take advantage of the dishwasher-safe parts! This makes cleaning a breeze (always double-check the manual for specific instructions).

Recipes Perfect for the Sous Chef Pro 16:
Main Courses:

Homemade Hummus: Whip up a creamy group of hummus in minutes using the mini bowl and pulse function. Ideal for pita bread and veggie dippers.

Slaw Sensations: Use the shredding disc to create colorful slaws for tacos or sandwiches. Try out with different vegetables like cabbage, carrots, and bell peppers.

Falafel Fun: Pulse chickpeas, herbs, and spices in the large bowl to create the base for delicious falafel.

Pizza Perfection: The dough blade makes homemade pizza dough a breeze.

Sides and Snacks:

Guacamole Glory: Pulse avocados, lime juice, onions, and cilantro in the mini bowl for a fresh and coarse guacamole.

Salsa Sensation: Use the pulse function to create your favorite salsa recipe, from coarse pico de gallo to a smooth restaurant-style salsa.

Quick Pickles: Thinly slice vegetables using the slicing disc and transform them into sharp pickles in minutes.

Dipping Delights: Prepare a different kind of dips and spreads using the food processor, from baba ghanoush to creamy spinach and artichoke dip.

Desserts:

Pie Crust Magic: The dough blade lets you create brittle pie crusts in no time. Simply pulse together flour, butter, and water for a perfect pastry base.

Nut Butter Nirvana: Make your own peanut butter, almond butter, or cashew butter in the mini bowl. Customize the texture with the pulse function.

Cake Batter Blitz: Skip the hand mixer! Use the food processor to mix dry cake ingredients and cream butter and sugar for a smooth and soft batter.

These are just a few ideas to get you started. With the Breville Sous Chef Pro 16 Cup Food Processor, the possibilities are endless! Remember to check your manual and explore recipe websites for even more inspiration.

A Cleaning Guide

Keeping your Breville Sous Chef Pro 16 Cup Food Processor clean is vital for maintaining its performance and hygiene. Here’s a breakdown of the cleaning process:

Before You Begin:

  • Unplug the machine: Always ensure the food processor is unplugged before detaching and cleaning.
  • Consult the manual: Double-check the Breville manual for specific cleaning instructions for any accessories you might have.

Disassembly:

  • Remove the lid and work bowl: Twist the top section of the lid counter-clockwise to unlock it, then lift it off the work bowl.
  • Take out the blade or disc: Carefully detach the blade or disc from the drive shaft in the work bowl. Remember, these parts are sharp, so handle them with caution.

Cleaning the Parts:

Blades and discs: Wash these parts by hand with warm, soapy water. You can use a soft bristled brush to remove any food particles stuck on the blades. Never submerge the blades or discs completely in water.

Work bowl and lid: These parts are dishwasher safe (top rack only). However, it’s recommended to occasionally hand wash them, especially for stubborn food remnants.

Motor base: Wipe down the motor base with a damp cloth to remove any spills or splatters. Do not submerge the motor base in water or any other liquids.

Drying:

  • Air dry all parts completely before reattaching the food processor. This will prevent any moisture build-up that could lead to mold growth. You can also use a clean dish towel to pat them dry.

Additional Tips:

  • To remove stubborn food remnants from the work bowl, you can fill it with warm soapy water and let it soak for a while before washing.
  • For particularly tough cleaning jobs, you can add a few drops of white vinegar to the soapy water.
  • Never use harsh chemicals, abrasive cleaners, or scouring pads on any part of the food processor. These can damage the surfaces.

By following these cleaning steps, you can ensure your Breville Sous Chef Pro 16 Cup Food Processor stays clean, hygienic, and functions perfectly for a long time.

What to avoid while Using the Breville Sous Chef Pro 16 Cup Food Processor

Here are some things to avoid while using your Breville Sous Chef Pro 16 Cup Food Processor to prevent damage, injury, and ensure smooth operation:

Don’t Overload:

  • Respect the capacity: The 16-cup bowl is spacious, but resist the urge to overstuff it. This can strain the motor and lead to uneven processing.
  • Process in batches: For large quantities, work in sets to ensure the food processor performs perfectly.

Wrong-Sized Ingredients:

  • Pre-cut wisely: While the feed chute is generous, pre-cutting cumbersome vegetables or fruits into manageable bits helps prevent jamming and ensures even processing.

Putting in the Wrong Things:

  • No hot liquids: The food processor isn’t designed for handling hot liquids. Let them cool completely before processing to avoid damaging the bowl or motor.
  • Frozen ingredients: Avoid processing frozen solid ingredients or ice cubes. The blades are not meant for such heavy-duty use and can become dull or break.
  • Unsuitable tasks: The food processor isn’t a replacement for everything. Avoid using it for tasks like grinding spices or blending smoothies. These are better suited for a dedicated spice grinder or blender.

Forgetting Safety:

  • Pulse with care: While the pulse function is great for achieving desired textures, be mindful not to continuously pulse for long periods. This can overheat the motor.
  • Sharp blades: Remember, the blades are very sharp. Handle them with care during assembly, detaching, and cleaning to avoid cuts.
  • Never operate without the lid: Always ensure the lid is securely locked in place before turning on the food processor to prevent injuries and spillages.

General Misuse:

  • Don’t force it: If the food processor struggles to process something, stop and check for any blockages or if the ingredients are too large. Forcing it can damage the motor.
  • Take breaks: Large batches or continuous processing can strain the motor. Check the manual for recommended usage times and allow the machine to rest periodically to prevent overheating.
  • Not reading the manual: The manual is your friend! It contains valuable information on using specific attachments, recommended processing times for different ingredients, and proper care instructions.

By following these tips, you can avoid common pitfalls and ensure your Breville Sous Chef Pro 16 Cup Food Processor serves you well for a long time.

In conclusion, the Breville Sous Chef Pro 16 is a powerful food processor with a large capacity and several attachments. It can be a great time-saver in the kitchen, but its size and price tag make it a better fit for serious cooks than occasional ones. If you cook a lot and want an all-round tool, this could be a worthwhile investment.

Oven

Which is Better Oven or Air Fryer?

Oven vs. Air Fryer: Uncovering the Culinary Conundrum

In the realm of modern cooking, two champions stand tall, each vying for a spot in your kitchen and claiming superiority over the other. Yes, we are diving into the age-old question: which is better, the conventional oven or the trendy air fryer? Buckle up as we delve deep into the heart of this culinary conundrum, dissecting their capabilities across various crucial factors.

Capacity:

Let’s talk space. Ovens, with their generous interiors, win hands down when it comes to accommodating large meals or multiple dishes simultaneously. Hosting a dinner party? The oven is your steadfast ally. On the flip side, air fryers, with their compact designs, are ideal for smaller households or solo cooks looking to whip up quick, single servings without hogging counter space.

Cost:

Money matters, and here’s where the air fryer throws a curveball. While initial investment costs might be higher for top-of-the-line air fryers, their efficiency in cooking smaller portions with less energy can lead to long-term savings on utility bills. Ovens, being more traditional, generally come with a lower upfront cost, but their energy consumption can add up over time, especially when used frequently for large meals.

Oven

Speed:

In the race against time, air fryers emerge as the sprinters. They preheat swiftly and cook food faster than conventional ovens, thanks to their compact heating elements and efficient air circulation. Craving crispy fries in a flash? The air fryer has your back. Ovens, while not sluggish by any means, do take a bit longer to preheat and cook, making them better suited for patient chefs who savour the slow-cooking process.

Features:

Here’s where the battle gets heated: Ovens, especially modern ones, boast a plethora of features, like convection cooking, multiple rack positions, and specialized settings for baking, broiling, and roasting. Air fryers, on the other hand, focus on one primary function—air frying—but often come with presets for popular dishes and intuitive controls for precise cooking.

Power Consumption:

The eco-warrior in us perks up at this point. Air fryers, with their rapid cooking times and smaller size, consume less electricity compared to ovens, making them a greener choice for energy-conscious cooks. However, it’s essential to note that the overall impact depends on usage patterns and the energy efficiency of the specific models.

Suitable Meals:

Culinary cravings play a pivotal role in this showdown. Air fryers excel at recreating crispy delights like fries, chicken wings, and even desserts with a fraction of the oil traditionally used. Ovens, with their versatility, handle everything from delicate pastries to succulent roasts, making them the go-to for diverse cooking needs and larger quantities.

Size:

Space constraints? Consider this your deciding factor. Air fryers, with their compact footprint, easily fit on countertops or in cramped kitchens, making them ideal for apartment dwellers or RV enthusiasts. Ovens, while undoubtedly larger, offer more cooking real estate for those with ample kitchen space and a penchant for culinary experimentation.

Maintenance:

The aftermath of a culinary escapade often involves cleaning duties. Air fryers, with their removable baskets or trays and non-stick coatings, simplify post-cooking cleanup. Ovens, with their larger interiors and intricate components, require a bit more elbow grease but are generally straightforward to maintain with regular cleaning.

In conclusion, the battle between oven and air fryer boils down to personal preferences, cooking habits, and kitchen dynamics. If you value versatility and cooking capacity, and don’t mind a slightly longer cooking time, the oven reigns supreme. On the flip side, for quick, crispy delights, energy efficiency, and space-saving designs, the air fryer steals the spotlight.

Ultimately, why choose when you can have the best of both worlds? Embrace the versatility of the oven and the speed of the air fryer to elevate your culinary adventures to new heights. After all, in the kitchen, it’s not just about the gadgets – it’s about the magic you create with them.

Contact us on WhatsApp and visit our page for more fascinating blogs, plus comment down below and let us know which one works best for you👇

Happy cooking!

Visit for more blogs: http://Prime home gadgets.com

Follow us on Instagram